DOOR / HATCH LUGGAGE DOOR LOCK CONTROL CABLE ASSEMBLY(for RHD) INSTALLATION
PROCEDURE

 64607
1.INSTALL LUGGAGE DOOR LOCK CONTROL CABLE SUB-ASSEMBLY
Install the luggage door lock control cable sub-assembly to the 11 clamps as shown in the illustration.
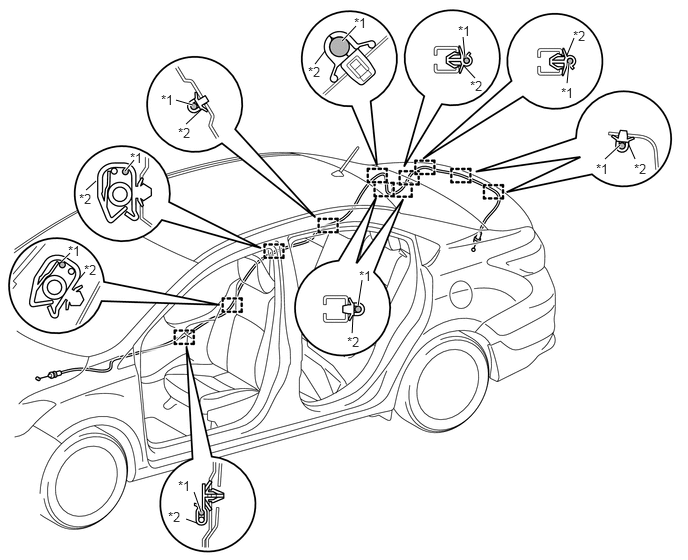
| *1 | Luggage Door Lock Control Cable Sub-assembly | *2 | Clamp |
Engage the guide and connect the luggage door lock control cable sub-assembly to the luggage door lock assembly.
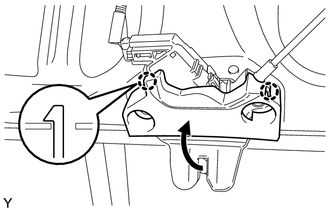
Engage the 2 claws and close the cover in the direction indicated by the arrow as shown in the illustration.
58510D
2.INSTALL FRONT FLOOR CARPET ASSEMBLY
Engage the 2 guides and return the front floor carpet assembly to the right side of the driver side rear floor.
Engage the 5 guides and return the front floor carpet assembly to the driver side front floor.
77306
3.INSTALL FUEL LID LOCK OPEN LEVER SUB-ASSEMBLY
64721B
4.INSTALL NO. 1 LUGGAGE COMPARTMENT TRIM COVER
Install the No. 1 luggage compartment trim cover with the 4 clips.
58387
5.INSTALL REAR FLOOR FINISH PLATE
64772C
6.INSTALL SPARE WHEEL COVER PAD
Install the spare wheel cover pad.
64770
7.INSTALL SPARE WHEEL COVER ASSEMBLY
64711
8.INSTALL LUGGAGE COMPARTMENT FLOOR MAT
64719A
9.INSTALL LUGGAGE COMPARTMENT DOOR COVER
62551F
10.INSTALL REAR SEAT SIDE GARNISH RH
- HINT:
-
Use the same procedure as for the LH side.
-
Click hereVehicle Interior>INTERIOR PANELS / TRIM>ROOF HEADLINING(for Sedan)>INSTALLATION
62413A
11.INSTALL CENTER PILLAR LOWER GARNISH RH
- HINT:
-
Use the same procedure as for the LH side.
-
Click hereVehicle Interior>INTERIOR PANELS / TRIM>ROOF HEADLINING(for Sedan)>INSTALLATION
73210
12.CONNECT FRONT SEAT OUTER BELT ASSEMBLY RH
- HINT:
-
Use the same procedure as for the LH side.
-
Click hereVehicle Interior>SEAT BELT>FRONT SEAT OUTER BELT ASSEMBLY>INSTALLATION
62331A
13.INSTALL REAR DOOR OPENING TRIM WEATHERSTRIP RH
- HINT:
-
Use the same procedure as for the LH side.
-
Click hereVehicle Interior>INTERIOR PANELS / TRIM>ROOF HEADLINING(for Sedan)>INSTALLATION
62311B
14.INSTALL FRONT DOOR OPENING TRIM WEATHERSTRIP RH
- HINT:
-
Use the same procedure as for the LH side.
-
Click hereVehicle Interior>INTERIOR PANELS / TRIM>ROOF HEADLINING(for Sedan)>INSTALLATION
62111C
15.INSTALL COWL SIDE TRIM BOARD RH
- HINT:
-
Use the same procedure as for the LH side.
-
Click hereVehicle Interior>INTERIOR PANELS / TRIM>ROOF HEADLINING(for Sedan)>INSTALLATION
16.INSTALL REAR SEAT ASSEMBLY (for Fixed Seat Type)
17.INSTALL REAR SEAT ASSEMBLY (for Separate Seat Type)