K411 CVT CONTINUOUSLY VARIABLE TRANSAXLE SYSTEM P0842 Transmission Fluid Pressure Sensor/Switch "A" Circuit Low P0843 Transmission Fluid Pressure Sensor/Switch "A" Circuit High
DESCRIPTION
The ECM performs learning control for the belt clamping pressure based on the belt clamping pressure signal, which is output by the oil pressure sensor.
| DTC No. | Detection Item | DTC Detection Condition | Trouble Area | MIL | Memory |
|---|---|---|---|---|---|
| P0842 | Transmission Fluid Pressure Sensor/Switch "A" Circuit Low | When 2 seconds or more have elapsed after engine start, there is a short in the oil pressure sensor circuit for 0.5 seconds (1 trip detection logic). | ·
Wire harness or connector ·
Oil pressure sensor ·
ECM |
Does not come on | DTC stored |
| P0843 | Transmission Fluid Pressure Sensor/Switch "A" Circuit High | When 2 seconds or more have elapsed after engine start, there is an open or a short to +B in the oil pressure sensor circuit for 0.5 seconds (1 trip detection logic). | ·
Wire harness or connector ·
Oil pressure sensor ·
ECM |
Does not come on | DTC stored |
MONITOR DESCRIPTION
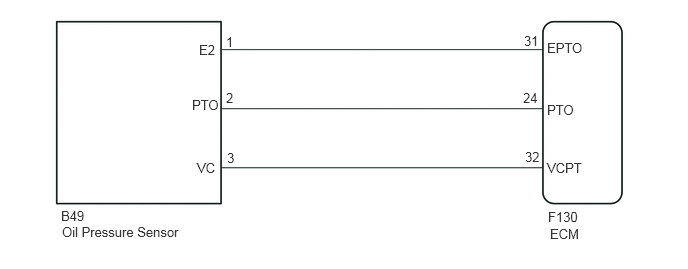
These DTCs indicate an open or short in the oil pressure sensor. When there is an open or short circuit in the oil pressure sensor circuit, the ECM detects the problem and stores a DTC.
WIRING DIAGRAM
CAUTION / NOTICE / HINT
- NOTICE:
- ·
Perform initialization when parts related to the continuously variable transaxle are replaced.
Click hereDrivetrain>K411 CVT>CONTINUOUSLY VARIABLE TRANSAXLE SYSTEM>INITIALIZATION
·Check that no DTCs are stored after performing initialization.
Click hereDrivetrain>K411 CVT>CONTINUOUSLY VARIABLE TRANSAXLE SYSTEM>DTC CHECK / CLEAR
PROCEDURE
Warm up the engine.
Connect the GTS to the DLC3.
Turn the ignition switch to ON.
Turn the GTS on.
Enter the following menus: Powertrain / Engine and ECT / Data List.
- Powertrain > Engine and ECT > Data List
-
Tester Display A/T Oil Pressure - 50003 234 409
In accordance with the display on the GTS, read the Data List.
- Powertrain > Engine and ECT > Data List
-
Tester Display Measurement Item Range Normal Condition Diagnostic Note A/T Oil Pressure Secondary oil pressure value Min.: -64 MPa
Max.: 63.998 MPaSecondary oil pressure inspection
·D position stall speed test: 4.4 to 6.5 MPa
·R position stall speed test: 4.4 to 6.8 MPa
-
- Result:
Result Proceed to Data display is not within Normal Condition range A Data display is within Normal Condition range B
A
B
Disconnect the B49 oil pressure sensor connector.
Disconnect the F130 ECM connector.
Measure the resistance according to the value(s) in the table below.
- Standard Resistance:
Tester Connection Condition Specified Condition B49-1 (E2) - F130-31 (EPTO) Always Below 1 Ω B49-2 (PTO) - F130-24 (PTO) Always Below 1 Ω B49-3 (VC) - F130-32 (VCPT) Always Below 1 Ω B49-1 (E2) or F130-31 (EPTO) - Body ground Always 10 kΩ or higher B49-2 (PTO) or F130-24 (PTO) - Body ground Always 10 kΩ or higher B49-3 (VC) or F130-32 (VCPT) - Body ground Always 10 kΩ or higher
Connect the F130 ECM connector.
Connect the B49 oil pressure sensor connector.
- Result:
Proceed to OK NG
OK
NG
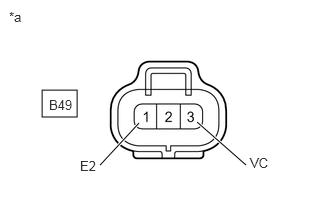
| *a | Front view of wire harness connector
(to Oil Pressure Sensor) |
Disconnect the oil pressure sensor connector.
Measure the voltage according to the value(s) in the table below.
- Standard Voltage:
Tester Connection Switch Condition Specified Condition B49-3 (VC) - B49-1 (E2) Ignition switch ON 4.75 to 5.25 V
Connect the oil pressure sensor connector.
- Result:
Proceed to OK NG
OK
NG
Replace the oil pressure sensor.
- Result:
Proceed to NEXT
NEXT
Replace the ECM.
Click hereEngine / Hybrid System>1NR-FE ENGINE CONTROL>ECM>REMOVAL
- Result:
Proceed to NEXT
NEXT