SUPPLEMENTAL RESTRAINT SYSTEMS KNEE AIRBAG ASSEMBLY DISPOSAL
CAUTION / NOTICE / HINT
- CAUTION:
-
Before performing pre-disposal deployment of any SRS component, review and closely follow all applicable environmental and hazardous material regulations. Pre-disposal deployment may be considered hazardous material treatment.
- HINT:
-
When scrapping a vehicle equipped with an SRS or disposing of the instrument panel passenger airbag assembly, be sure to deploy the airbag first in accordance with the procedure described below. If any abnormality occurs with the airbag deployment, contact the Service Dept. of the distributor.
- CAUTION:
- ·
An airbag or pretensioner may be activated by static electricity. To prevent this, be sure to touch a metal surface with bare hands to discharge static electricity before performing this procedure.
·Never dispose of a lower No. 1 instrument panel airbag assembly that has an undeployed airbag.
·The airbag emits an exploding sound when it is deployed, so perform the operation outdoors, and where it will not create a nuisance to nearby residents.
·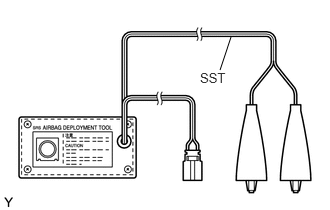 2.406,0.385 2.292,0.729 false 2.083,0.729 2.417,0.927 0.333,0.198 10 false SST
When deploying the airbag, always use the specified SST (SRS Airbag Deployment Tool). Perform the operation in a place away from electrical noise.
·When deploying the airbag, perform the operation at least 10 m (33 ft.) away from the lower No. 1 instrument panel airbag assembly.
·The lower No. 1 instrument panel airbag assembly becomes extremely hot when the airbag is deployed, so do not touch it for at least 30 minutes after deployment.
·Use gloves and safety glasses when handling a lower No. 1 instrument panel airbag assembly with a deployed airbag.
·Do not apply water, etc. to a lower No. 1 instrument panel airbag assembly with a deployed airbag.
·Always wash your hands with water after completing the operation.
PROCEDURE

 73900
1.DISPOSE OF LOWER NO. 1 INSTRUMENT PANEL AIRBAG ASSEMBLY (When Installed in Vehicle)
- HINT:
-
Prepare a battery as the power source to deploy the airbag.
Check the function of SST.
- SST
- 09082-00700
- CAUTION:
-
Always use the specified SST (SRS Airbag Deployment Tool) when deploying the airbag.
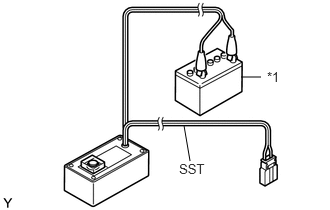
| *1 | Battery |
Connect the red clip of SST to the positive battery terminal and the black clip of SST to the negative battery terminal.
- SST
- 09082-00700
Press the SST activation switch, and check that the LED on the SST activation switch illuminates.
- CAUTION:
- ·
Do not connect the SST connector (yellow colored one) to the airbag.
·If the LED illuminates when the activation switch is not being pressed, SST may be malfunctioning. Do not use SST.
Disconnect SST from the battery.
Remove the No. 1 instrument panel under cover sub-assembly.
Click hereVehicle Interior>INTERIOR PANELS / TRIM>UPPER INSTRUMENT PANEL>REMOVAL
Remove the lower instrument panel finish panel assembly.
Click hereVehicle Interior>INTERIOR PANELS / TRIM>UPPER INSTRUMENT PANEL>REMOVAL
Disconnect cable from negative battery terminal.
- CAUTION:
-
Wait at least 90 seconds after disconnecting the cable from the negative (-) battery terminal to disable the SRS system.
- NOTICE:
-
When disconnecting the cable, some systems need to be initialized after the cable is reconnected.
-
Click hereGeneral>INTRODUCTION>REPAIR INSTRUCTION>INITIALIZATION
Disconnect the airbag connector.
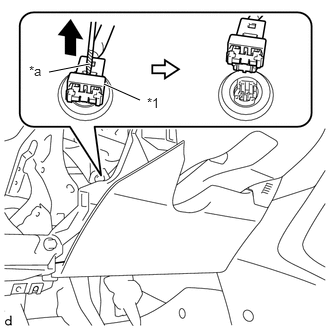
| *1 | Locking Button |
| *a | Protective Tape |
Using a screwdriver with its tip wrapped in protective tape, release the locking button.
- NOTICE:
-
Do not damage the airbag wire harness when handling the airbag connector.
Disconnect the airbag connector.
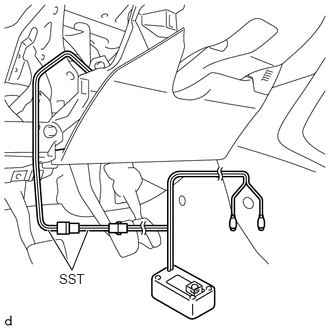
Connect SST.
Connect the SST connector to the lower No. 1 instrument panel airbag assembly.
- SST
- 09082-00700 09082-00802 (09082-10801, 09082-20801)
- NOTICE:
-
Do not lock the secondary lock of the twin lock to avoid damaging the SST connector and wire harness.
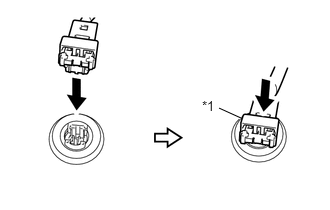
| *1 | Locking Button |
Push in the locking button.
- NOTICE:
-
Securely lock the locking button.
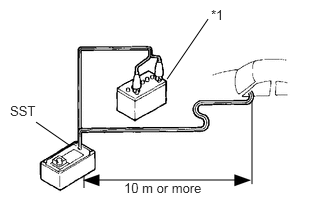
| *1 | Battery |
Move SST to at least 10 m (32.8 ft.) away from the vehicle.
Close all doors and windows of the vehicle.
- NOTICE:
-
Do not damage the SST wire harness.
Connect the red clip of SST to the positive battery terminal and the black clip of SST to the negative battery terminal.
Deploy the airbag.
Check that no one is inside the vehicle or within a 10 m (32.8 ft.) radius of the vehicle.
Press the SST activation switch and deploy the airbag.
- CAUTION:
- ·
Make sure that no one is near the vehicle when deploying the airbag.
·The lower No. 1 instrument panel airbag assembly becomes extremely hot when the airbag is deployed, so do not touch it for at least 30 minutes after deployment.
·Use gloves and safety glasses when handling a lower No. 1 instrument panel airbag assembly which has been deployed.
·Do not apply water, etc. to a lower No. 1 instrument panel airbag assembly which has been deployed.
·Always wash your hands with water after completing the operation.
- HINT:
-
The airbag is deployed as the LED on the SST activation switch illuminates.
73900
2.DISPOSE OF LOWER NO. 1 INSTRUMENT PANEL AIRBAG ASSEMBLY (When not Installed in Vehicle)
- HINT:
-
Prepare a battery as the power source to deploy the airbag.
Check the function of SST.
- SST
- 09082-00700
- CAUTION:
-
Always use the specified SST (SRS Airbag Deployment Tool) when deploying the airbag.
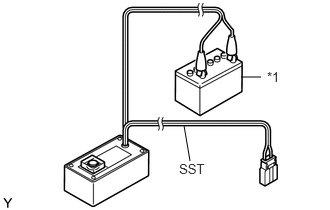
| *1 | Battery |
Connect the red clip of SST to the positive battery terminal and the black clip of SST to the negative battery terminal.
- SST
- 09082-00700
Press the SST activation switch, and check that the LED on the SST activation switch illuminates.
- CAUTION:
- ·
Do not connect the SST connector (yellow colored one) to the airbag.
·If the LED illuminates when the activation switch is not being pressed, SST may be malfunctioning. Do not use SST.
Disconnect SST from the battery.
Remove the lower No. 1 instrument panel airbag assembly.
Click hereVehicle Interior>SUPPLEMENTAL RESTRAINT SYSTEMS>KNEE AIRBAG ASSEMBLY>REMOVAL
- CAUTION:
- ·
Before removing the lower No. 1 instrument panel airbag assembly, wait at least 90 seconds after turning the ignition switch off and disconnecting the cable from the negative (-) battery terminal.
·When storing the lower No. 1 instrument panel airbag assembly, keep the upper surface of the airbag deployment side facing upward.
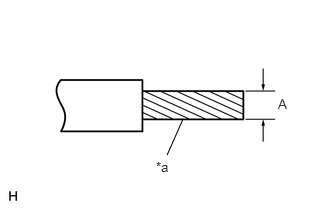
| *a | Stripped Wire Harness Section |
Using a braided wire harness, tie the lower No. 1 instrument panel airbag assembly to the tire.
- Stripped wire harness section:
Area Measurement A 1.25 mm2 or more (0.00192 in.2 or more)
- CAUTION:
-
Do not use a wire harness that is too thin or any other object to tie the lower No. 1 instrument panel airbag assembly because it may snap due to the shock when the airbag is deployed. Always use a wire harness for vehicle use with a cross section of at least 1.25 mm2 (0.0019 in.2).
- HINT:
-
To calculate the area of the stripped wire harness cross section:
-
Area = 3.14 x (Diameter)2 divided by 4
Position the lower No. 1 instrument panel airbag assembly inside the tire, as shown in the illustration.
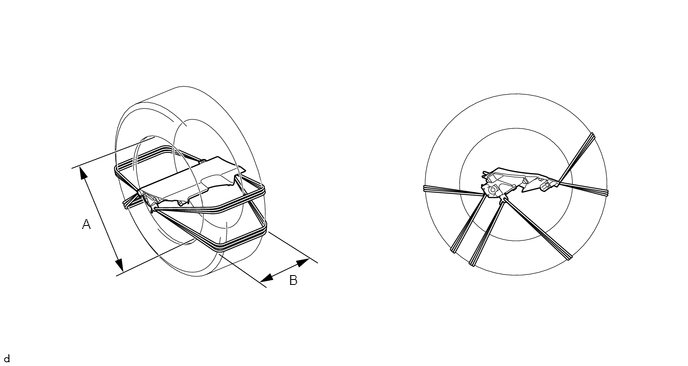
- Tire size:
Area Measurement A 360 mm (14.17 in.) B 185 mm (7.28 in.)
- CAUTION:
- ·
Make sure that the wire harnesses are tight. If there is any slack in the wire harnesses, the lower No. 1 instrument panel airbag assembly may become loose due to the shock when the airbag is deployed.
·Always tie the lower No. 1 instrument panel airbag assembly with the airbag deployment side facing inside the tire.
- NOTICE:
-
The tire will be marked by the airbag deployment, so use a waste tire.
Connect SST.
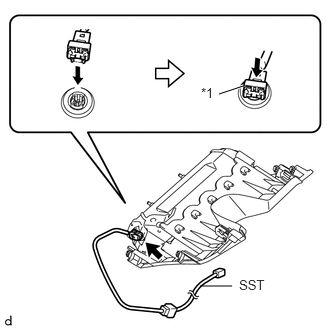
| *1 | Locking Button |
Connect the SST connector to the lower No. 1 instrument panel airbag assembly.
- SST
- 09082-00770 09082-00802 (09082-10801, 09082-20801)
- NOTICE:
-
Do not lock the secondary lock of the twin lock to avoid damaging the SST connector and wire harness.
Push in the locking button.
- NOTICE:
- ·
Securely lock the locking button.
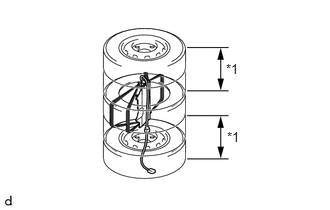
| *1 | Tire (2 or more) |
Place the tires.
Place at least 2 tires under the tire to which the lower No. 1 instrument panel airbag assembly is tied.
Place at least 2 tires over the tire to which the lower No. 1 instrument panel airbag assembly is tied. A disc wheel should be installed onto the top tire.
- NOTICE:
- ·
Do not place SST connector under the tire because it could be damaged.
·As the disc wheel will be marked by the airbag deployment, use a waste disc wheel.
·As the tires will be marked by the airbag deployment, use waste tires.
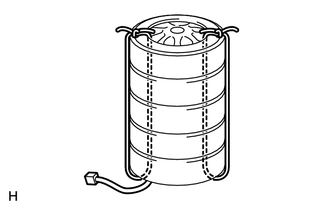
Tie the tires together with 2 wire harnesses.
- CAUTION:
-
Make sure that the wire harnesses are tight. It is highly dangerous when a loose wire harness results in the tires coming free due to the shock when the airbag is deployed.
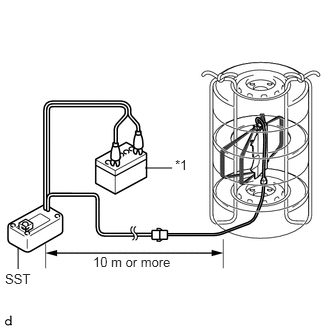
| *1 | Battery |
Connect SST.
- SST
- 09082-00700
- NOTICE:
-
Do not lock the secondary lock of the twin lock to avoid damaging the SST connector and wire harness. Also, secure some slack for SST wire harness inside the tire.
Deploy the airbag.
Connect the red clip of SST to the positive battery terminal and the black clip of SST to the negative battery terminal.
Check that no one is within a 10 m (33 ft.) radius of the tire to which the lower No. 1 instrument panel airbag assembly is tied.
Press the SST activation switch and deploy the airbag.
- CAUTION:
-
Make sure that no one is near the tires when deploying the airbag.
- HINT:
-
The airbag is deployed as the LED on the SST activation switch illuminates.
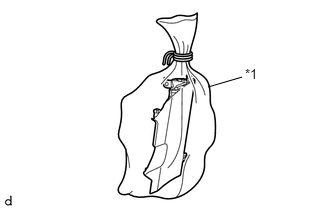
| *1 | Plastic Bag |
Dispose of the lower No. 1 instrument panel airbag assembly.
- CAUTION:
- ·
The lower No. 1 instrument panel airbag assembly becomes extremely hot when the airbag is deployed, so do not touch it for at least 30 minutes after deployment.
·Use gloves and safety glasses when handling a lower No. 1 instrument panel airbag assembly which has been deployed.
·Do not apply water, etc. to a lower No. 1 instrument panel airbag assembly which has been deployed.
·Always wash your hands with water after completing the operation.
Remove the lower No. 1 instrument panel airbag assembly from the tire.
Place the lower No. 1 instrument panel airbag assembly in a plastic bag, tie it tightly and dispose of it according to local regulations.