WINDOW / GLASS WINDSHIELD GLASS INSTALLATION
PROCEDURE

 56111
1.CLEAN WINDSHIELD GLASS
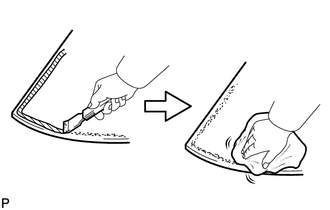
Using a scraper, remove any adhesive dam and adhesive residue from the windshield glass.
- NOTICE:
-
Be careful not to damage the windshield glass.
Clean the outer circumference of the windshield glass with a non-residue solvent.
- NOTICE:
- ·
Do not touch the windshield glass surface after cleaning it.
·Even if using a new windshield glass, clean the windshield glass with a non-residue solvent.
2.CLEAN VEHICLE BODY
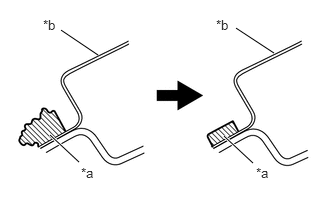
| *a | Adhesive |
| *b | Body |
Clean and shape the contact surfaces of the vehicle body.
Using a knife, cut away excess adhesive on the contact surfaces of the vehicle body as shown in the illustration.
- NOTICE:
-
Be careful not to damage the vehicle body.
- HINT:
-
Leave as much adhesive on the vehicle body as possible.
Clean the contact surfaces of the vehicle body with a piece of cloth saturated with cleaner.
- HINT:
-
Even if all the adhesive has been removed, clean the vehicle body.
56116C
3.INSTALL NO. 2 WINDSHIELD GLASS STOPPER (for 2-piece Type)
Using a brush or sponge, coat the application area of 2 new No. 2 windshield glass stoppers with primer G.
- NOTICE:
- ·
Do not apply too much primer G.
·Allow the primer G to dry for 3 minutes or more.
·Throw away any leftover primer G.
- HINT:
-
If an area other than specified is coated by accident, wipe off the primer G with a clean piece of cloth before it dries.
Install the 2 new No. 2 windshield glass stoppers onto the windshield glass as shown in the illustration.
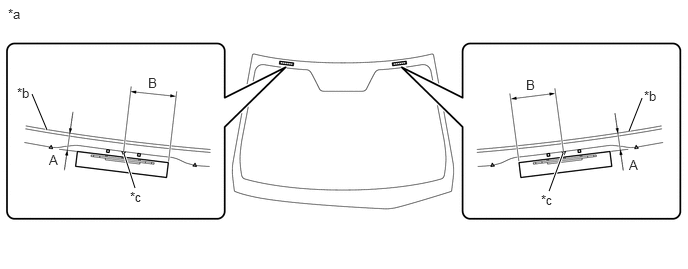
| *a | Back Side | *b | Windshield Glass Edge Side |
| *c | Ceramic Notch | - | - |
- Standard Dimension:
Area Dimension Area Dimension A 14.1 to 15.1 mm (0.556 to 0.594 in.) B 40.0 mm (1.575 in.)
- NOTICE:
-
Only 2-piece type windshield glass stoppers are supplied. Use the 2-piece type windshield glass stoppers even if 1-piece type windshield glass stoppers were used.
56115A
4.INSTALL NO. 1 WINDSHIELD GLASS STOPPER (for 2-piece Type)
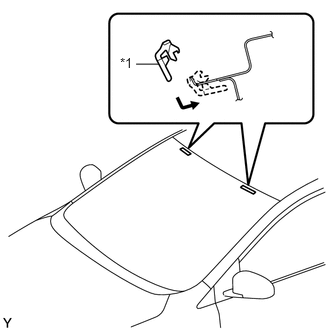
| *1 | No. 1 Windshield Glass Stopper |
Install 2 new No. 1 windshield glass stoppers to the vehicle body as shown in the illustration.
- NOTICE:
-
Only 2-piece type No. 1 windshield glass stoppers are supplied. Use 2-piece type windshield glass stoppers even if a 1-piece type was used.
56117D
5.INSTALL WINDSHIELD GLASS ADHESIVE DAM
Apply primer G to the glass where the glass adhesive dam will be installed.
- NOTICE:
- ·
Allow the primer to dry for 3 minutes or more.
·Throw away any leftover primer.
·Do not apply too much primer.
- HINT:
-
If an area other than that specified is coated by accident, wipe off the primer with a clean piece of cloth before it dries.
Install 4 new window glass adhesive dams to the windshield glass as shown in the illustration.
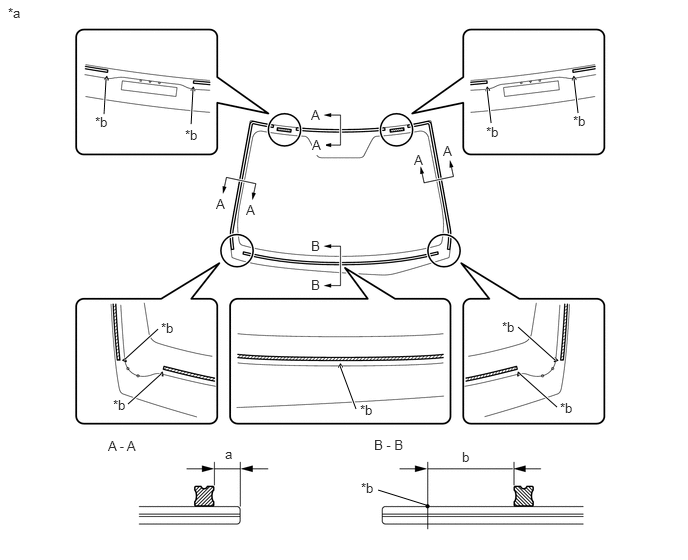
| *a | Back Side | *b | Ceramic Notch |
- Standard Dimension:
Area Dimension Area Dimension a 4.0 mm (0.158 in.) b 38.5 mm (1.52 in.)
- NOTICE:
-
Install a new window glass adhesive dam along the ceramic notches.
56111
6.INSTALL WINDSHIELD GLASS
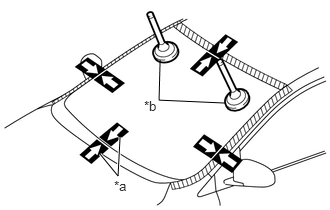
| *a | Matchmarks |
| *b | Suction Cups |
Position the windshield glass.
Using suction cups, place the windshield glass in the correct position.
Check that the whole contact surface of the windshield glass rim is perfectly even.
Align the matchmarks on the windshield glass and vehicle body.
- NOTICE:
-
Check that the windshield glass stoppers are attached to the vehicle body correctly.
Remove the windshield glass.
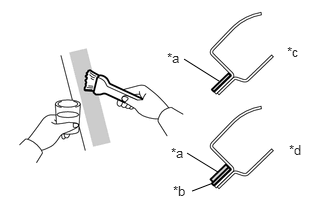
| *a | Primer M |
| *b | Adhesive |
| *c | Correct |
| *d | Incorrect |
Using a brush, coat the installation surface on the vehicle body with primer M.
- NOTICE:
- ·
Do not coat the adhesive with primer M.
·Do not apply too much primer M.
·Allow the primer M coating to dry for 3 minutes or more.
·Do not keep any of the opened primer M for later use.
Using a brush or sponge, coat the application areas that still have adhesive attached with primer G.
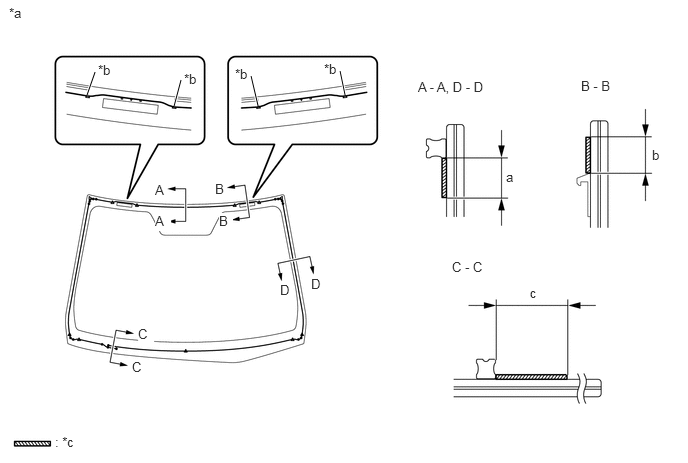
| *a | Back Side | *b | Ceramic Notch |
| *c | Primer G | - | - |
- Standard Dimension:
Area Dimension Area Dimension a 12.5 mm (0.492 in.) b 10.0 mm (0.394 in.) c 20.5 mm (0.807 in.) - -
- NOTICE:
- ·
Do not apply too much primer.
·Allow the primer coating to dry for 3 minutes or more.
·Throw away any leftover primer.
- HINT:
- ·
Apply primer G onto the ceramic notches.
·If an area other than that specified is coated by accident, wipe off the primer with a clean piece of cloth before it dries.
Apply adhesive to the windshield glass.
- Adhesive:
Toyota Genuine Windshield Glass Adhesive or equivalent
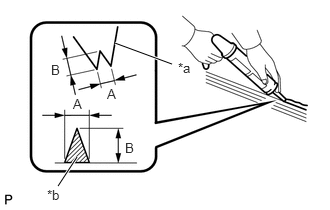
| *a | Nozzle |
| *b | Adhesive |
Cut off the tip of the cartridge nozzle as shown in the illustration.
- Standard Dimension:
Area Dimension A 8.0 mm (0.315 in.) B 12.0 mm (0.472 in.)
- HINT:
-
After cutting off the tip, use all adhesive within the time limit described in the table below.
- Usage Time Frame:
Temperature Usage Time Frame 35°C (95°F) 15 minutes 20°C (68°F) 1 hour and 40 minutes 5°C (41°F) 8 hours
Load the sealer gun with a cartridge.
Apply adhesive to the windshield glass as shown in the illustration.
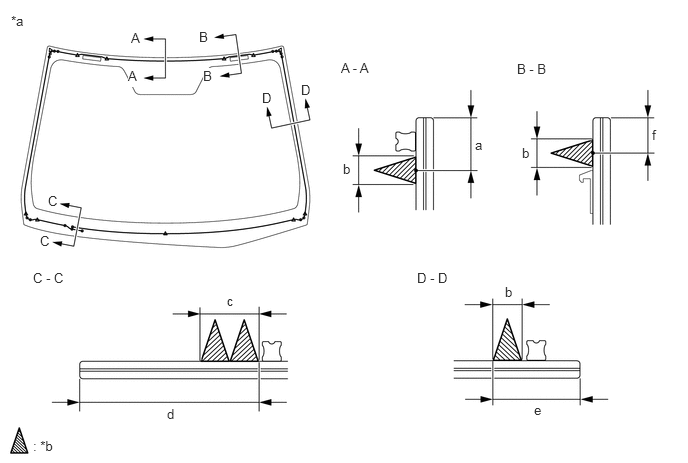
| *a | Back Side | *b | Adhesive |
- Standard Dimension:
Area Dimension Area Dimension a 14.7 mm (0.579 in.) b 8.0 mm (0.315 in.) c 16.0 mm (0.630 in.) d 68.3 mm (2.689 in.) e 18.7 mm (0.736 in.) f 10.0 mm (0.394 in.)
| *a | Matchmarks |
| *b | Suction Cups |
Install the windshield glass.
Using suction cups, position the windshield glass so that the matchmarks are aligned, and press it in gently along the rim.
- NOTICE:
- ·
Check that the windshield glass stoppers are attached to the vehicle body correctly.
·Check the clearance between the vehicle body and windshield glass.
Lightly press the front surface of the windshield glass to ensure that the windshield glass is securely fit to the vehicle body.
- HINT:
-
Press the glass with a force of 98 N (10 kgf, 22.0 lbf) or more.
Using a scraper, remove any excess or protruding adhesive.
Hold the windshield glass using protective tape until the applied adhesive becomes hard.
- NOTICE:
-
Do not drive the vehicle for the time described in the table below.
- Minimum Time:
Temperature Minimum Time prior to Driving Vehicle 35°C (95°F) 1 hour and 30 minutes 20°C (68°F) 5 hours 5°C (41°F) 24 hours
7.INSPECT FOR LEAK AND REPAIR
After the adhesive has hardened, apply water from the outside of the vehicle. Check that no water leaks into the cabin.
If water leaks into the cabin, allow the water to dry and add adhesive.
Remove the protective tape.
63310
8.INSTALL ROOF HEADLINING ASSEMBLY
Return the front section of the roof headlining assembly to the original position.
74348C
9.INSTALL VISOR HOLDER LH
74348B
10.INSTALL VISOR HOLDER RH
- HINT:
-
Use the same procedure as for the LH side.
74320
11.INSTALL VISOR ASSEMBLY LH
74310
12.INSTALL VISOR ASSEMBLY RH
- HINT:
-
Use the same procedure as for the LH side.
74610A
13.INSTALL ASSIST GRIP SUB-ASSEMBLY
81260A
14.INSTALL MAP LIGHT ASSEMBLY
62212
15.INSTALL FRONT PILLAR GARNISH LH
w/o Curtain Shield Airbag:
Click hereVehicle Interior>INTERIOR PANELS / TRIM>ROOF HEADLINING(for Hatchback)>INSTALLATION
w/ Curtain Shield Airbag:
Click hereVehicle Interior>INTERIOR PANELS / TRIM>ROOF HEADLINING(for Hatchback)>INSTALLATION
62211
16.INSTALL FRONT PILLAR GARNISH RH
- HINT:
-
Use the same procedure as for the LH side.
62312B
17.CONNECT FRONT DOOR OPENING TRIM WEATHERSTRIP LH
Connect the front door opening trim weatherstrip LH.
62311B
18.CONNECT FRONT DOOR OPENING TRIM WEATHERSTRIP RH
- HINT:
-
Use the same procedure as for the LH side.
87810
19.INSTALL INNER REAR VIEW MIRROR ASSEMBLY
55781E
20.INSTALL COWL TOP VENTILATOR LOUVER SUB-ASSEMBLY