1NR-FE COOLING RADIATOR INSTALLATION
PROCEDURE

 16561
1.INSTALL NO. 1 RADIATOR TO SUPPORT SEAL
- HINT:
-
This procedure is only performed when replacing the No. 1 radiator to support seal with a new one.
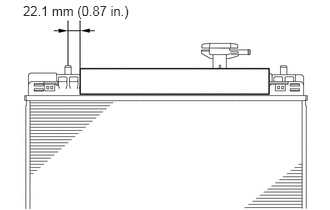
Install the No. 1 radiator to support seal for upper side to the radiator assembly.
- HINT:
-
Make sure that the No. 1 radiator to support seal does not overlap onto the radiator core plate.
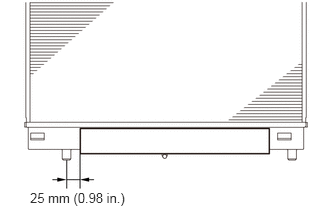
Install the No. 1 radiator to support seal for lower side to the radiator assembly.
- HINT:
-
Make sure that the No. 1 radiator to support seal does not overlap onto the radiator core plate.
2.INSTALL RADIATOR DRAIN COCK PLUG
Install the radiator drain cock plug to the radiator assembly.
- NOTICE:
-
Replace the O-ring if it is damaged.
16535
3.INSTALL LOWER RADIATOR SUPPORT
Install the 2 lower radiator supports to the radiator assembly.
16523A
4.INSTALL RADIATOR SUPPORT CUSHION
Install the 2 radiator support cushions to the radiator assembly.
16711
5.INSTALL FAN SHROUD
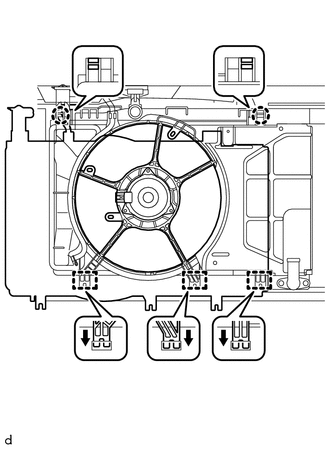
Engage the 3 guides and 2 claws to install the fan shroud to the radiator assembly.
16400
6.INSTALL RADIATOR ASSEMBLY (w/ Cooler System)
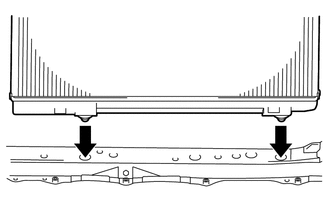
Install the radiator assembly together with fan shroud to the vehicle.
- NOTICE:
-
Do not apply excessive force to the cooler condenser assembly or piping when installing the radiator assembly.
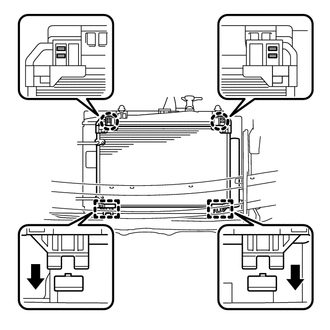
Engage the 2 guides and 2 claws to connect the cooler condenser assembly to the radiator assembly.
- HINT:
-
While tilting the cooler condenser assembly toward the front of the vehicle, install the cooler condenser assembly to the radiator assembly.
Engage the 3 clamps to connect the wire harness to the fan shroud.
Connect the cooling fan motor connector.
16400
7.INSTALL RADIATOR ASSEMBLY (w/o Cooler System)
Install the radiator assembly together with fan shroud to the vehicle.
Engage the 3 clamps to connect the wire harness to the fan shroud.
Connect the cooling fan motor connector.
16572D
8.CONNECT NO. 2 RADIATOR HOSE
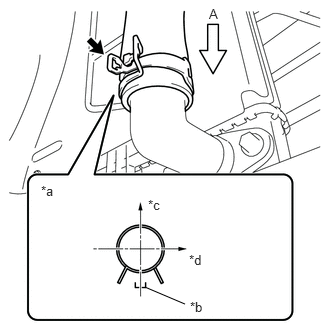
| *a | View A |
| *b | Hose Paint Mark |
| *c | Front of Vehicle |
| *d | Right Side of Vehicle |
Connect the No. 2 radiator hose to the radiator assembly and slide the hose clip to secure it.
- NOTICE:
-
Perform the installation with the No. 2 radiator hose and hose clip at the correct angle.
16571C
9.CONNECT NO. 1 RADIATOR HOSE
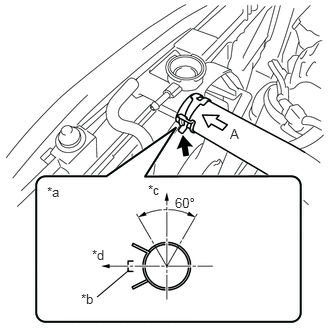
| *a | View A |
| *b | Hose Paint Mark |
| *c | Top of Vehicle |
| *d | Left Side of Vehicle |
Connect the No. 1 radiator hose to the radiator assembly and slide the hose clip to secure it.
- NOTICE:
-
Perform the installation with the No. 1 radiator hose and hose clip at the correct angle.
10.CONNECT RADIATOR RESERVOIR TANK HOSE
Connect the radiator reservoir tank hose to the radiator assembly.
53216A
11.INSTALL UPPER RADIATOR SUPPORT
Install the upper radiator support to the radiator support assembly with the 4 bolts.
- Torque:
- 5.5 N*m (56 kgf*cm, 49 in.*lbf)
Connect the low pitched horn assembly connector.
Engage the 3 clamps to connect the wire harness to the upper radiator support.
Engage the clamp to connect the hood lock control cable assembly to the upper radiator support.
88891H
12.INSTALL NO. 1 COOLER COVER
53215B
13.INSTALL HOOD LOCK SUPPORT
Install the hood lock support to the radiator support assembly with the 2 bolts.
- Torque:
- 12.5 N*m (127 kgf*cm, 9 ft.*lbf)
Engage the clamp to connect the wire harness to the hood lock support.
53510
14.INSTALL HOOD LOCK ASSEMBLY
w/ Engine Hood Courtesy Switch:
Click hereVehicle Interior>THEFT DETERRENT / KEYLESS ENTRY>ENGINE HOOD COURTESY SWITCH>INSTALLATION
w/o Engine Hood Courtesy Switch:
Click hereVehicle Exterior>DOOR / HATCH>HOOD LOCK CONTROL CABLE ASSEMBLY(for RHD)>INSTALLATION
89173
15.INSTALL FRONT AIRBAG SENSOR (w/ Airbag System)
81150
16.INSTALL HEADLIGHT ASSEMBLY LH
81150
17.INSTALL HEADLIGHT ASSEMBLY RH
- HINT:
-
Use the same procedure as for the LH side.
18.ADD ENGINE COOLANT
19.INSPECT FOR COOLANT LEAK
20.ADJUST HOOD SUB-ASSEMBLY