P910 HYBRID TRANSMISSION / TRANSAXLE HYBRID VEHICLE TRANSAXLE INSTALLATION
CAUTION / NOTICE / HINT
- CAUTION:
-
The engine assembly with hybrid vehicle transaxle assembly is very heavy. Be sure to follow the procedure described in the repair manual, or the engine lifter may suddenly drop.
PROCEDURE

 1.INSTALL UNION
- HINT:
-
Perform this procedure only when replacement of the union or O-ring is necessary.
Coat a new O-ring with ATF.
Install the union and O-ring to the hybrid vehicle transaxle assembly.
- Torque:
- 27 N*m (275 kgf*cm, 20 ft.*lbf)
30900N
2.INSTALL TRANSAXLE BREATHER PLUG
- HINT:
-
Perform this procedure only when replacement of the transaxle breather plug is necessary.
Install the transaxle breather plug to the hybrid vehicle transaxle assembly.
- Torque:
- 11.3 N*m (115 kgf*cm, 8 ft.*lbf)
3.INSTALL TRANSAXLE HOUSING PLUG
- HINT:
-
Perform this procedure only when replacement of the transaxle housing plug or gasket is necessary.
Install the transaxle housing plug and a new gasket to the hybrid vehicle transaxle assembly.
- Torque:
- 39.2 N*m (400 kgf*cm, 29 ft.*lbf)
4.INSTALL STUD BOLT
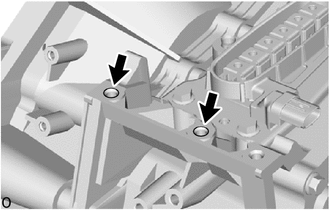
Clean and degrease the 2 stud bolt holes of the hybrid vehicle transaxle assembly.
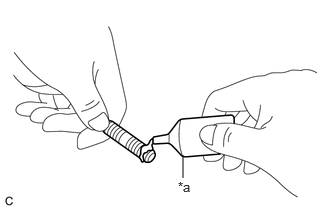
| *a | Adhesive |
Apply adhesive to 2 or 3 threads on the ends of the 2 stud bolts.
- Adhesive:
Toyota Genuine Adhesive 1324, Three Bond 1324 or equivalent
- NOTICE:
-
In order to ensure proper sealing of the 2 stud bolts, install them within 10 minutes of applying adhesive.
Using a E8 "TORX" socket wrench, install the 2 stud bolts to the hybrid vehicle transaxle assembly.
- Torque:
- 10 N*m (102 kgf*cm, 7 ft.*lbf)
5.INSTALL WIRE HARNESS CLAMP BRACKET
Install the 2 wire harness clamp brackets to the hybrid vehicle transaxle assembly with the 2 bolts.
- Torque:
- 10 N*m (102 kgf*cm, 7 ft.*lbf)
33823
6.INSTALL NO. 1 TRANSMISSION CONTROL CABLE BRACKET
Install the No. 1 transmission control cable bracket to the hybrid vehicle transaxle assembly with the bolt.
- Torque:
- 12 N*m (122 kgf*cm, 9 ft.*lbf)
44781E
7.INSTALL HOSE BRACKET
Install the hose bracket to the hybrid vehicle transaxle assembly with the bolt.
- Torque:
- 8.0 N*m (82 kgf*cm, 71 in.*lbf)
G1251B
8.INSTALL NO. 1 MOTOR COOLING PIPE
Temporarily install a new No. 1 motor cooling pipe to the union with the flare nut.
Install the No. 2 oil cooler tube clamp to the No. 1 transmission control cable bracket with the bolt.
- Torque:
- 8.0 N*m (82 kgf*cm, 71 in.*lbf)
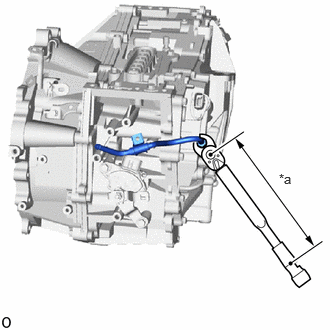
| *a | Torque Wrench Fulcrum Length |
Using a 17 mm union nut wrench, tighten the flare nut to install the No. 1 motor cooling pipe.
- Torque:
- Specified Tightening Torque : 34.3 N*m (350 kgf*cm, 25 ft.*lbf)
- HINT:
- ·
Calculate the torque wrench reading when changing the fulcrum length of the torque wrench.
Click hereGeneral>INTRODUCTION>REPAIR INSTRUCTION>PRECAUTION
·When using a 17 mm union nut wrench (fulcrum length of 30 mm (1.18 in.)) + torque wrench (fulcrum length of 180 mm (7.09 in.)):
29.4 N*m (300 kgf*cm, 22 ft.*lbf)
G125A
9.INSTALL MOTOR COOLING COOLER
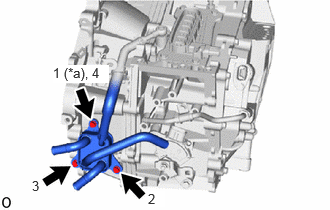
| *a | Temporarily Tighten |
Temporarily install the motor cooling cooler with No. 2 motor cooling pipe to the hybrid vehicle transaxle assembly with the 3 bolts.
Tighten the 3 bolts in the order shown in the illustration.
- Torque:
- 8.0 N*m (82 kgf*cm, 71 in.*lbf)
Temporarily install the No. 2 motor cooling pipe to the hybrid vehicle transaxle assembly with the oil cooler union bolt and a new gasket.
Engage the clamp.
Tighten the oil cooler union bolt to install the No. 2 motor cooling pipe.
- Torque:
- 35 N*m (357 kgf*cm, 26 ft.*lbf)
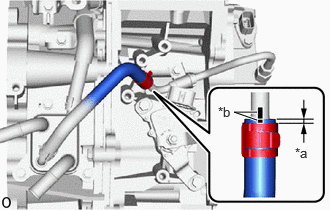
| *a | 2 to 7 mm (0.0787 to 0.276 in.) |
| *b | Paint Mark |
Connect the No. 1 motor cooling hose to the No. 1 motor cooling pipe and slide the clip to secure it.
- NOTICE:
-
Make sure to align the paint mark on the No. 1 motor cooling pipe with the paint mark on the No. 1 motor cooling hose.
G1148
10.INSTALL MOTOR CABLE
12364B
11.INSTALL NO. 2 ENGINE MOVING CONTROL ROD
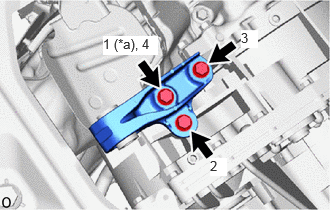
| *a | Temporarily Tighten |
Install the No. 2 engine moving control rod to the hybrid vehicle transaxle assembly with the 3 bolts in the order shown in the illustration.
- Torque:
- 44 N*m (449 kgf*cm, 32 ft.*lbf)
51201
12.TEMPORARILY INSTALL FRONT SUSPENSION CROSSMEMBER SUB-ASSEMBLY
Temporarily install the front suspension crossmember sub-assembly to the No. 2 engine moving control rod with the bolt.
13.INSTALL ENGINE ASSEMBLY
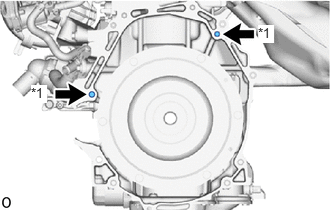
| *1 | Knock Pin |
Make sure that the knock pins are installed to the engine assembly.
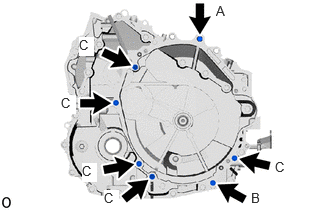
Install the engine assembly to the hybrid vehicle transaxle assembly with the 7 bolts.
| Bolt | Bolt Length | Torque |
|---|---|---|
| (A), (C) | 45 mm (1.77 in.) | 46 N*m (469 kgf*cm, 34 ft.*lbf) |
| (B) | 35 mm (1.38 in.) | 25 N*m (255 kgf*cm, 18 ft.*lbf) |
- NOTICE:
- ·
When tightening the bolts, be sure that the contact surfaces of the engine assembly and hybrid vehicle transaxle assembly are in close contact with one another.
·Temporarily tighten the bolt (A), and then fully tighten the 7 bolts in the order of (B), (A) and (C).
·Do not apply grease to the inner splines of the transmission input damper assembly or input shaft assembly.
·Make sure that the wire harness or similar items are not pinched between the contact surfaces.
·Do not use excessive force when installing the engine assembly.
·Make sure to align the hybrid vehicle transaxle assembly so that the input shaft assembly of the hybrid vehicle transaxle assembly will be inserted straight into the inner splines of the transmission input damper assembly.
·When inserting the input shaft assembly of the hybrid vehicle transaxle assembly into the inner splines of the transmission input damper assembly, do not shake the engine assembly.
·When installing the engine assembly to the hybrid vehicle transaxle assembly, make sure to securely fit the knock pins into the knock pin holes.
16290F
14.SEPARATE NO. 3 WATER BY-PASS HOSE ASSEMBLY
Engage the clamp to install the No. 3 water by-pass hose to the hybrid vehicle transaxle assembly.
11363A
15.INSTALL FLYWHEEL HOUSING SIDE COVER
Install the flywheel housing side cover to the engine assembly.
28193
16.INSTALL STARTER HOLE INSULATOR
Install the starter hole insulator to the engine assembly with the 2 bolts.
- Torque:
- 46 N*m (469 kgf*cm, 34 ft.*lbf)
821H2
17.INSTALL HV AIR CONDITIONING WIRE
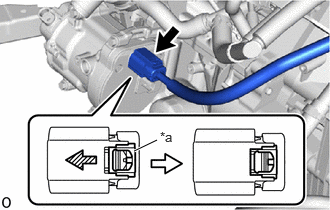
| *a | Green-colored Lock |

|
Slide |
Connect the connector and slide the green-colored lock as shown in the illustration to lock it securely.
- CAUTION:
-
Make sure to wear insulated gloves.
- NOTICE:
-
Make sure that the connector is connected securely.
Engage the clamp.
Install the HV air conditioning wire to the hybrid vehicle transaxle assembly with the 2 bolts.
- Torque:
- 10 N*m (102 kgf*cm, 7 ft.*lbf)
82121
18.CONNECT ENGINE WIRE
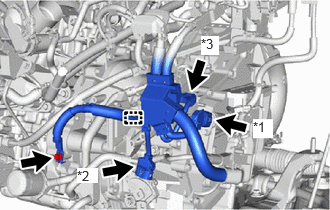
| *1 | Resolver (Transmission Fluid Temperature Sensor) Connector |
| *2 | Shift Lever Position Sensor Connector |
| *3 | Generator Temperature Sensor Connector |
Connect the generator temperature sensor connector.
Confirm that no foreign matter or water has entered the connector of the shift lever position sensor and connect the connector.
Connect the resolver (transmission fluid temperature sensor) connector.
Install the bolt.
- Torque:
- 20 N*m (204 kgf*cm, 15 ft.*lbf)
Engage the clamp.
Engage the 6 clamps.
19.REMOVE ENGINE HANGER
20.INSTALL ENGINE ASSEMBLY WITH TRANSAXLE
21. PERFORM RESOLVER LEARNING
- NOTICE:
-
If the hybrid vehicle transaxle assembly has been replaced, make sure to perform resolver learning.
-
Click hereEngine / Hybrid System>HYBRID / BATTERY CONTROL>HYBRID CONTROL SYSTEM>UTILITY