K320 MULTIDRIVE / CVT OIL PAN INSTALLATION
PROCEDURE

 1.INSTALL TRANSAXLE SIDE COVER SUB-ASSEMBLY

|
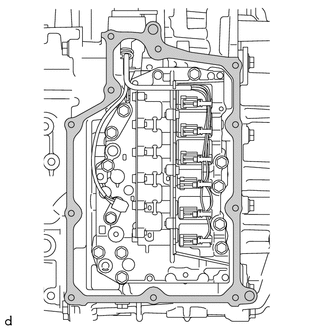
Area to be Cleaned |
Clean the transaxle side cover sub-assembly installation surface of the transaxle case sub-assembly.
- NOTICE:
-
Completely remove any oil or grease from the contact surfaces of the transaxle case sub-assembly.
Coat a new O-ring with Toyota Genuine CVT fluid FE and install it to the transaxle side cover sub-assembly.
Temporarily install a new transaxle side cover sub-assembly to the transaxle case sub-assembly with the 11 bolts.
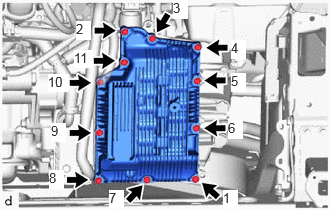
Fully tighten the 11 bolts in the order shown in the illustration.
- Torque:
- 7.4 N*m (75 kgf*cm, 65 in.*lbf)
2.INSTALL WIRE HARNESS CLAMP BRACKET
Install the wire harness clamp bracket to the continuously variable transaxle assembly with the bolt.
- Torque:
- 10 N*m (102 kgf*cm, 7 ft.*lbf)
82121
3.INSTALL ENGINE WIRE
Engage the 2 clamps to connect the engine wire to the continuously variable transaxle assembly.
17701
4.INSTALL AIR CLEANER CASE SUB-ASSEMBLY
17705
5.INSTALL AIR CLEANER CAP WITH AIR CLEANER HOSE
6.ADD CONTINUOUSLY VARIABLE TRANSAXLE FLUID
7.INSPECT FOR CONTINUOUSLY VARIABLE TRANSAXLE FLUID LEAK
51442C
8.INSTALL ENGINE UNDER COVER LH
51451A
9.INSTALL CENTER ENGINE UNDER COVER