HEATING / AIR CONDITIONING REFRIGERANT(for HFC-134a(R134a)) REPLACEMENT
PROCEDURE

 1. RECOVER REFRIGERANT FROM REFRIGERATION SYSTEM
Turn the ignition switch on.
Operate the compressor under the conditions shown below:
| Item | Condition |
|---|---|
| Operating time | 3 minutes or more |
| Temperature setting | Max cool |
| Blower speed | High |
| Engine (for Gasoline Model) | Idling |
| Ignition switch (for HV Model) | On (READY) |
| A/C switch | On |
This causes most of the compressor oil from the various components of the A/C system to collect in the compressor.
- HINT:
-
It is not necessary to operate the compressor if the A/C does not operate because of compressor lock, etc.
Turn the ignition switch off.
Recover the refrigerant from the A/C system using a refrigerant recovery unit.
- HINT:
-
Use the refrigerant recovery unit in accordance with the manufacturer's instruction manual.
2. CHARGE AIR CONDITIONING SYSTEM WITH REFRIGERANT
Perform vacuum purging using a vacuum pump or appropriate equipment.
Charge the air conditioning system with refrigerant.
- Refrigerant Type:
HFC-134a (R134a)
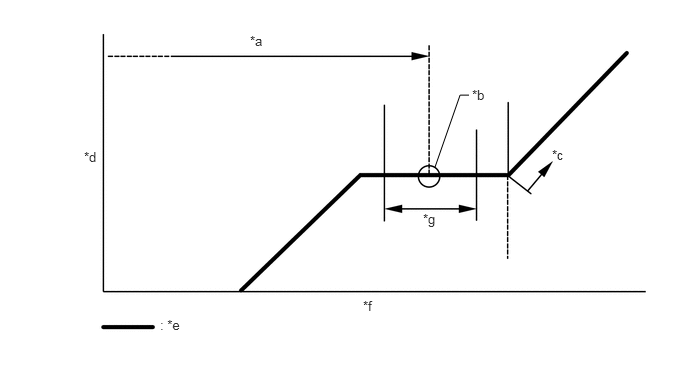
| *a | Standard Charge Amount | *b | Mean Value in Proper Range |
| *c | Overcharged | *d | High Pressure |
| *e | Sub-cool System | *f | Refrigerant Amount |
| *g | +/-50 g (+/-1.76 oz) | - | - |
- Standard Charge Amount:
for Gasoline Model:
300 to 400 g (10.6 to 14.1 oz)
for HV Model:
400 to 500 g (14.1 to 17.6 oz)
- SST
- 09985-20010 (09985-02010, 09985-02050, 09985-02060, 09985-02070, 09985-02080, 09985-02090, 09985-02110, 09985-02130, 09985-02140, 09985-02150)
- NOTICE:
- ·
Do not turn the A/C switch on before charging the air conditioning system with refrigerant. Doing so may cause the compressor to work without refrigerant, resulting in overheating of the compressor.
·The refrigerant amount should be checked by quantity (weight).
·The graph above is shown for reference only.
- HINT:
-
Ensure that sufficient refrigerant is available to recharge the system when using a refrigerant recovery unit. Refrigerant recovery units are not always able to recover 100% of the refrigerant from an air conditioning system.
3. WARM UP ENGINE (for Gasoline Model)
Keep the A/C switch on for at least 2 minutes to warm up the compressor.
- NOTICE:
-
To prevent damage to the compressor, be sure to warm up the compressor when turning the air conditioning on after removing and installing any air conditioning system lines (including the compressor).
4.WARM UP COMPRESSOR (for HV Model)
Keep the A/C switch on for at least 2 minutes to warm up the compressor.
- NOTICE:
-
To prevent damage to the compressor, be sure to warm up the compressor when turning the air conditioning on after removing and installing any air conditioning system lines (including the compressor).
5.INSPECT FOR REFRIGERANT LEAK
After recharging the air conditioning system with refrigerant, inspect for refrigerant leaks using a halogen leak detector.
Carry out the test under the following conditions:
Turn the ignition switch off.
Ensure good ventilation (the halogen leak detector may react to volatile gases which are not refrigerant, such as gasoline vapor and exhaust gas).
Repeat the inspection 2 or 3 times.
Measure the pressure to make sure that there is some refrigerant remaining in the air conditioning system.
Pressure when the compressor is off: approximately 392 to 588 kPa (3.9 to 5.9 kgf/cm2, 57 to 85 psi)
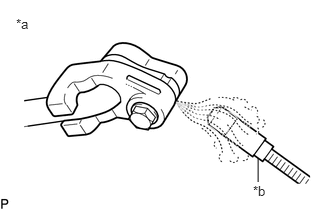
| *a | Inspect for Leak |
| *b | Halogen Leak Detector |
Using a halogen leak detector, inspect for refrigerant leaks from the air conditioning system.
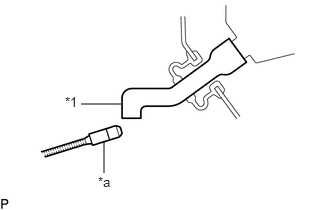
| *1 | Drain Cooler Hose |
| *a | Halogen Leak Detector |
Bring the halogen leak detector close to the drain cooler hose with the detector power off, and then turn the detector on.
- HINT:
- ·
After the blower motor has stopped, leave the cooling unit for more than 15 minutes.
·Bring the halogen leak detector sensor under the drain cooler hose.
·When bringing the halogen leak detector close to the drain cooler hose, make sure that the halogen leak detector does not react to volatile gases. If it is not possible to avoid interference from volatile gases, the vehicle should be lifted up to allow checking for leaks.
If a refrigerant leak is not detected from the drain cooler hose, remove the blower motor control from the cooling unit. Insert the halogen leak detector sensor into the unit and check for leaks.
Disconnect the pressure sensor connector and leave it for approximately 20 minutes. Bring the halogen leak detector close to the pressure sensor and check for leaks.
- HINT:
-
When checking for leaks, the presence of oily dirt at a joint can indicate a leak.
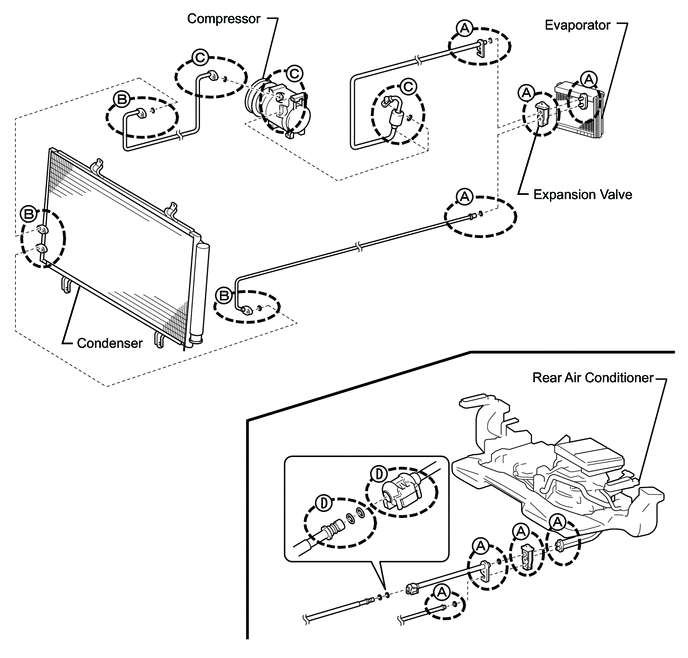
6.INSPECT REFRIGERANT LEAK (for Refrigerant Line)
Inspect for refrigerant leaks using a halogen leak detector.
When a leak occurs at location A:
Click hereVehicle Interior>HEATING / AIR CONDITIONING>REFRIGERANT (for HFC-134a(R134a))>REPLACEMENT
When a leak occurs at location B:
Click hereVehicle Interior>HEATING / AIR CONDITIONING>REFRIGERANT (for HFC-134a(R134a))>REPLACEMENT
When a leak occurs at location C:
Click hereVehicle Interior>HEATING / AIR CONDITIONING>REFRIGERANT (for HFC-134a(R134a))>REPLACEMENT
When a leak occurs at location D:
Click hereVehicle Interior>HEATING / AIR CONDITIONING>REFRIGERANT (for HFC-134a(R134a))>REPLACEMENT
7.INSPECT REFRIGERANT LEAK (for Expansion Valve)
- NOTICE:
- ·
Once an O-ring has been removed, be sure to replace it with a new one even if it appears normal.
·Because there could be malfunctions in more than one location, be sure to perform all work procedures.
·If all parts related to piping connections were checked and no defects were found, it is possible that sealing performance was temporarily degraded due to foreign matter contamination or deformation of O-rings.
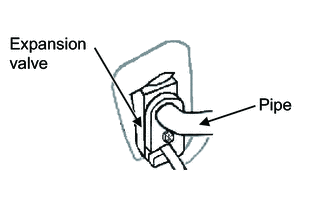
Remove the refrigerant line.
- NOTICE:
- ·
Wipe the area around the connecting portions with a clean piece of cloth before disassembly.
·To prevent damage to the sealing surfaces or shedding of foreign matter adhesions, be sure to remove the parts by slowly pulling them straight out.
Remove the refrigerant line from the expansion valve.
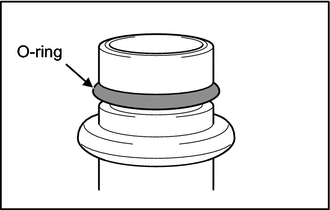
Inspect the piping O-ring surface.
- NOTICE:
- ·
Be sure to perform the O-ring inspection in a brightly-lit work area.
·If the O-ring surface condition is hard to see due to oil, etc., it can be degreased to improve visibility. However, when degreasing, be careful not to lose any foreign matter which may be adhering to the surface.
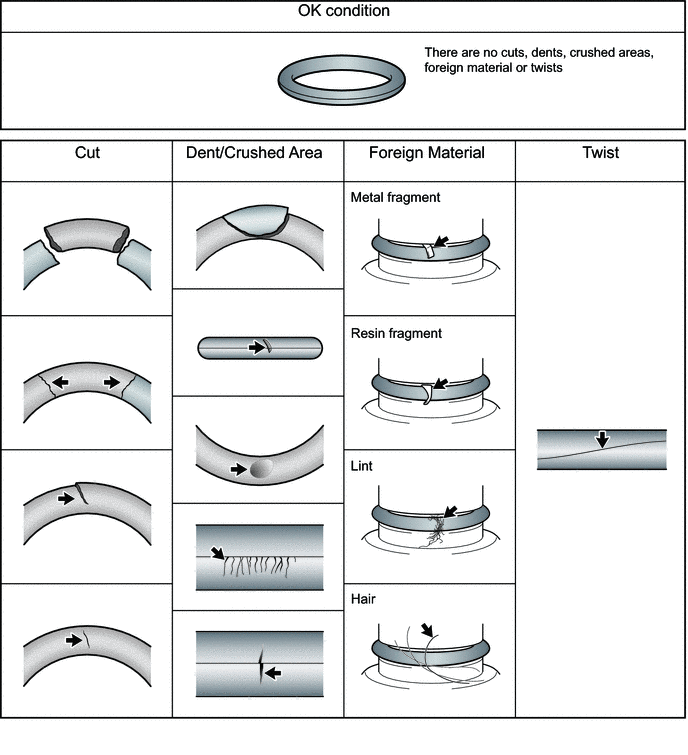
Check the entire surface of the O-ring, and if cuts, crushing, indentation, foreign matter contamination, or twisting are found, clean or replace as necessary.
Click hereVehicle Interior>HEATING / AIR CONDITIONING>REFRIGERANT (for HFC-134a(R134a))>REPLACEMENT
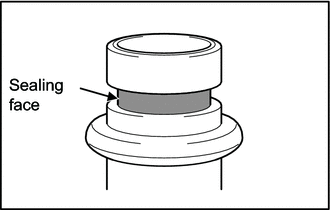
Inspect the piping sealing face.
- NOTICE:
-
When removing O-rings, be careful not to damage the O-ring or the sealing face.
Remove the O-ring.
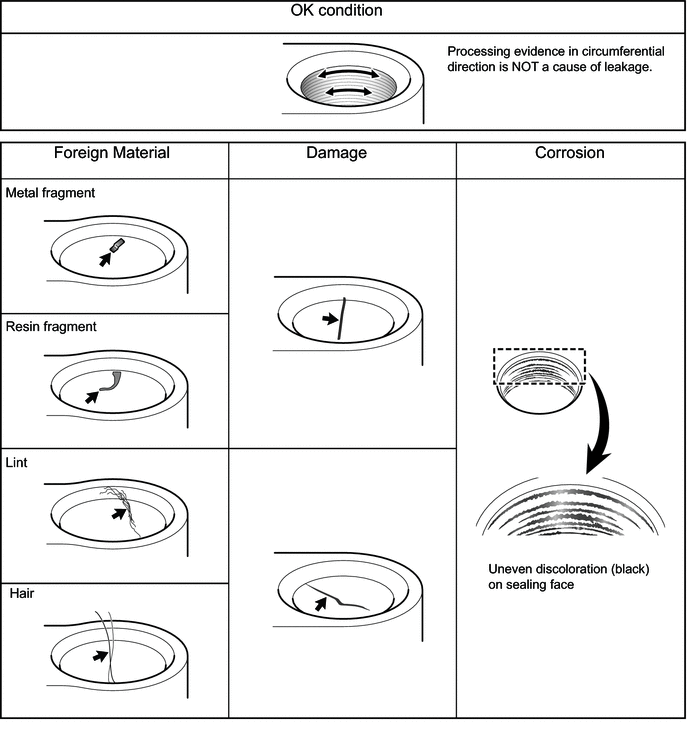
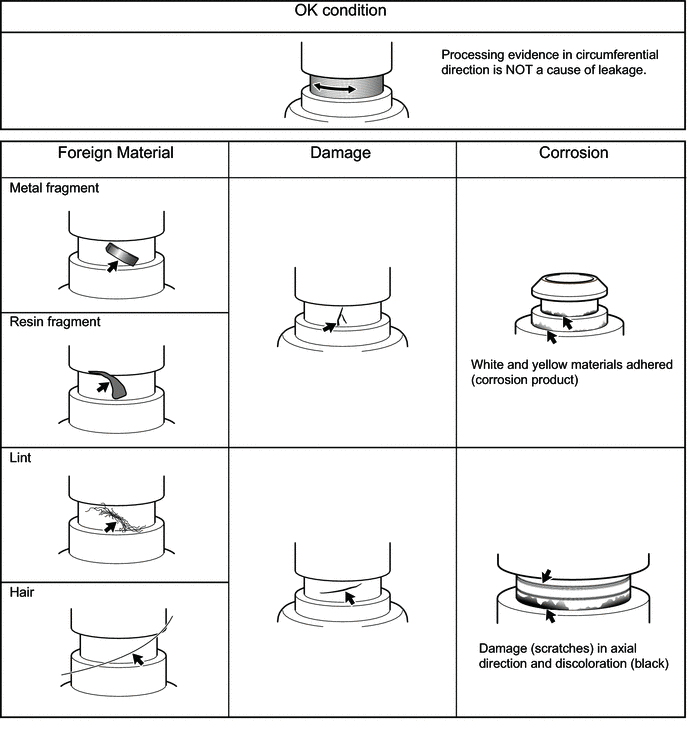
Check the sealing face of the piping, and if foreign matter adhesion, scratches, or corrosion are found, clean or replace as necessary.
Click hereVehicle Interior>HEATING / AIR CONDITIONING>REFRIGERANT (for HFC-134a(R134a))>REPLACEMENT
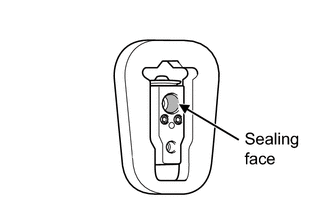
Inspect the expansion valve sealing face (piping side).
- NOTICE:
-
If the O-ring surface condition is hard to see due to oil, etc., it can be degreased to improve visibility. However, when degreasing, be careful not to lose any foreign matter which may be adhering to the surface.
Check the entire surface of the expansion valve sealing face (piping side), and if foreign matter adhesion, scratches, or corrosion are found, clean or replace as necessary.
Click hereVehicle Interior>HEATING / AIR CONDITIONING>REFRIGERANT (for HFC-134a(R134a))>REPLACEMENT
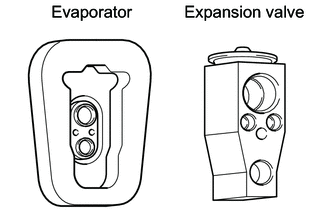
Remove the expansion valve.
- NOTICE:
- ·
Wipe connecting portions and their surrounding areas with a clean piece of cloth before removal.
·To prevent damage to the sealing surfaces or shedding of foreign matter adhesions, be sure to remove the parts by slowly pulling them straight out.
·If the parts are difficult to separate, wiggle them up/down and left/right while slowly pulling them apart.
Remove the expansion valve from the evaporator sub-assembly.
- HINT:
-
If necessary, remove the air conditioner unit assembly.
-
Click hereVehicle Interior>HEATING / AIR CONDITIONING>AIR CONDITIONING UNIT>REMOVAL
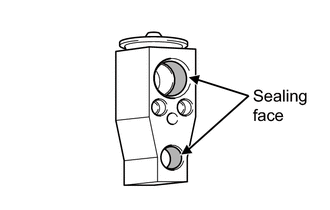
Inspect the expansion valve sealing face (evaporator side).
- NOTICE:
-
If the O-ring surface condition is hard to see due to oil, etc., it can be degreased to improve visibility. However, when degreasing, be careful not to lose any foreign matter which may be adhering to the surface.
Check the entire surface of the expansion valve sealing face (evaporator side), and if foreign matter adhesion, scratches, or corrosion are found, clean or replace as necessary.
Click hereVehicle Interior>HEATING / AIR CONDITIONING>REFRIGERANT (for HFC-134a(R134a))>REPLACEMENT
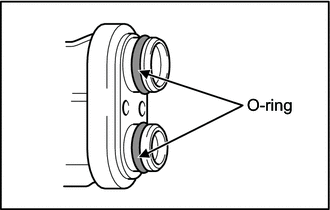
Inspect the evaporator O-ring surface.
- NOTICE:
- ·
Be sure to perform the O-ring inspection in a brightly-lit work area.
·If the O-ring surface condition is hard to see due to oil, etc., it can be degreased to improve visibility. However, when degreasing, be careful not to lose any foreign matter which may be adhering to the surface.
Check the entire surface of the O-ring, and if cuts, crushing, indentation, foreign matter contamination, or twisting are found, clean or replace as necessary.
Click hereVehicle Interior>HEATING / AIR CONDITIONING>REFRIGERANT (for HFC-134a(R134a))>REPLACEMENT
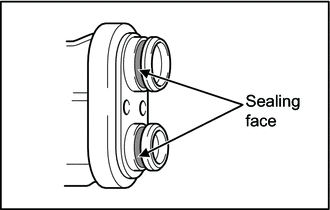
Inspect the evaporator sealing face.
- NOTICE:
-
When removing O-rings, be careful not to damage the O-ring or the sealing face.
Remove the O-ring.
Check the sealing face of the evaporator, and if foreign matter adhesion, scratches, or corrosion are found, clean or replace as necessary.
Click hereVehicle Interior>HEATING / AIR CONDITIONING>REFRIGERANT (for HFC-134a(R134a))>REPLACEMENT
8.INSPECT REFRIGERANT LEAK (for Condenser)
- NOTICE:
- ·
Once an O-ring has been removed, be sure to replace it with a new one even if it appears normal.
·Because there could be malfunctions in more than one location, be sure to perform all work procedures.
·If all parts related to piping connections were checked and no defects were found, it is possible that sealing performance was temporarily degraded due to foreign matter contamination or deformation of O-rings.
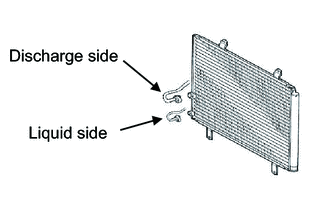
Remove the refrigerant line.
- NOTICE:
- ·
Wipe the area around the connecting portions with a clean piece of cloth before disassembly.
·To prevent damage to the sealing surfaces or shedding of foreign matter adhesions, be sure to remove the parts by slowly pulling them straight out.
Remove the refrigerant line from the condenser assembly.
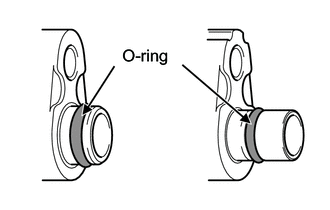
Inspect the piping O-ring surface.
- NOTICE:
- ·
Be sure to perform the O-ring inspection in a brightly-lit work area.
·If the O-ring surface condition is hard to see due to oil, etc., it can be degreased to improve visibility. However, when degreasing, be careful not to lose any foreign matter which may be adhering to the surface.
Check the entire surface of the O-ring, and if cuts, crushing, indentation, foreign matter contamination, or twisting are found, clean or replace as necessary.
Click hereVehicle Interior>HEATING / AIR CONDITIONING>REFRIGERANT (for HFC-134a(R134a))>REPLACEMENT
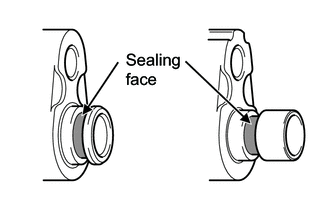
Inspect the piping sealing face.
- NOTICE:
-
When removing O-rings, be careful not to damage the O-ring or the sealing face.
Remove the O-ring.
Check the sealing face of the piping, and if foreign matter adhesion, scratches, or corrosion are found, clean or replace as necessary.
Click hereVehicle Interior>HEATING / AIR CONDITIONING>REFRIGERANT (for HFC-134a(R134a))>REPLACEMENT
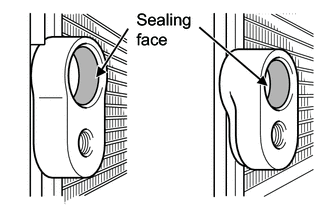
Inspect the condenser sealing face.
- NOTICE:
-
If the O-ring surface condition is hard to see due to oil, etc., it can be degreased to improve visibility. However, when degreasing, be careful not to lose any foreign matter which may be adhering to the surface.
Check the sealing face of the condenser, and if foreign matter adhesion, scratches, or corrosion are found, clean or replace as necessary.
Click hereVehicle Interior>HEATING / AIR CONDITIONING>REFRIGERANT (for HFC-134a(R134a))>REPLACEMENT
9.INSPECT REFRIGERANT LEAK (for Compressor)
- NOTICE:
- ·
Once an O-ring has been removed, be sure to replace it with a new one even if it appears normal.
·Because there could be malfunctions in more than one location, be sure to perform all work procedures.
·If all parts related to piping connections were checked and no defects were found, it is possible that sealing performance was temporarily degraded due to foreign matter contamination or deformation of O-rings.
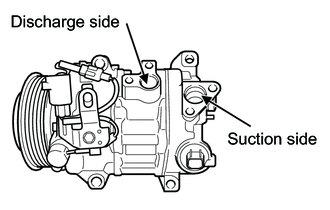
Remove the refrigerant line.
- NOTICE:
- ·
Wipe the area around the connecting portions with a clean piece of cloth before disassembly.
·To prevent damage to the sealing surfaces or shedding of foreign matter adhesions, be sure to remove the parts by slowly pulling them straight out.
Remove the refrigerant line from the compressor assembly.
Inspect the piping O-ring surface.
- NOTICE:
- ·
Be sure to perform the O-ring inspection in a brightly-lit work area.
·If the O-ring surface condition is hard to see due to oil, etc., it can be degreased to improve visibility. However, when degreasing, be careful not to lose any foreign matter which may be adhering to the surface.
Check the entire surface of the O-ring, and if cuts, crushing, indentation, foreign matter contamination, or twisting are found, clean or replace as necessary.
Click hereVehicle Interior>HEATING / AIR CONDITIONING>REFRIGERANT (for HFC-134a(R134a))>REPLACEMENT
Inspect the piping sealing face.
- NOTICE:
-
When removing O-rings, be careful not to damage the O-ring or the sealing face.
Remove the O-ring.
Check the sealing face of the piping, and if foreign matter adhesion, scratches, or corrosion are found, clean or replace as necessary.
Click hereVehicle Interior>HEATING / AIR CONDITIONING>REFRIGERANT (for HFC-134a(R134a))>REPLACEMENT
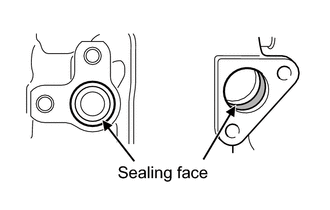
Inspect the compressor sealing face.
- NOTICE:
-
If the O-ring surface condition is hard to see due to oil, etc., it can be degreased to improve visibility. However, when degreasing, be careful not to lose any foreign matter which may be adhering to the surface.
Check the sealing face of the compressor, and if foreign matter adhesion, scratches, or corrosion are found, clean or replace as necessary.
Click hereVehicle Interior>HEATING / AIR CONDITIONING>REFRIGERANT (for HFC-134a(R134a))>REPLACEMENT
10.INSPECT REFRIGERANT LEAK (for Other Component)
- NOTICE:
- ·
Once an O-ring has been removed, be sure to replace it with a new one even if it appears normal.
·Because there could be malfunctions in more than one location, be sure to perform all work procedures.
·If all parts related to piping connections were checked and no defects were found, it is possible that sealing performance was temporarily degraded due to foreign matter contamination or deformation of O-rings.
Inspect the piping O-ring surface and component O-ring surface.
- NOTICE:
- ·
Be sure to perform the O-ring inspection in a brightly-lit work area.
·If the O-ring surface condition is hard to see due to oil, etc., it can be degreased to improve visibility. However, when degreasing, be careful not to lose any foreign matter which may be adhering to the surface.
Check the entire surface of the O-ring, and if cuts, crushing, indentation, foreign matter contamination, or twisting are found, clean or replace as necessary.
Click hereVehicle Interior>HEATING / AIR CONDITIONING>REFRIGERANT (for HFC-134a(R134a))>REPLACEMENT
Inspect the piping sealing face.
- NOTICE:
-
When removing O-rings, be careful not to damage the O-ring or the sealing face.
Remove the O-ring.
Check the sealing face of the piping, and if foreign matter adhesion, scratches, or corrosion are found, clean or replace as necessary.
Click hereVehicle Interior>HEATING / AIR CONDITIONING>REFRIGERANT (for HFC-134a(R134a))>REPLACEMENT
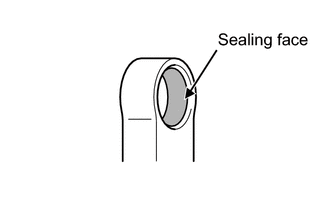
Inspect the component sealing face.
- NOTICE:
-
If the O-ring surface condition is hard to see due to oil, etc., it can be degreased to improve visibility. However, when degreasing, be careful not to lose any foreign matter which may be adhering to the surface.
Check the entire surface of the component sealing face, and if foreign matter adhesion, scratches, or corrosion are found, clean or replace as necessary.
Click hereVehicle Interior>HEATING / AIR CONDITIONING>REFRIGERANT (for HFC-134a(R134a))>REPLACEMENT
11.INSPECT REFRIGERANT LEAK (for O-ring)
- NOTICE:
-
Once an O-ring has been removed, be sure to replace it with a new one even if it appears normal.
Check that the O-ring has no defects.
12.INSPECT REFRIGERANT LEAK (for Sealing face)
- NOTICE:
-
Once an O-ring has been removed, be sure to replace it with a new one even if it appears normal.
Check that the sealing face of the ring installation area has no defects.
13.INSPECT REFRIGERANT LEAK (for Component Connection)
Check that the sealing face of the component connection area has no defects.