C551 MANUAL TRANSMISSION / TRANSAXLE MANUAL TRANSAXLE UNIT REASSEMBLY
PROCEDURE

 33134B
1.INSTALL OUTPUT SHAFT COVER
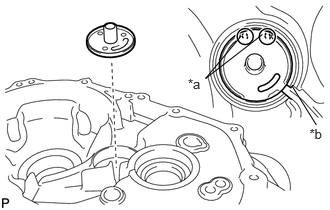
| *a | Protrusion |
| *b | Oil Groove |
Install the output shaft cover to the manual transaxle case as shown in the illustration.
33321N
2.INSTALL OUTPUT SHAFT FRONT BEARING
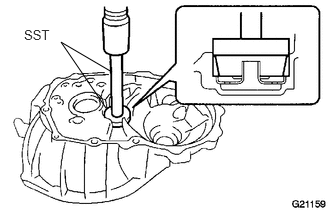
Using SST and a press, press in the output shaft front bearing (outer race) to the manual transaxle case.
- SST
- 09950-60010 (09951-00510)
09950-70010 (09951-07150)
41311E
3.INSTALL FRONT DIFFERENTIAL CASE FRONT TAPERED ROLLER BEARING
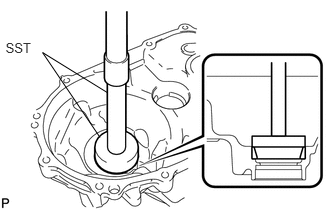
Using SST and a press, press in the front differential case front tapered roller bearing (outer race) to the manual transaxle case.
- SST
- 09950-60010 (09951-00510)
09950-70010 (09951-07150)
41311F
4.INSTALL FRONT DIFFERENTIAL CASE REAR TAPERED ROLLER BEARING
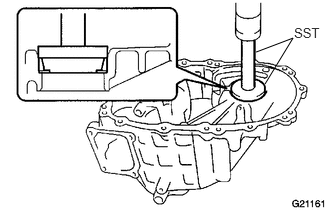
Install the differential case shim to the manual transmission case.
- HINT:
-
When reusing the front differential case rear tapered roller bearing, reuse the original shim. When installing a new front differential case rear tapered roller bearing, first select and install a shim which is thinner than the original.
- SST
- 09950-60020 (09951-00710)
09950-70010 (09951-07200)
Using SST and a press, press in the front differential case rear tapered roller bearing (outer race).
5.ADJUST DIFFERENTIAL SIDE BEARING PRELOAD
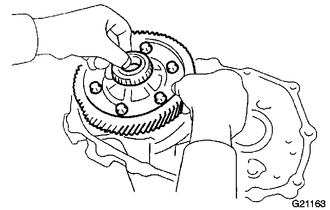
Coat the differential case with gear oil, and install the differential case assembly to the manual transaxle case.
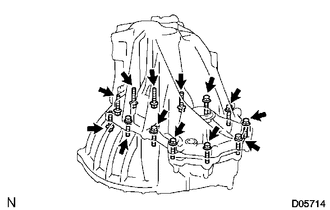
Install the manual transmission case with the 13 bolts.
- Torque:
- 29.4 N*m (300 kgf*cm, 22 ft.*lbf)
- HINT:
-
From manual transmission case side: 8 bolts
-
From manual transaxle case side: 5 bolts
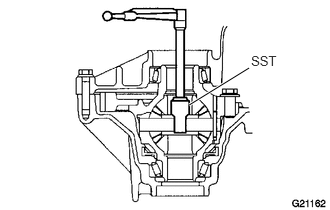
Using SST and a torque wrench, turn the differential case right and left 2 or 3 times to allow the bearings to settle.
- SST
- 09564-32011
Using SST and a torque wrench, measure the starting preload.
- SST
- 09564-32011
- New bearing preload:
0.78 to 1.57 N*m (7.96 to 16.00 kgf*cm, 6.9 to 13.89 in.*lbf)
- Used bearing preload:
0.49 to 0.98 N*m (5.00 to 1.00 kgf*cm, 4.33 to 8.67 in.*lbf)
If the preload is not as specified, replace the differential case shim with one of a different thickness. Use the table below to select a differential case shim which will ensure that the preload is within the specification.
- Differential Case Shim Thickness:
Part No. Mark Thickness
mm (in.)90564-41065 01 1.100 (0.0433) 90564-41066 02 1.150 (0.0453) 90564-41067 03 1.200 (0.0472) 90564-41068 04 1.250 (0.0492) 90564-41069 05 1.300 (0.0512) 90564-41070 06 1.350 (0.0532) 90564-41071 07 1.400 (0.0551) 90564-41072 08 1.450 (0.0571) 90564-41073 09 1.500 (0.0590) 90564-41074 10 1.550 (0.0610) 90564-41075 11 1.600 (0.0630) 90564-41076 12 1.650 (0.0650) 90564-41077 13 1.700 (0.0669) 90564-41078 14 1.750 (0.0689) 90564-41079 15 1.800 (0.0709) 90564-41080 16 1.850 (0.0728) 90564-41081 17 1.900 (0.0748) 90564-41082 18 1.950 (0.0768) 90564-41083 19 2.000 (0.0787)
- HINT:
- ·
Select a thicker differential case shim to increase the preload, or a thinner differential case shim to decrease the preload.
·Make a memo, as the torque values will be needed to adjust output shaft bearing preload procedure.
Remove the 13 bolts and manual transmission case from the manual transaxle case.
Remove the differential case assembly from the manual transaxle case.
33321A
6.INSTALL OUTPUT SHAFT REAR BEARING
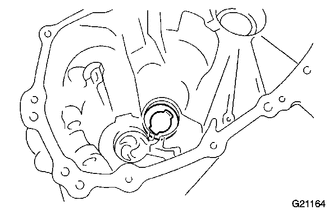
Install the rear output shaft bearing shim to the manual transmission case.
- HINT:
-
When reusing the rear output shaft bearing shim, reuse the original shim. When installing a new rear output shaft bearing shim, first select and install a shim which is thinner than the original.
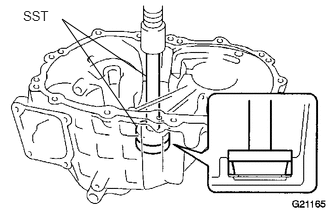
Using SST and a press, press in the rear output shaft bearing (outer race) to the manual transmission case.
- SST
- 09950-60010 (09951-00570)
09950-70010 (09951-07200)
7.ADJUST OUTPUT SHAFT BEARING PRELOAD
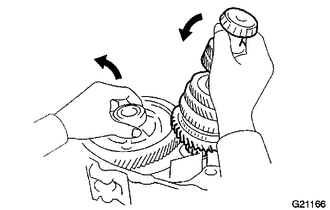
Install the output shaft assembly and differential case to the manual transaxle case.
Install the manual transmission case to the manual transaxle case with the 13 bolts.
- Torque:
- 29.4 N*m (300 kgf*cm, 22 ft.*lbf)
- HINT:
-
For manual transmission case side: 8 bolts
-
For manual transaxle case side: 5 bolts
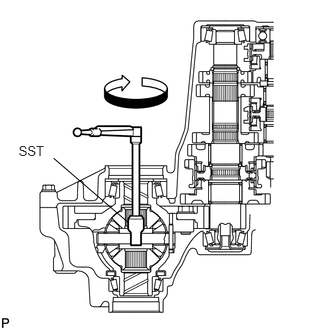
Using SST and a torque wrench, turn the differential case assembly and output shaft assembly clockwise and counterclockwise 2 or 3 times to allow the bearings to settle.
- SST
- 09564-32011
Using SST and a torque wrench, measure the preload (value A). Calculate the rear output shaft bearing preload using the following formula.
- Formula:
Value A - Differential side bearing preload = Output shaft bearing preload
- Preload (at starting):
- New bearing:
3.37 to 6.73 N*m (34.36 to 68.62 kgf*cm, 29.83 to 59.56 in.*lbf)
- Used bearing:
2.10 to 4.20 N*m (21.42 to 42.83 kgf*cm, 18.59 to 37.17 in.*lbf)
If the preload is not as specified, replace the rear output shaft bearing shim with one of a different thickness. Use the table below to select a rear output shaft bearing shim which will ensure that the reload is within the specification.
- Rear Output Shaft Bearing Shim Thickness:
Part No. Mark Thickness
mm (in.)90564-38001 A 1.550 (0.0610) 90564-38002 B 1.600 (0.0630) 90564-38003 C 1.650 (0.0650) 90564-38004 D 1.700 (0.0669) 90564-38005 E 1.750 (0.0689) 90564-38006 F 1.800 (0.0709) 90564-38007 G 1.850 (0.0728) 90564-38008 H 1.900 (0.0748) 90564-38009 J 1.950 (0.0768) 90564-38010 K 2.000 (0.0787) 90564-38011 L 2.050 (0.0807) 90564-38012 M 2.100 (0.0827) 90564-38013 N 2.150 (0.0846) 90564-38014 P 2.200 (0.0866) 90564-38015 Q 2.250 (0.0886)
- NOTICE:
-
Select a thicker bearing shim to increase the preload, or a thinner bearing shim to decrease the preload.
Remove the 13 bolts and the manual transmission case from the manual transaxle case.
Remove the output shaft assembly and differential case assembly from the manual transaxle case.
33311K
8.ADJUST REAR INPUT SHAFT BEARING SHIM
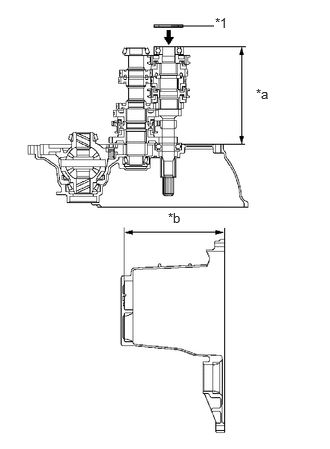
| *1 | Rear Input Shaft Bearing Shim |
| *a | Dimension A |
| *b | Dimension B |
Using a vernier caliper, accurately measure dimensions A and B shown in the illustration.
Calculate the rear input shaft bearing shim clearance using the following formula.
- Formula:
Dimension B - Dimension A - Rear input shaft bearing shim thickness = Between 0 mm and 0.1 mm (0.00394 in.)
If the clearance is not as specified, replace the rear input shaft bearing shim with one of a different thickness. Use the table below to select a rear input shaft bearing shim which will ensure that the clearance is within the specification.
- Rear Input Shaft Bearing Shim Thickness:
Part No. Mark Thickness
mm (in.)90564-38006 F 1.800 (0.0709) 90564-38007 G 1.850 (0.0728) 90564-38008 H 1.900 (0.0748) 90564-38009 J 1.950 (0.0768) 90564-38010 K 2.000 (0.0787) 90564-38011 L 2.050 (0.0807) 90564-38012 M 2.100 (0.0827) 90564-38013 N 2.150 (0.0846) 90564-38014 P 2.200 (0.0866) 90564-38015 Q 2.250 (0.0886) 90564-38016 R 2.300 (0.0906) 90564-38017 S 2.350 (0.0925) 90564-38018 T 2.400 (0.0945)
Coat the selected rear input shaft bearing shim with MP grease, and then replace the installed rear input shaft bearing shim with the selected one.
9.INSTALL TRANSMISSION CASE OIL SEAL
10.INSTALL TRANSAXLE CASE OIL SEAL
31105D
11.INSTALL FRONT TRANSAXLE CASE OIL SEAL
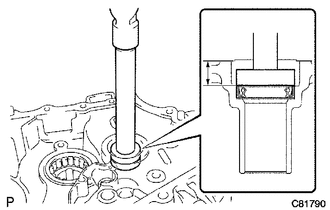
Using SST and a hammer, install a new front transaxle case oil seal to the manual transaxle case.
- SST
- 09710-20011 (09710-06071)
09950-70010 (09951-07150)
- Standard depth:
14.4 to 15.4 mm (0.567 to 0.606 in.)
- NOTICE:
-
Do not damage the lip of the front transaxle case oil seal.
Coat the tip of the front transaxle case oil seal with MP grease.
33449
12.INSTALL TRANSMISSION MAGNET
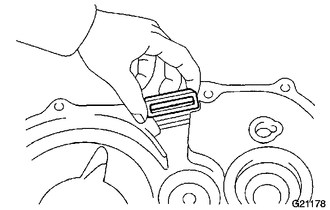
Clean the transmission magnet and install it to the manual transaxle case.
13.INSTALL NO. 2 OIL RECEIVER PIPE
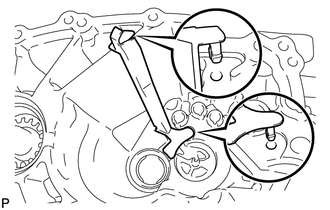
Align the 2 protrusions with the 2 holes of the manual transmission case and install the No. 2 oil receiver pipe to the manual transmission case as shown in the illustration.
- NOTICE:
-
Do not damage the No. 2 oil receiver pipe.
14.INSTALL DIFFERENTIAL CASE ASSEMBLY
Coat the differential case tapered roller bearing with gear oil, and install the differential case assembly to the manual transaxle case.
15.INSTALL OUTPUT SHAFT ASSEMBLY
Install the output shaft assembly to the manual transaxle case.
16.INSTALL INPUT SHAFT ASSEMBLY
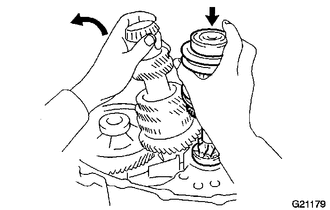
Coat the sliding and rotating surfaces of the input shaft assembly and output shaft assembly with gear oil and install them to the manual transaxle case.
- NOTICE:
-
Do not damage the lip of the front transaxle case oil seal.
33243A
17.INSTALL NO. 2 GEAR SHIFT FORK SHAFT
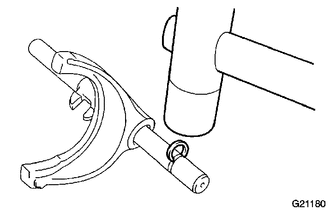
Install the No. 2 gear shift fork to the No. 2 gear shift fork shaft.
Using a plastic hammer, install a new snap ring to the No. 2 gear shift fork shaft.
Install the reverse shift fork to the No. 2 gear shift fork shaft.
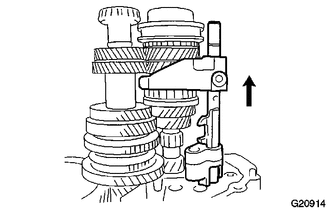
Shift the No. 2 transmission hub sleeve to the 4th gear position.
While aligning the No. 2 gear shift fork with the No. 2 transmission hub sleeve, install the No. 2 gear shift fork shaft together with the No. 2 gear shift fork and reverse shift fork to the manual transaxle case.
Clean and degrease the No. 2 gear shift fork bolt and installation hole.
Apply adhesive to 2 or 3 threads on the end of the No. 2 gear shift fork bolt.
- Adhesive:
Toyota Genuine Adhesive 1324, Three Bond 1324 or equivalent
- NOTICE:
-
To prevent contamination by foreign matter, install immediately after applying adhesive.
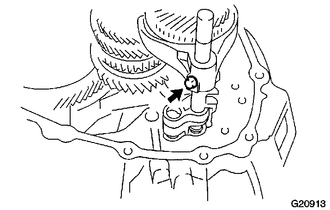
Install the No. 2 gear shift fork bolt to the No. 2 gear shift fork.
- Torque:
- 15.7 N*m (160 kgf*cm, 12 ft.*lbf)
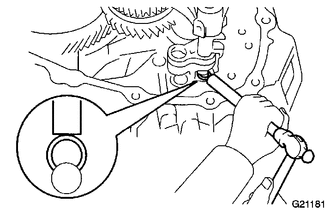
While lifting the reverse shift fork, using a brass bar and a hammer, install a new snap ring to the No. 2 gear shift fork shaft.
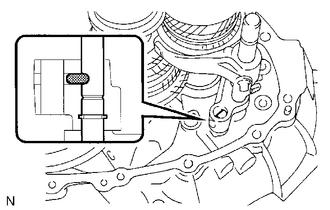
Install the straight pin to the reverse shift fork.
33244G
18.INSTALL NO. 3 GEAR SHIFT FORK SHAFT
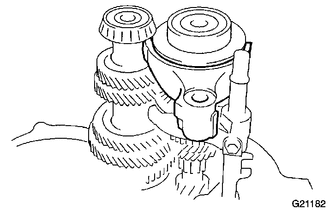
Install the No. 3 gear shift fork to the No. 3 transmission hub sleeve.
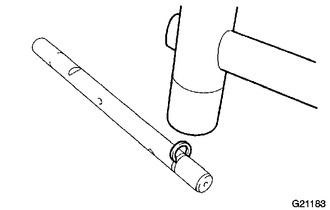
Using a plastic hammer, install a new snap ring to the No. 3 gear shift fork shaft.
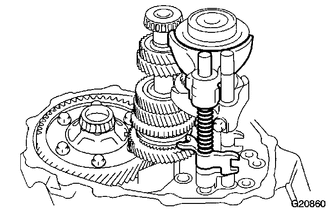
Pass the No. 3 gear shift fork shaft through the No. 3 gear shift fork, compression spring and No. 3 gear shift head, and then install them to the manual transaxle case.
Using a pin punch and a hammer, tap in the slotted spring pin to the No. 3 gear shift head to secure the No. 3 gear shift head to the No. 3 gear shift fork shaft.
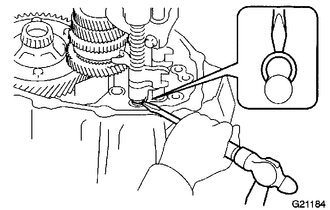
Using a screwdriver and a hammer, install a new snap ring to the No. 3 gear shift fork shaft.
Install the straight pin to the No. 3 gear shift fork.
33242
19.INSTALL NO. 1 GEAR SHIFT FORK SHAFT
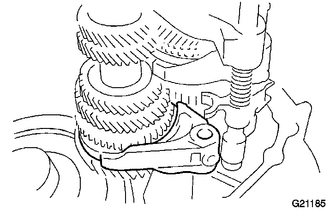
Install the No. 1 gear shift fork to the No. 1 transmission hub sleeve.
Using a plastic hammer, install a new snap ring to the No. 1 gear shift fork shaft.
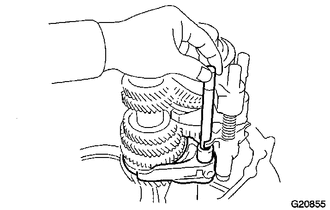
Pass the No. 1 gear shift fork shaft through the No. 1 gear shift head and No. 1 gear shift fork, and then install them to the manual transaxle case.
Using a pin punch and a hammer, tap in the slotted spring pin to the No. 1 gear shift head to secure the No. 1 gear shift head to the No. 1 gear shift fork shaft.
Clean and degrease the No. 1 gear shift fork bolt and installation hole.
Apply adhesive to 2 or 3 threads on the end of the No. 1 gear shift fork bolt.
- Adhesive:
Toyota Genuine Adhesive 1324, Three Bond 1324 or equivalent
- NOTICE:
-
To prevent contamination by foreign matter, install immediately after applying adhesive.
Install the No. 1 gear shift fork bolt to the No. 1 gear shift fork.
- Torque:
- 15.7 N*m (160 kgf*cm, 12 ft.*lbf)
33402
20.INSTALL REVERSE IDLER GEAR SUB-ASSEMBLY
Coat the reverse idler gear shaft with gear oil.
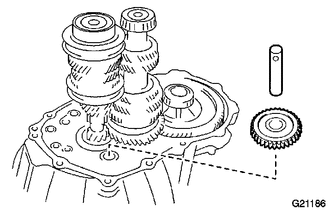
Install the reverse idler gear sub-assembly to the manual transaxle case, and then pass the reverse idler gear shaft through the reverse idler gear sub-assembly to install it.
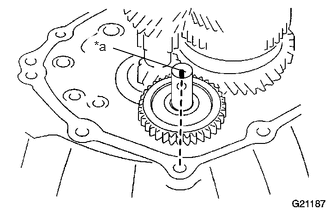
| *a | Alignment Mark |
Align the alignment mark on the reverse idler gear shaft with the bolt hole of the manual transaxle case as shown in the illustration.
33240
21.INSTALL REVERSE SHIFT ARM BRACKET ASSEMBLY
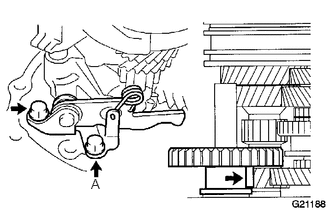
Clean and degrease the bolt A and installation hole.
Apply adhesive to 2 or 3 threads on the end of the bolt A.
- Adhesive:
Toyota Genuine Adhesive 1324, Three Bond 1324 or equivalent
- NOTICE:
-
To prevent contamination by foreign matter, install immediately after applying adhesive.
Install the reverse shift arm bracket assembly to the manual transaxle case with the 2 bolts.
- Torque:
- 17.2 N*m (175 kgf*cm, 13 ft.*lbf)
33111
22.INSTALL MANUAL TRANSMISSION CASE
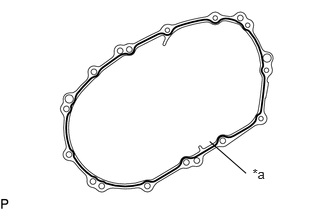
| *a | Seal Packing
(Seal Diameter: 1.2 mm (0.0472 in.)) |
Clean and degrease the contact surfaces of the manual transmission case and manual transaxle case.
Apply seal packing to the manual transmission case as shown in the illustration.
- Seal packing:
Toyota Genuine Seal Packing 1281, Three Bond 1281 or equivalent
- NOTICE:
-
Assemble the parts within 10 minutes of application. Otherwise, the seal packing material must be removed and reapplied.
Install the manual transmission case to the manual transaxle case with the 13 bolts.
- Torque:
- 29.4 N*m (300 kgf*cm, 22 ft.*lbf)
- HINT:
-
From manual transmission case side: 8 bolts
-
From manual transaxle case side: 5 bolts
33451H
23.INSTALL REVERSE IDLER GEAR SHAFT BOLT
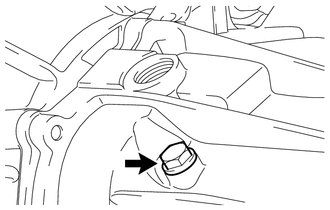
Clean and degrease the reverse idler gear shaft bolt and installation hole.
Apply adhesive to 2 or 3 threads on the end of the reverse idler gear shaft bolt.
- Adhesive:
Toyota Genuine Adhesive 1324, Three Bond 1324 or equivalent
- NOTICE:
-
To prevent contamination by foreign matter, install immediately after applying adhesive.
Install the reverse idler gear shaft bolt with a new gasket.
- Torque:
- 29.4 N*m (300 kgf*cm, 22 ft.*lbf)
24.INSTALL SHIFT AND SELECT LEVER SHAFT ASSEMBLY
Install the select return compression spring to the manual transmission case.
Clean and degrease the contact surfaces of the shift and select lever shaft assembly and manual transmission case.
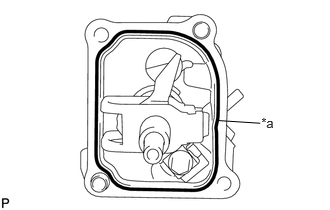
| *a | Seal Packing
(Seal Diameter: 1.2 mm (0.0472 in.)) |
Apply seal packing to the shift and select lever shaft assembly as shown in the illustration.
- Seal packing:
Toyota Genuine Seal Packing 1281, Three Bond 1281 or equivalent
- NOTICE:
-
Assemble the parts within 10 minutes of application. Otherwise, the seal packing material must be removed and reapplied.
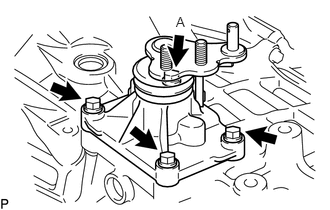
Clean and degrease the bolt A and installation hole.
Apply adhesive to 2 or 3 threads on the end of the bolt A.
- Adhesive:
Toyota Genuine Adhesive 1344, Three Bond 1344 or equivalent
- NOTICE:
-
To prevent contamination by foreign matter, install immediately after applying adhesive.
w/ Stop And Start System:
Install the shift and select lever shaft assembly and washer to the manual transmission case with the 4 bolts.
- Torque:
- 18 N*m (184 kgf*cm, 13 ft.*lbf)
w/o Stop And Start System:
Install the shift and select lever shaft assembly to the manual transmission case with the 4 bolts.
- Torque:
- 18 N*m (184 kgf*cm, 13 ft.*lbf)
33295B
25.INSTALL SHIFT GATE PIN
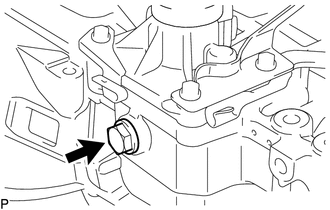
Clean and degrease the shift gate pin and installation hole.
Apply adhesive to 2 or 3 threads on the end of the shift gate pin.
- Adhesive:
Toyota Genuine Adhesive 1324, Three Bond 1324 or equivalent
- NOTICE:
-
To prevent contamination by foreign matter, install immediately after applying adhesive.
Install the shift gate pin to the manual transmission case.
- Torque:
- 36.8 N*m (375 kgf*cm, 27 ft.*lbf)
26.INSTALL NEUTRAL POSITION SWITCH (w/ Stop And Start System)
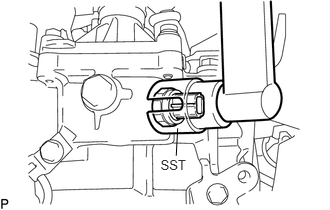
Using SST, install the neutral position switch with a new gasket to the manual transmission case.
- SST
- 09817-16011
- Torque:
- 40.2 N*m (410 kgf*cm, 30 ft.*lbf)
27.INSTALL CONTROL CABLE BRACKET
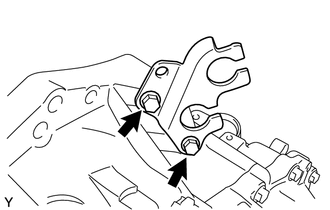
Install the control cable bracket with the 2 bolts.
- Torque:
- 11.3 N*m (115 kgf*cm, 8 ft.*lbf)
84210
28.INSTALL BACK-UP LIGHT SWITCH ASSEMBLY
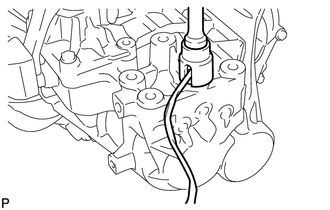
Using SST, install the back-up light switch assembly with a new gasket to the manual transmission case.
- SST
- 09817-16011
- Torque:
- 40.2 N*m (410 kgf*cm, 30 ft.*lbf)
Engage the 2 clamps to connect the wire harness connector.
33101A
29.INSTALL MANUAL TRANSAXLE FILLER PLUG
Install the manual transmission filler plug with a new gasket.
- Torque:
- 39.2 N*m (400 kgf*cm, 29 ft.*lbf)
33104
30.INSTALL MANUAL TRANSAXLE DRAIN PLUG
Install the manual transmission drain plug with a new gasket.
- Torque:
- 39.2 N*m (400 kgf*cm, 29 ft.*lbf)
31207A
31.INSTALL CLUTCH RELEASE FORK SHAFT OIL SEAL
31204
32.INSTALL CLUTCH RELEASE FORK SUB-ASSEMBLY
31230
33.INSTALL CLUTCH RELEASE BEARING ASSEMBLY
34.INSTALL NO. 1 CLUTCH HOUSING COVER