DOOR LOCK REAR DOOR LOCK INSTALLATION
CAUTION / NOTICE / HINT
- HINT:
- ·
Use the same procedure for the LH side and RH side.
·The following procedure is for the LH side.
PROCEDURE

 69780E
1.INSTALL REAR DOOR INSIDE LOCKING CABLE ASSEMBLY (w/o Double Locking System)
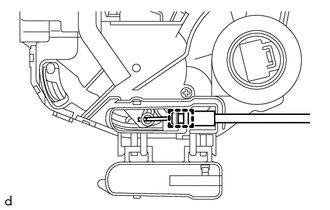
Engage the guide to install the rear door inside locking cable assembly to the rear door lock assembly.
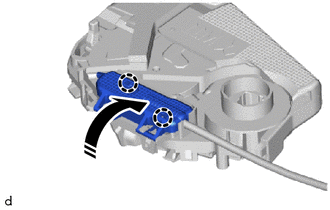

|
Install in this Direction |
Engage the claws as shown in the illustration.
69780E
2.INSTALL REAR DOOR INSIDE LOCKING CABLE ASSEMBLY (w/ Double Locking System)
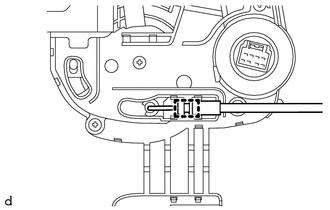
Engage the guide to install the rear door inside locking cable assembly to the rear door lock assembly.
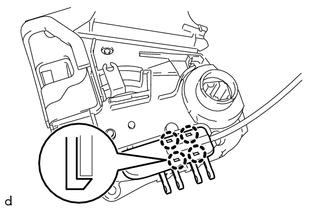
|
|
Install in this Direction |
Engage the claws as shown in the illustration.
69740E
3.INSTALL REAR DOOR LOCK REMOTE CONTROL CABLE ASSEMBLY (w/o Double Locking System)
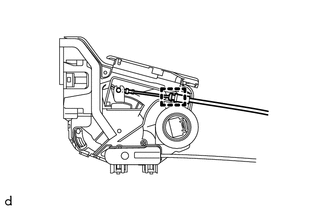
Engage the guide to install the rear door lock remote control cable assembly to the rear door lock assembly.
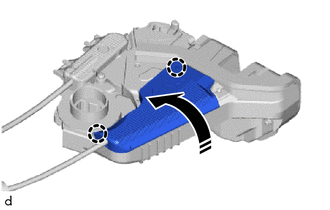
|
|
Install in this Direction |
Engage the claws as shown in the illustration.
69740E
4.INSTALL REAR DOOR LOCK REMOTE CONTROL CABLE ASSEMBLY (w/ Double Locking System)
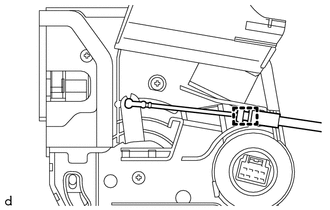
Engage the guide to install the rear door lock remote control cable assembly to the rear door lock assembly.
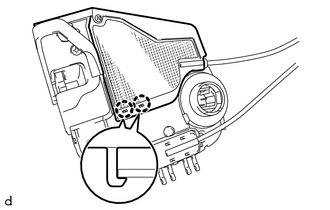
|
|
Install in this Direction |
Engage the claws as shown in the illustration.
69060A
5.INSTALL REAR DOOR LOCK ASSEMBLY
- NOTICE:
- ·
When reusing a removed rear door lock assembly, replace the door lock wiring harness seal with a new one.
·Do not allow grease or dust to adhere to the door lock wiring harness seal installation surface.
·Reusing a door lock wiring harness seal or using a damaged door lock wiring harness seal may cause water ingress. This may result in a malfunction of the rear door lock assembly.
Apply MP grease to the sliding parts of the rear door lock assembly.
When reusing the rear door lock assembly:
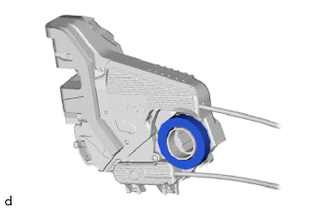
Install a new door lock wiring harness seal to the rear door lock assembly.
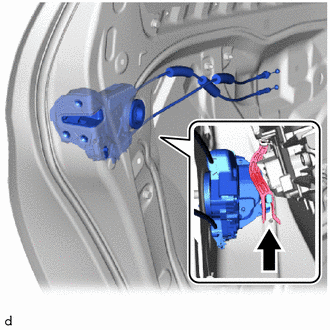
Connect the rear door lock assembly to the release plate of the rear door outside handle frame sub-assembly as shown in the illustration, and set it to the rear door panel.
- HINT:
-
Make sure that the release plate of the rear door outside handle frame sub-assembly is securely connected to the rear door lock assembly.
Using a T30 "TORX" socket wrench, install the rear door lock assembly with the 3 screws.
- Torque:
- 5.5 N*m (56 kgf*cm, 49 in.*lbf)
Connect the connector.
68104
6.INSTALL REAR DOOR GLASS SUB-ASSEMBLY
67408E
7.INSTALL REAR DOOR WINDOW DIVISION BAR SUB-ASSEMBLY
68152C
8.INSTALL REAR DOOR GLASS RUN
67842E
9.INSTALL REAR DOOR SERVICE HOLE COVER (w/ Rear Speaker)
67842E
10.INSTALL REAR DOOR SERVICE HOLE COVER (w/o Rear Speaker)
68199
11.INSTALL REAR DOOR BELT REAR SEAL
68197A
12.INSTALL REAR DOOR BELT FRONT SEAL
68174A
13.INSTALL REAR DOOR GLASS INNER WEATHERSTRIP
67604
14.INSTALL REAR DOOR TRIM BOARD SUB-ASSEMBLY
74272A
15.INSTALL REAR DOOR ARMREST BASE UPPER PANEL (w/o Power Window)
16.INSTALL REAR POWER WINDOW REGULATOR SWITCH ASSEMBLY WITH REAR DOOR ARMREST BASE UPPER PANEL (w/ Power Window)
67674A
17.INSTALL REAR DOOR FRAME GARNISH
69260E
18.INSTALL REAR DOOR WINDOW REGULATOR HANDLE ASSEMBLY (w/o Power Window)
19.CONNECT CABLE FROM NEGATIVE AUXILIARY BATTERY TERMINAL
for M15A-FKS:
Click hereGeneral>MAINTENANCE>M15A-FKS AUXILIARY BATTERY>INSTALLATION
for M15A-FXE:
Click hereGeneral>MAINTENANCE>M15A-FXE AUXILIARY BATTERY>INSTALLATION
for 1KR-FE:
Click hereGeneral>MAINTENANCE>1KR-FE AUXILIARY BATTERY>INSTALLATION
20. INITIALIZATION AFTER RECONNECTING AUXILIARY BATTERY TERMINAL
Click hereGeneral>SETUP>WHEN DISCONNECTING OR RECONNECTING BATTERY TERMINAL>WORK PROCEDURE
- HINT:
-
When disconnecting and reconnecting the auxiliary battery, there is an automatic learning function that completes learning when the respective system is used.
-
Click hereGeneral>SETUP>WHEN DISCONNECTING OR RECONNECTING BATTERY TERMINAL>AUTOMATIC LEARNING CHART
21. INITIALIZE POWER WINDOW CONTROL SYSTEM
22.INSPECT POWER WINDOW OPERATION