BRAKE CONTROL / DYNAMIC CONTROL SYSTEMS ELECTRONICALLY CONTROLLED BRAKE SYSTEM(for Gasoline Model TMC Made) C143A7E ABS Solenoid Control Module Actuator Stuck On C143A7F ABS Solenoid Control Module Actuator Stuck Off
DESCRIPTION
The ABS solenoid relay is built into the skid control ECU in the brake actuator assembly.
The ABS solenoid relay supplies power to the holding solenoid and reduction solenoid.
The solenoid relay is turned on 1.5 seconds after the ignition switch is turned to ON, and is turned off if an open or short in the solenoid is detected by self-diagnosis performed when the vehicle is starting off.
| DTC No. | Detection Item | DTC Detection Condition | Trouble Area | DTC Output from |
|---|---|---|---|---|
| C143A7E | ABS Solenoid Control Module Actuator Stuck On | When voltage at terminal +BS is 9.5 V or higher, solenoid relay is OFF, relay contact is ON continuously for 4.5 seconds or more. | Skid control ECU (brake actuator assembly) | Brake |
| C143A7F | ABS Solenoid Control Module Actuator Stuck Off | When voltage at terminal +BS is 9.5 V or higher and solenoid relay is ON, relay contact is OFF continuously for 0.22 seconds or more. | ·
Wire harness and connector ·
Skid control ECU (brake actuator assembly) |
Brake |
WIRING DIAGRAM
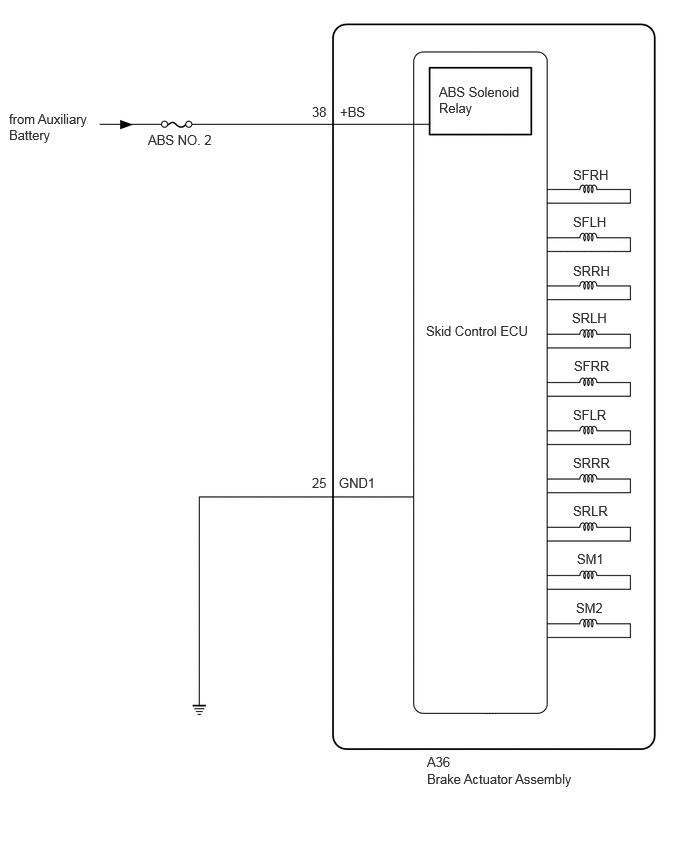
CAUTION / NOTICE / HINT
- NOTICE:
- ·
Inspect the fuses for circuits related to this system before performing the following procedure.
·After replacing the skid control ECU (brake actuator assembly), perform "Calibration".
- HINT:
-
When C137BA2 and/or C137BA3 is output together with C143A7E and/or C143A7F, inspect and repair the trouble areas indicated by C137BA2 and/or C137BA3 first.
-
for C137BA2: Click hereBrake>BRAKE CONTROL / DYNAMIC CONTROL SYSTEMS>ELECTRONICALLY CONTROLLED BRAKE SYSTEM (for Gasoline Model TMC Made)>C137BA2
-
for C137BA3: Click hereBrake>BRAKE CONTROL / DYNAMIC CONTROL SYSTEMS>ELECTRONICALLY CONTROLLED BRAKE SYSTEM (for Gasoline Model TMC Made)>C137BA3
PROCEDURE
Pre-procedure1
Make sure that there is no looseness at the locking part and the connecting part of the connectors.
- OK:
The connector is securely connected.
Disconnect the A36 skid control ECU (brake actuator assembly) connector.
Check both the connector case and the terminals for deformation and corrosion.
- OK:
No deformation or corrosion.
Procedure1
Measure the voltage according to the value(s) in the table below.
- Standard Voltage:
Tester Connection Condition Specified Condition A36-38 (+BS) - Body ground Always 11 to 14 V
Post-procedure1
None
- Result:
Proceed to OK NG
OK
NG
Measure the resistance according to the value(s) in the table below.
- Standard Resistance:
Tester Connection Condition Specified Condition A36-25 (GND1) - Body ground 1 minute or more after disconnecting the cable from the negative (-) auxiliary battery terminal Below 1 Ω
- Result:
Proceed to OK NG
OK
NG
Reconnect the A36 skid control ECU (brake actuator assembly) connector.
Operate the GTS to clear the codes.
- Chassis > Brake > Clear DTCs
- 50002 435
Press the DTC clear button.
Turn the ignition switch off.
- Result:
Proceed to NEXT
NEXT
Based on the Freeze Frame Data and interview with the customer, attempt to reproduce the conditions when the malfunction occurred.
Operate the GTS to read the DTCs.
- Chassis > Brake > Trouble Codes
- 50001 435
Check if the same DTC is output.
- Result:
Result Proceed to C143A7E and C143A7F are not output A C143A7E or C173A7F is output B
- HINT:
- ·
If a speed signal of 20 km/h (12 mph) or more is input to the skid control ECU (brake actuator assembly) with the ignition switch ON and the stop light switch assembly off, the ECU performs self-diagnosis of the solenoid circuit.
·If the normal system code is output (no DTCs are output), slightly jiggle the connectors, wire harnesses, and fuses of the skid control ECU (brake actuator assembly).
·If any DTCs are output while jiggling a connector or wire harness of the skid control ECU (brake actuator assembly), inspect and repair the connector or wire harness.
·If no DTCs were output when reconfirming DTCs, checking for intermittent problems is necessary because it is suspected that the original DTCs were stored due to the poor connection of a connector terminal.
A
Click hereGeneral>INTRODUCTION>HOW TO TROUBLESHOOT ECU CONTROLLED SYSTEMS>HOW TO PROCEED WITH TROUBLESHOOTING
B