BRAKE SYSTEM (OTHER) BRAKE MASTER CYLINDER(for Gasoline Model TMC Made RHD) INSTALLATION
PROCEDURE

 47201
1.INSTALL BRAKE MASTER CYLINDER SUB-ASSEMBLY
- NOTICE:
-
When installing a new brake master cylinder sub-assembly, remove the protectors from the master cylinder piston and outlet ports.
Install a new brake master cylinder O-ring to the brake master cylinder sub-assembly.
Install the brake master cylinder sub-assembly to the brake booster assembly with 2 nuts.
- Torque:
- 12.5 N*m (127 kgf*cm, 9 ft.*lbf)
- NOTICE:
- ·
The brake master cylinder sub-assembly requires careful handling. Do not drop or subject the brake master cylinder sub-assembly to any impact. Do not reuse a brake master cylinder sub-assembly that has been dropped.
·Do not hold the brake master cylinder sub-assembly by the master cylinder piston. Hold the brake master cylinder sub-assembly by its body or its brake master cylinder reservoir assembly when carrying it.
·Do not pull out the master cylinder piston.
·Do not strike or pinch the master cylinder piston, or cause any damage to the master cylinder piston by any other means.
·When installing the brake master cylinder sub-assembly to the brake booster assembly, or when removing the brake master cylinder sub-assembly from the brake booster assembly, make sure that the brake master cylinder sub-assembly is kept horizontal or with its tip facing downward (the master cylinder piston is facing upward) to prevent the master cylinder piston from falling out.
·Do not allow any foreign matter to contaminate the master cylinder piston. If any foreign matter gets on the master cylinder piston, remove it by using a piece of cloth and then apply an even layer of lithium soap base glycol grease around the circumference (sliding part) of the master cylinder piston.
·Do not use any other types of grease.
·Do not kink or damage the brake lines.
·Do not allow the brake lines to twist or interfere with other parts or the vehicle body during tightening.
·Do not allow any foreign matter such as dirt or dust to enter the brake lines from the connecting parts.
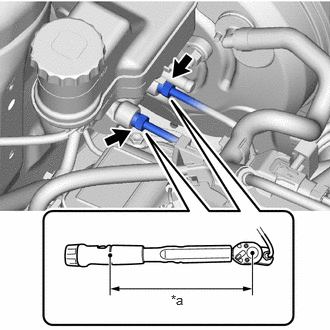
| *a | Torque Wrench Fulcrum Length |
Using a union nut wrench, connect the 2 brake lines to the brake master cylinder sub-assembly.
- Torque:
- Specified tightening torque : 19.5 N*m (199 kgf*cm, 14 ft.*lbf)
- NOTICE:
- ·
Do not kink or damage the brake lines.
·Do not allow the brake lines to twist or interfere with other parts or the vehicle body during tightening.
·Do not allow any foreign matter such as dirt or dust to enter the brake lines from the connecting parts.
- HINT:
- ·
Calculate the torque wrench reading when changing the fulcrum length of the torque wrench.
Click hereGeneral>INTRODUCTION>REPAIR INSTRUCTION>PRECAUTION
·When using a union nut wrench (fulcrum length of 20 mm (0.787 in.)) + torque wrench (fulcrum length of 162 mm (6.38 in.)): 17.4 N*m (177 kgf*cm, 13 ft.*lbf)
Connect the reservoir level switch connector.
31434E
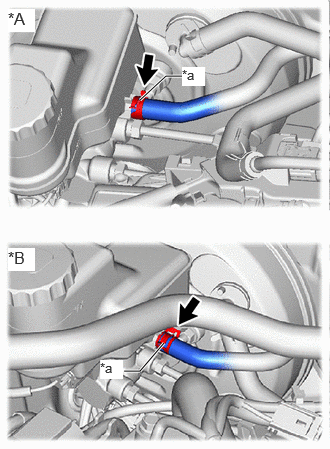
2.CONNECT NO. 1 CLUTCH RESERVOIR HOSE (for Manual Transaxle)
| *A | for M15A-FKS |
| *B | for G16E-GTS |
| *a | Paint Mark |
Connect the No. 1 clutch reservoir hose to the brake master cylinder reservoir assembly and slide the clip to secure it.
- NOTICE:
-
When connecting the No. 1 clutch reservoir hose, face the paint mark up.
55225
3.INSTALL DASH PANEL HEAT INSULATOR (for G16E-GTS)
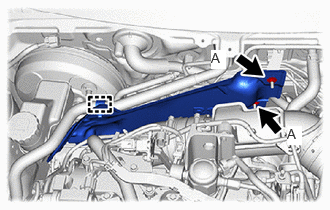
Temporarily install the dash panel heat insulator to the vehicle body with the 2 nuts (A) and clamp.
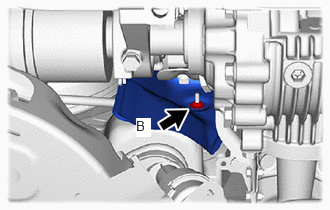
Install the nut (B).
- Torque:
- 5.0 N*m (51 kgf*cm, 44 in.*lbf)
Tighten the 2 nuts (A).
- Torque:
- 5.0 N*m (51 kgf*cm, 44 in.*lbf)
51410
4.INSTALL NO. 1 ENGINE UNDER COVER ASSEMBLY (for G16E-GTS)
5.BLEED BRAKE SYSTEM
6.BLEED CLUTCH LINE (for Manual Transaxle)
for EA67F:
Click hereDrivetrain>CLUTCH>CLUTCH SYSTEM (for EA67F)>BLEEDING
for EC6E:
Click hereDrivetrain>CLUTCH>CLUTCH SYSTEM (for EC6E)>BLEEDING
55701J
7.INSTALL OUTER COWL TOP PANEL SUB-ASSEMBLY
55735A
8.INSTALL WATER GUARD PLATE LH
55815E
9.INSTALL FRONT NO. 1 VENTILATOR SEAL
10.INSTALL WINDSHIELD WIPER MOTOR AND LINK