DOOR / HATCH FRONT DOOR(for 5 Door) REASSEMBLY
CAUTION / NOTICE / HINT
- HINT:
- ·
Use the same procedure for the LH side and RH side.
·The following procedure is for the LH side.
PROCEDURE

 67837B
1.INSTALL FRONT DOOR DUST PROOF SEAL (for TMMF Made)
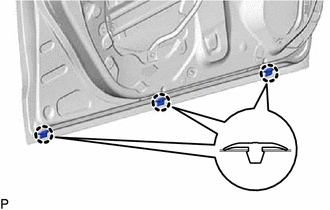
Engage the claws to install 3 new front door dust proof seals.
67837B
2.INSTALL FRONT DOOR DUST PROOF SEAL (for TMC Made)
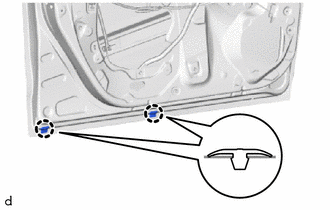
Engage the claws to install 2 new front door dust proof seals.
- NOTICE:
-
Even if there were 3 dust proof seals at the time of removal, install 2 dust proof seals as shown in the illustration.
3. REPAIR INSTRUCTION
75922M
4.INSTALL NO. 1 BLACK OUT TAPE
5.INSTALL CUSHION
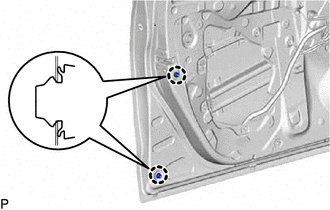
Engage the claws to install 2 new cushions.
67862
6.INSTALL FRONT DOOR WEATHERSTRIP
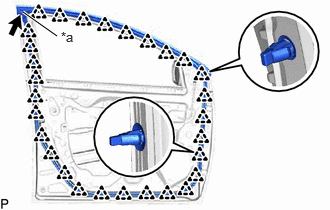
| *a | Clip A |
Engage the clip A and other clips to install the front door weatherstrip.
68620
7.INSTALL FRONT DOOR CHECK ASSEMBLY
Clean the bolt hole in the vehicle body.
Clean the threads of the bolt A.
Apply adhesive to the threads of the bolt A.
- Adhesive:
Toyota Genuine Adhesive 1324, Three Bond 1324 or equivalent
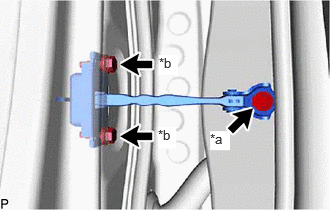
| *a | Bolt A |
| *b | Bolt B |
Install the front door check assembly with the bolt A and 2 bolts B.
- Torque:
- Bolt A : 30 N*m (306 kgf*cm, 22 ft.*lbf)
- Bolt B : 5.5 N*m (56 kgf*cm, 49 in.*lbf)
68210C
8.INSTALL FRONT DOOR GLASS OUTER WEATHERSTRIP ASSEMBLY
69312
9.INSTALL FRONT DOOR LOCK OPEN ROD
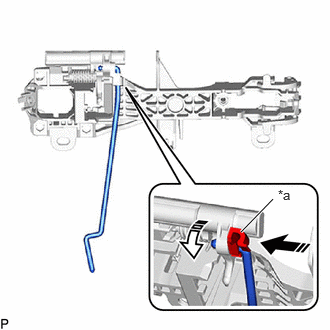
| *a | Snap |

|
Install in this Direction (1) |

|
Install in this Direction (2) |
Engage the snap to install the front door lock open rod to the front door outside frame sub-assembly as shown in the illustration.
69202A
10.INSTALL FRONT DOOR OUTSIDE HANDLE FRAME SUB-ASSEMBLY
Apply MP grease to the sliding parts on the front door outside handle frame sub-assembly.
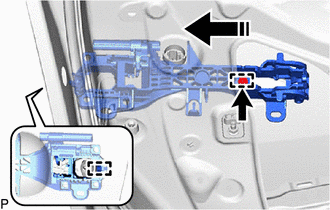
|
|
Install in this Direction |
Engage the guides to install the front door outside handle frame sub-assembly as shown in the illustration.
Using a T30 "TORX" socket wrench, tighten the screw.
- Torque:
- 4.0 N*m (41 kgf*cm, 35 in.*lbf)
w/ Entry and Start System:
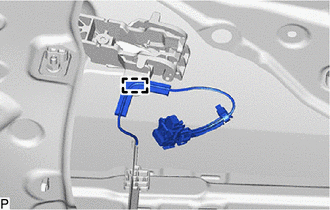
Engage the clamp to install the wire harness.
69040A
11.INSTALL FRONT DOOR LOCK ASSEMBLY
69242E
12.INSTALL FRONT DOOR OUTSIDE HANDLE REAR PAD
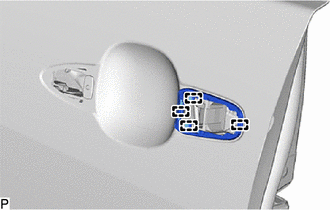
Engage the guides to install the front door outside handle rear pad.
69241H
13.INSTALL FRONT DOOR OUTSIDE HANDLE FRONT PAD
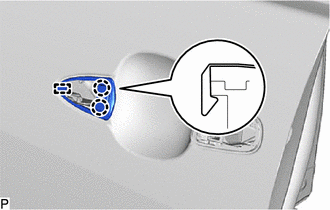
Engage the guide and claws to install the front door outside handle front pad.
14.INSTALL FRONT DOOR LOCK CYLINDER ASSEMBLY (for Driver Side)
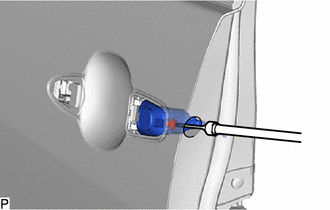
Install the front door lock cylinder assembly.
- HINT:
-
Check that the front door lock cylinder assembly is inserted into the front door lock with motor assembly.
Using a T30 "TORX" socket wrench, tighten the screw.
- Torque:
- 4.0 N*m (41 kgf*cm, 35 in.*lbf)
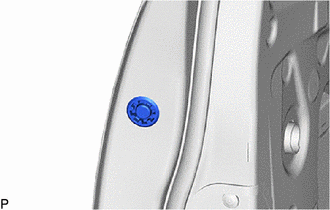
Install the hole plug.
69217F
15.INSTALL FRONT DOOR OUTSIDE HANDLE COVER (for Front Passenger Side)
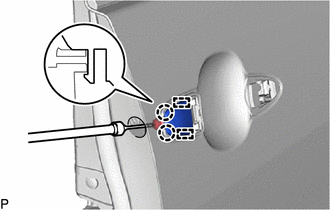
Engage the claws and guides to install the front door outside handle cover.
Using a T30 "TORX" socket wrench, tighten the screw.
- Torque:
- 4.0 N*m (41 kgf*cm, 35 in.*lbf)
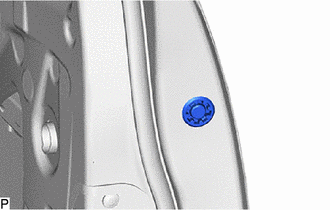
Install the hole plug.
69220
16.INSTALL FRONT DOOR OUTSIDE HANDLE ASSEMBLY
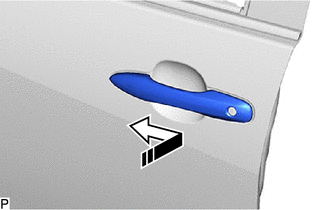
|
|
Install in this Direction |
Install the front door outside handle assembly as shown in the illustration.
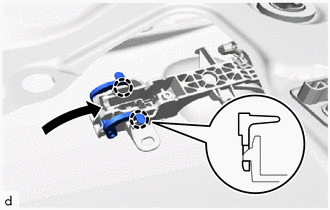
Move the lever and engage the claws as shown in the illustration.
w/ Entry andStart System:
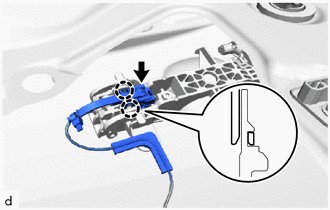
Connect the connector.
Engage the claws.
67402F
17.INSTALL FRONT DOOR FRONT LOWER FRAME SUB-ASSEMBLY
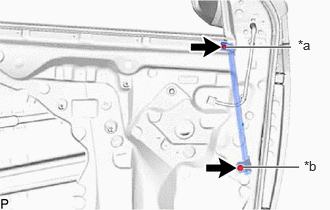
| *a | Bolt A |
| *b | Bolt B |
Install the front door front lower frame sub-assembly with the bolt A and bolt B.
- Torque:
- Bolt A : 6.0 N*m (61 kgf*cm, 53 in.*lbf)
- Bolt B : 8.5 N*m (87 kgf*cm, 75 in.*lbf)
67404F
18.INSTALL FRONT DOOR REAR LOWER FRAME SUB-ASSEMBLY
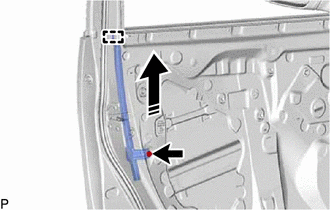
|
|
Install in this Direction |
Engage the guide to install the front door rear lower frame sub-assembly as shown in the illustration.
Install the bolt.
- Torque:
- 8.5 N*m (87 kgf*cm, 75 in.*lbf)
68151C
19.INSTALL FRONT DOOR GLASS RUN
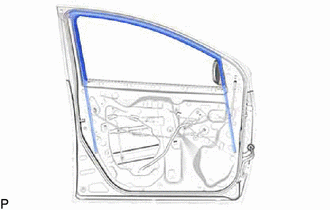
Install the front door glass run.
69820
20.INSTALL FRONT DOOR WINDOW REGULATOR ASSEMBLY
Apply MP grease to the sliding parts of the front door window regulator assembly.
Install the front door window regulator assembly with the 6 nuts.
- Torque:
- 8.0 N*m (82 kgf*cm, 71 in.*lbf)
Connect the connector.
68102
21.INSTALL FRONT DOOR GLASS SUB-ASSEMBLY
for Driver Side:
Connect the multiplex network master switch assembly.
Connect the cable to the negative (-) auxiliary battery terminal.
Move the front door glass sub-assembly so that the door glass bolt holes can be seen.
Disconnect the cable from the negative (-) auxiliary battery terminal.
Disconnect the multiplex network master switch assembly.
for Front Passenger Side:
Connect the power window regulator switch assembly.
Connect the cable to the negative (-) auxiliary battery terminal.
Move the front door glass sub-assembly so that the door glass bolt holes can be seen.
Disconnect the cable from the negative (-) auxiliary battery terminal.
Disconnect the power window regulator switch assembly.
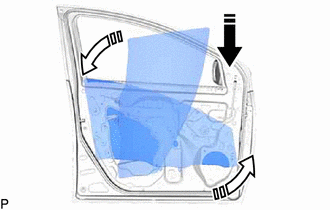
|
|
Install in this Direction (1) |
|
|
Install in this Direction (2) |
Insert the front door glass sub-assembly into the front door panel along the front door glass run as shown in the illustration.
- NOTICE:
-
Be careful not to damage the front door glass sub-assembly.
Install the front door glass sub-assembly with the 2 bolts.
- Torque:
- 8.0 N*m (82 kgf*cm, 71 in.*lbf)
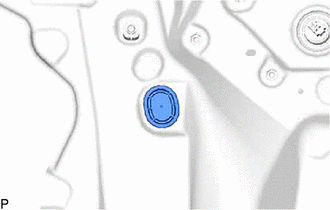
Install the hole plug.
8983AA
22.INSTALL SIDE AIRBAG PRESSURE SENSOR
67832
23.INSTALL FRONT DOOR SERVICE HOLE COVER
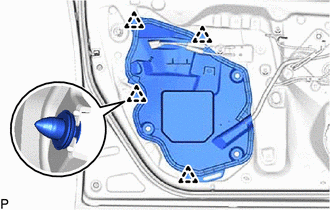
Pass the front door lock remote control cable assembly, front door inside locking cable assembly and wire harness through front door service hole cover.
Engage the clips to install the front door service hole cover.
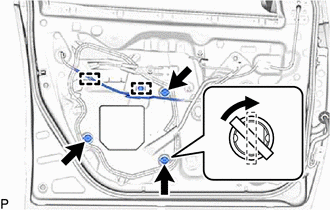
Engage the clamp and guide.
Insert the 3 front door service hole cover clips and turn them 45° as shown in the illustration.
87940
24.INSTALL OUTER REAR VIEW MIRROR ASSEMBLY (for TMC Made)
87940
25.INSTALL OUTER REAR VIEW MIRROR ASSEMBLY (for TMMF Made)
86160
26.INSTALL FRONT NO. 1 SPEAKER ASSEMBLY (w/ Front Speaker)
86262E
27.INSTALL FRONT SPEAKER COVER (w/o Front Speaker)
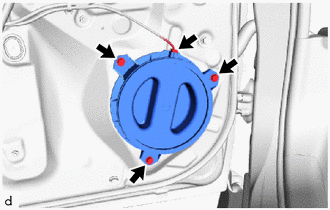
Install the front speaker cover with the 3 screws.
Connect the connector.
67856B
28.INSTALL FRONT DOOR PANEL PROTECTOR
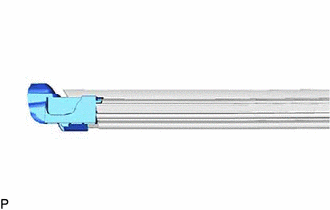
Install the front door panel protector to the front door glass inner weatherstrip.
67838A
29.INSTALL FRONT DOOR VENT SEAL
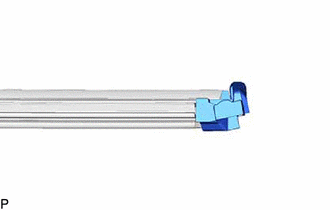
Install the front door vent seal to the front door glass inner weatherstrip.
68172A
30.INSTALL FRONT DOOR GLASS INNER WEATHERSTRIP
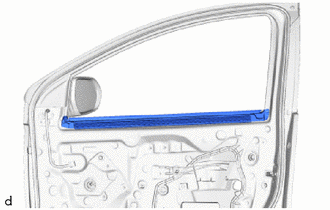
Install the front door glass inner weatherstrip with the front door panel protector and front door vent seal.
69284C
31.INSTALL FRONT DOOR INSIDE HANDLE BEZEL PLUG
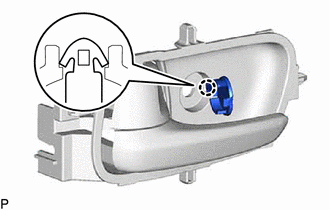
Engage the claw to install the front door inside handle bezel plug.
69206B
32.INSTALL FRONT DOOR INSIDE HANDLE SUB-ASSEMBLY
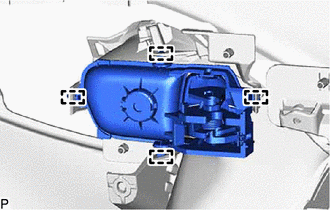
Engage the guides to install the front door inside handle sub-assembly.
67602
33.INSTALL FRONT DOOR TRIM BOARD SUB-ASSEMBLY
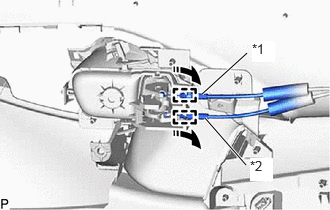
| *1 | Front Door Inside Locking Cable Assembly |
| *2 | Front Door Lock Remote Control Cable Assembly |
Engage the guides to connect the front door lock remote control cable assembly and front door inside locking cable assembly.
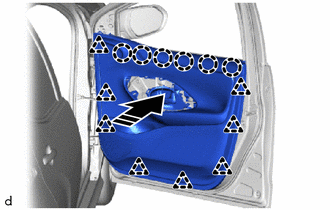
Engage the claws and clips to install the front door trim board sub-assembly as shown in the illustration.
Install the 3 screws.
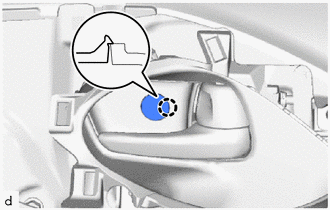
Engage the claw to close the front door inside handle bezel plug.
67656
34.INSTALL FRONT DOOR TRIM GARNISH
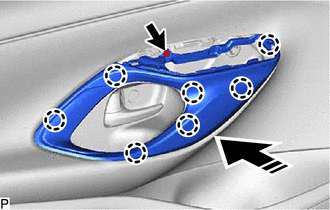
|
|
Install in this Direction |
Engage the claws to install the front door trim garnish as shown in the illustration.
Install the screw.
74232
35.INSTALL MULTIPLEX NETWORK MASTER SWITCH ASSEMBLY WITH FRONT ARMREST BASE UPPER PANEL (for Driver Side)
Connect the 2 connectors.
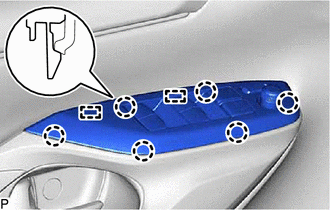
Engage the claws and guides to install the multiplex network master switch assembly with front door upper armrest base panel.
74231
36.INSTALL POWER WINDOW REGULATOR SWITCH ASSEMBLY WITH FRONT ARMREST BASE UPPER PANEL (for Front Passenger Side)
Connect the connector.
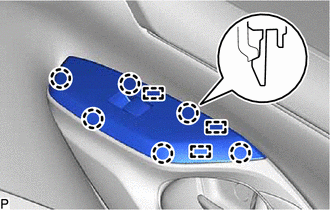
Engage the claws and guides to install the power window regulator switch assembly with front door upper armrest base panel.
67492A
37.INSTALL FRONT DOOR LOWER FRAME BRACKET GARNISH
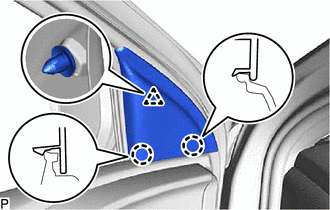
Engage the claws and clip to install the front door lower frame bracket garnish.
38.CONNECT CABLE TO NEGATIVE AUXILIARY BATTERY TERMINAL
for M15A-FKS:
Click hereGeneral>MAINTENANCE>M15A-FKS AUXILIARY BATTERY>INSTALLATION
for M15A-FXE:
Click hereGeneral>MAINTENANCE>M15A-FXE AUXILIARY BATTERY>INSTALLATION
for 1KR-FE:
Click hereGeneral>MAINTENANCE>1KR-FE AUXILIARY BATTERY>INSTALLATION
39. INITIALIZATION AFTER RECONNECTING AUXILIARY BATTERY TERMINAL
Click hereGeneral>SETUP>WHEN DISCONNECTING OR RECONNECTING BATTERY TERMINAL>WORK PROCEDURE
- HINT:
-
When disconnecting and reconnecting the auxiliary battery, there is an automatic learning function that completes learning when the respective system is used.
-
Click hereGeneral>SETUP>WHEN DISCONNECTING OR RECONNECTING BATTERY TERMINAL>AUTOMATIC LEARNING CHART
40.INSPECT SRS WARNING LIGHT
41.INITIALIZE POWER WINDOW CONTROL SYSTEM
42.INSPECT POWER WINDOW OPERATION