FRONT SUSPENSION FRONT LOWER SUSPENSION ARM(for TMC Made except G16E-GTS, LH Side) REMOVAL
CAUTION / NOTICE / HINT
The necessary procedures (adjustment, calibration, initialization, or registration) that must be performed after parts are removed, installed, or replaced during the front lower No. 1 suspension arm sub-assembly LH removal/installation are shown below.
| Replacement Part or Procedure | Necessary Procedure | Effect/Inoperative when not Performed | Link |
|---|---|---|---|
| Front wheel alignment adjustment | for HV Model:
1.
Perform "Reset Memory" 2.
Perform calibration (linear solenoid valve offset learning, SM solenoid valve offset learning, brake pedal stroke sensor assembly zero point calibration, system information memorization, and yaw rate and acceleration sensor zero point calibration) |
·
DTCs are stored ·
ABS warning light illuminates ·
Brake system warning light (yellow indicator) ·
Slip indicator light illuminates ·
VSC disabled or malfunctions |
( ) |
| for Gasoline Model:
Calibration |
·
DTCs are stored ·
ABS warning light illuminates ·
Slip indicator light illuminates ·
VSC disabled or malfunctions |
()
|
|
| Suspension, tires, etc.
(The vehicle height changes because of suspension or tire replacement.) |
·
Ultrasonic sensor detection angle ·
Ultrasonic sensor detection angle registration |
Parking support brake system | ()
|
| Rear television camera assembly optical axis (Back camera position setting) | Parking assist monitor system | ()
|
PROCEDURE

 1.REMOVE FRONT WHEEL
51451A
2.REMOVE CENTER ENGINE UNDER COVER
48069
3.SEPARATE FRONT LOWER NO. 1 SUSPENSION ARM SUB-ASSEMBLY LH
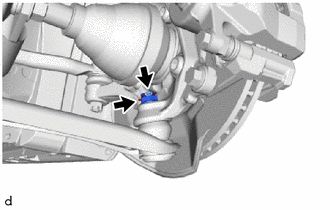
Remove the clip and nut from the front lower No. 1 suspension arm sub-assembly LH.
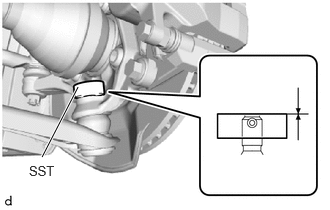
Install SST to the front lower No. 1 suspension arm sub-assembly LH as shown in the illustration.
- SST
- 09960-20010 (09961-02060)
- NOTICE:
-
Make sure that the upper ends of the front lower No. 1 suspension arm sub-assembly LH and SST are aligned.
Using SST, separate the front lower No. 1 suspension arm sub-assembly LH from the steering knuckle.
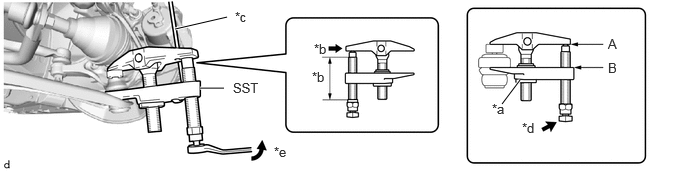
| *a | Center Nut | *b | Molybdenum grease application area |
| *c | String | *d | Place wrench here |
| *e | Turn | - | - |
- SST
- 09960-20010 (09961-02010, 09961-02060)
- CAUTION:
-
Apply molybdenum grease to the bolt threads and the tip of SST.
- NOTICE:
- ·
Be sure to tighten the string firmly to secure SST to the steering knuckle to prevent SST from falling off.
·Install SST with the center nut so that A and B shown in the illustration are parallel. Otherwise, the ball joint dust cover may be damaged.
·Be sure to place the wrench on the part indicated in the illustration.
·Do not damage the ball joint dust cover.
·Do not damage the steering knuckle.
·Do not damage the front disc brake dust cover.
·Do not damage the drive shaft outboard joint boot.
48069
4.REMOVE FRONT LOWER NO. 1 SUSPENSION ARM SUB-ASSEMBLY LH
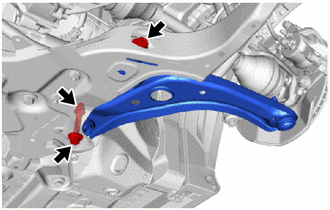
Remove the 2 bolts, nut and front lower No. 1 suspension arm sub-assembly LH from the front suspension crossmember sub-assembly.
- NOTICE:
-
Because the nut has its own stopper, do not turn the nut. Loosen the bolt with the nut secured.