BRAKE (REAR) REAR BRAKE(for 2-Pot Caliper) INSTALLATION
CAUTION / NOTICE / HINT
- HINT:
- ·
Use the same procedure for the RH side and LH side.
·The following procedure is for the LH side.
PROCEDURE

 42432
1.INSTALL REAR DISC
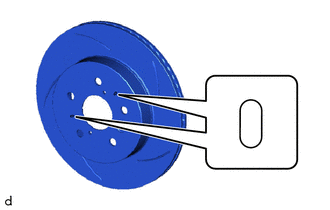
Check the identification marks and confirm the installation positions.
- NOTICE:
-
The rear disc needs to be installed to the correct side of the vehicle. The rear disc for the right wheel has grooves in the 2 locations shown in the illustration, while the rear disc for the left wheel has no grooves.
When reusing the rear disc:
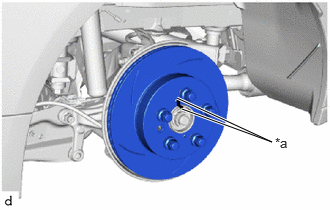
| *a | Matchmark |
Align the matchmarks of the rear disc and rear axle hub and bearing assembly, and install the rear disc.
When replacing the rear disc:
Inspect the rear disc runout.
Click hereBrake>BRAKE (REAR)>REAR BRAKE (for 2-Pot Caliper)>INSPECTION
Select the installation position where the rear disc has minimal runout, and install the rear disc.
Temporarily install the 5 hub nuts.
2.ADJUST PARKING BRAKE SHOE CLEARANCE
42491
3.INSTALL PARKING BRAKE SHOE ADJUSTING HOLE PLUG
Install the parking brake shoe adjusting hole plug to the rear disc.
47850
4.INSTALL REAR DISC BRAKE CYLINDER ASSEMBLY
Install the rear disc brake cylinder assembly to the rear axle carrier sub-assembly with the 2 bolts.
- Torque:
- 107 N*m (1091 kgf*cm, 79 ft.*lbf)
47319F
5.CONNECT REAR FLEXIBLE HOSE
Connect the rear flexible hose to the rear disc brake cylinder assembly with a new union bolt and a new gasket.
- Torque:
- 39.2 N*m (400 kgf*cm, 29 ft.*lbf)
- NOTICE:
-
Install the rear flexible hose lock securely into the lock hole in the rear disc brake cylinder assembly.
04946
6.INSTALL REAR DISC BRAKE ANTI-SQUEAL SHIM KIT
04466
7.INSTALL REAR DISC BRAKE PAD
47848
8.TEMPORARILY INSTALL REAR DISC BRAKE ANTI-RATTLE SPRING
47748E
9.INSTALL REAR DISC BRAKE ANTI-RATTLE PIN
47843
10.INSTALL REAR DISC BRAKE PIN HOLD CLIP
11.BLEED BRAKE LINE
12.INSPECT AND ADJUST PARKING BRAKE LEVER TRAVEL
13.INSTALL REAR WHEEL