G16E-GTS EMISSION CONTROL MONOLITHIC CONVERTER INSTALLATION
PROCEDURE

 25733A
1.INSTALL NO. 1 VACUUM PIPE (w/ Differential Pressure Sensor)
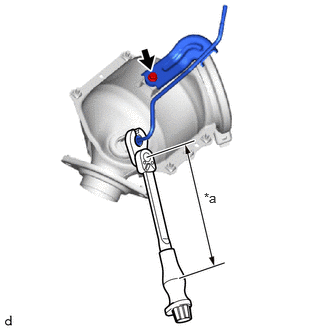
| *a | Torque Wrench Fulcrum Length |
Temporarily install a new No. 1 vacuum pipe to the exhaust manifold converter sub-assembly with the bolt.
- NOTICE:
-
Do not reuse the No. 1 pipe.
Temporarily the flange nut of the No. 1 vacuum pipe.
Tighten the bolt.
- Torque:
- 10 N*m (102 kgf*cm, 7 ft.*lbf)
Using a 14 mm union nut wrench, tighten the flange nut of the No. 1 vacuum pipe.
- Torque:
- Specified tightening torque : 30 N*m (306 kgf*cm, 22 ft.*lbf)
- HINT:
- ·
Calculate the torque wrench reading when changing the fulcrum length of the torque wrench.
Click hereGeneral>INTRODUCTION>REPAIR INSTRUCTION>PRECAUTION
·When using a 14 mm union nut wrench (fulcrum length of 25 mm (0.984 in.)) + torque wrench (fulcrum length of 180 mm (7.09 in.)): 26.3 N*m (268 kgf*cm, 19 ft.*lbf)
17279
2.INSTALL TURBINE OUTLET ELBOW GASKET
Install a new outlet turbine elbow gasket to the turbocharger sub-assembly.
25051
3.REPLACE EXHAUST MANIFOLD CONVERTER SUB-ASSEMBLY
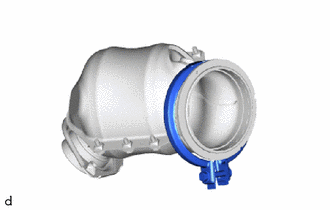
Temporary install a new exhaust pipe clamp to the exhaust manifold converter sub-assembly.
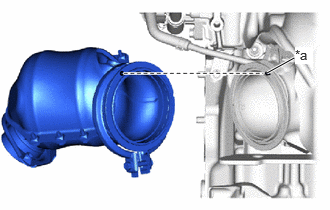
| *a | Pin |
Insert the stud bolt of the exhaust pipe support stay into the exhaust manifold converter sub-assembly, align the pin and assemble the exhaust manifold converter sub-assembly.
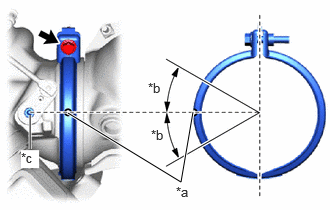
| *a | Paint Mark |
| *b | 25° |
| *c | Turbocharger Sub-assembly Link |
Align the paint mark within the area shown in the illustration and provisionally install the exhaust pipe clamp.
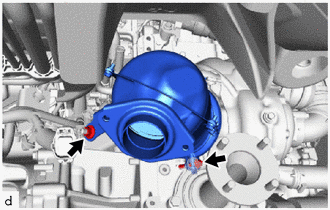
Install the nut.
- Torque:
- 43 N*m (438 kgf*cm, 32 ft.*lbf)
Tighten the bolt of exhaust pipe clamp.
- Torque:
- 18 N*m (184 kgf*cm, 13 ft.*lbf)
25760
4.CONNECT VACUUM TRANSMITTING HOSE ASSEMBLY (w/ Differential Pressure Sensor)
Install the vacuum transmitting hose assembly to the vacuum pipe and slide the clip to secure them.
51201
5.INSTALL FRONT SUSPENSION CROSSMEMBER SUB-ASSEMBLY
37100
6.INSTALL PROPELLER SHAFT WITH CENTER BEARING ASSEMBLY
89467B
7.INSPECT AIR FUEL RATIO SENSOR