GF1A TRANSFER / 4WD / AWD ACTIVE TORQUE SPLIT AWD SYSTEM 4WD Warning Light Remains ON
DESCRIPTION
The 4WD ECU assembly is connected to the combination meter assembly via the CAN communication system.
If the 4WD ECU assembly stores any DTCs which are related to the active torque split AWD system, the warning message is displayed on the multi-information display in the combination meter assembly.
WIRING DIAGRAM
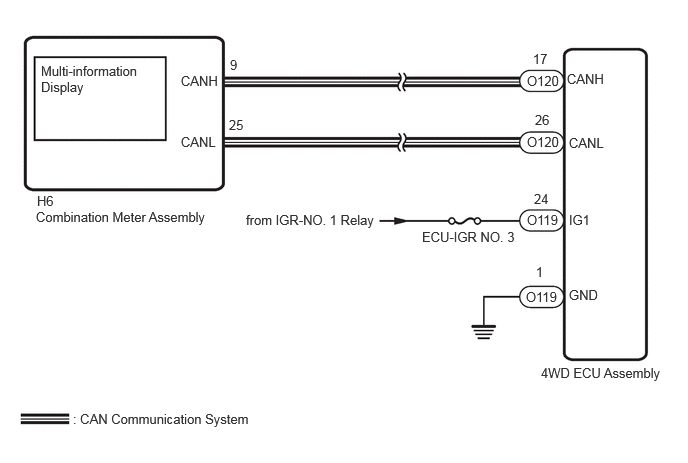
CAUTION / NOTICE / HINT
- NOTICE:
- ·
Inspect the fuses for circuits related to this system before performing the following inspection procedure.
·When the 4WD ECU assembly is replaced, before removing the 4WD ECU assembly, it is necessary to perform ECU Data Save to save the original 4WD ECU assembly information.
Click hereDrivetrain>GF1A (TRANSFER / 4WD / AWD)>ACTIVE TORQUE SPLIT AWD SYSTEM>CALIBRATION
- HINT:
-
Check the condition of each related circuit connector before troubleshooting.
PROCEDURE
Using the GTS, check for Vehicle Control History.
Click hereDrivetrain>GF1A (TRANSFER / 4WD / AWD)>ACTIVE TORQUE SPLIT AWD SYSTEM>VEHICLE CONTROL HISTORY
- Chassis > Four Wheel Drive > Utility
-
Tester Display Vehicle Control History (RoB) - 50005 448 1055
- HINT:
-
If vehicle control history is stored when the active torque split AWD system are suspended, the warning message is displayed.
- Result:
Result Proceed to There is no vehicle control history for when the active torque split AWD system were suspended. A There is vehicle control history for when the active torque split AWD system were suspended. B
A
B
Click hereDrivetrain>GF1A (TRANSFER / 4WD / AWD)>ACTIVE TORQUE SPLIT AWD SYSTEM>VEHICLE CONTROL HISTORY
- NOTICE:
-
After performing troubleshooting and repair regarding vehicle control history, clear the vehicle control history.
Check that there is no looseness at the locking and connecting parts of the 4WD ECU assembly connector.
Disconnect the O119 and O120 4WD ECU assembly connectors.
Check the connector case and the terminal for deformation and corrosion.
- OK:
No deformation or corrosion
Connect the O119 and O120 4WD ECU assembly connectors.
- Result:
Proceed to OK NG
OK
NG
Turn the ignition switch off.
Disconnect the O119 4WD ECU assembly connector.
Turn the ignition switch to ON.
Measure the voltage according to the value(s) in the table below.
- Standard Voltage:
Tester Connection Switch Condition Specified Condition O119-24 (IG1) - Body ground Ignition switch ON 11 to 14 V
- Result:
Proceed to OK NG
OK
NG
Turn the ignition switch off.
Disconnect the O119 4WD ECU assembly connector.
Measure the resistance according to the value(s) in the table below.
- Standard Resistance:
Tester Connection Condition Specified Condition O119-1 (GND) - Body ground Always Below 1 Ω
- Result:
Proceed to OK NG
OK
NG
According to the display on the GTS, read the Data List.
- Chassis > Four Wheel Drive > Data List
-
Tester Display Measurement Item Range Normal Condition Diagnostic Note 4WD Warning Light 4WD/AWD warning (multi-information display) OFF / ON OFF: Warning off
ON: Warning on-
- Chassis > Four Wheel Drive > Data List
-
Tester Display 4WD Warning Light - 50003 448 114
Check the GTS display condition of the 4WD/AWD warning light.
- Result:
Result Proceed to Display of the Data List remains OFF A Display of the Data List remains ON B
A
Click hereVehicle Interior>METER / GAUGE / DISPLAY>METER / GAUGE SYSTEM>HOW TO PROCEED WITH TROUBLESHOOTING
B