P0139 Oxygen Sensor Circuit Slow Response (Bank 1 Sensor 2)
Diagnostic trouble codes · Vehicles built from Aug 2005
DESCRIPTION
In order to obtain a high purification rate for the carbon monoxide (CO), hydrocarbon (HC) and nitrogen oxide (NOx) components in the exhaust gas, a Three-Way Catalytic Converter (TWC) is used. For the most efficient use of the TWC, the air-fuel ratio must be precisely controlled so that it is always close to the stoichiometric air-fuel ratio. The heated oxygen sensor has the characteristic whereby its output voltage changes suddenly in the vicinity of the stoichiometric air-fuel ratio. This is used to detect the oxygen concentration in the exhaust gas and provide the ECM with feedback to control the air-fuel ratio. When the air-fuel ratio becomes lean, the oxygen concentration in the exhaust gas increases. The heated oxygen sensor informs the ECM of the lean condition (low voltage, i.e. less than 0.45 V). When the air-fuel ratio is richer than the stoichiometric air-fuel level, the oxygen concentration in the exhaust gas is reduced. And the heated oxygen sensor informs the ECM of the rich condition (high voltage, i.e. more than 0.45 V). The ECM judges, using the voltage output of the heated oxygen sensor, whether the air-fuel ratio is rich or lean and controls the injection time accordingly. If a malfunction of the heated oxygen sensor causes an output of abnormal voltage, the ECM is unable to perform accurate air-fuel ratio control. The heated oxygen sensor includes a heater which heats the zirconia element. The heater is controlled by the ECM. When the intake air volume is low (the temperature of the exhaust gas is low), a current flows to the heater in order to heat the sensor for accurate oxygen concentration detection.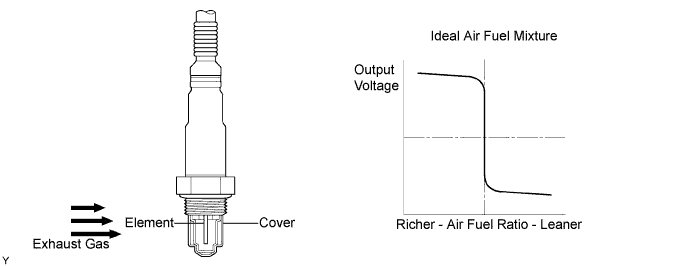

| DTC No. |
DTC Detection Condition |
Trouble Area |
| P0139 |
While driving for 10 minutes or more at vehicle speed of 70 to 110 km/h (44 to 68 mph) with transmission in 5th, heated oxygen sensor (sensor 2) signal does not switch from rich to lean or vice versa for 50 seconds (3 trip detection logic). |
|
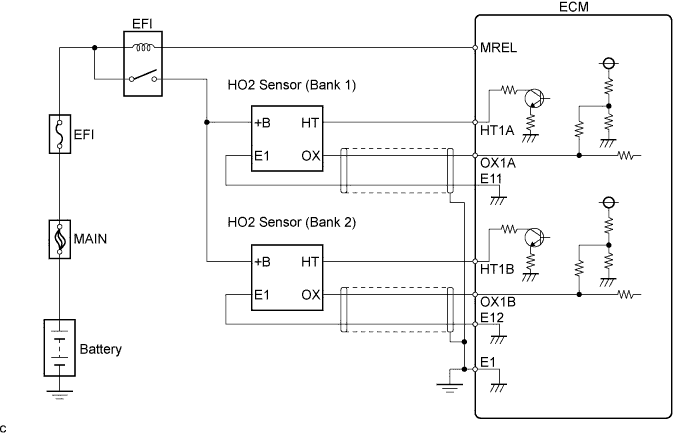
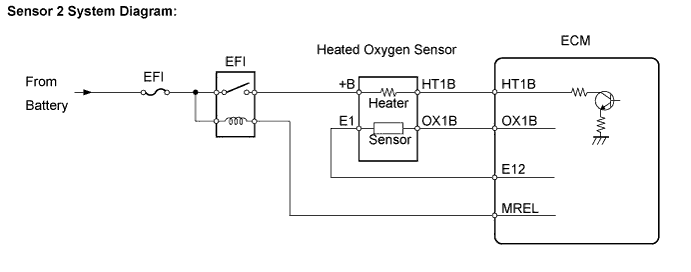
WIRING DIAGRAM
CONFIRMATION DRIVING PATTERN
- CAUTION:
- Strictly observe traffic laws when performing the confirmation driving pattern.
INSPECTION PROCEDURE
- HINT:
- Read freeze frame data using the intelligent tester. The ECM records vehicle and driving condition information as freeze frame data the moment a DTC is stored. When troubleshooting, freeze frame data can help determine if the vehicle was moving or stationary, if the engine was warmed up or not, if the air-fuel ratio was lean or rich, and other data from the time the malfunction occurred
| 1. CHECK ANY OTHER DTC OUTPUT (IN ADDITION TO DTC P0139) |

Connect the intelligent tester to the DLC3.
Turn the ignition switch on (IG) and turn the tester ON.
Select the following menu items: Powertrain / Engine and ECT / DTC.
Read DTCs.
- Result:
Display (DTC Output)
Proceed To
P0139
A
P0139 and other DTCs
B
- HINT:
- If any DTCs other than P0139 are output, troubleshoot those DTCs first.
|
|
||||

| A | |
 |
| 2. PERFORM ACTIVE TEST USING INTELLIGENT TESTER (Control the Injection Volume for A/F Sensor) |
Connect the intelligent tester to the DLC3.
Start the engine and turn the intelligent tester ON.
Warm up the engine.
Run the engine at 2,500 rpm for approximately 3 minutes.
On the intelligent tester, select the following menu items: Powertrain / Engine and ECT / Active Test / Control the Injection Volume for A/F Sensor (A/F Control).
Perform the A/F control operation with the engine in an idling condition (press the right or left button to change the fuel injection volume).
Monitor the voltage output of the heated oxygen sensors (O2S B1S1 and O2S B1S2) displayed on the tester.
- Result:
- The heated oxygen sensor reacts in accordance with increases and decreases of the fuel injection volume:
- +25 % = Rich output:
- More than 0.5 V
- -12.5 % = Lean output:
- Less than 0.4 V
- NOTICE:
- Sensor 1 (front sensor) has an output delay of a few seconds.
- Sensor 2 (rear sensor) has a maximum output delay of approximately 20 seconds.
- Sensor 1 (front sensor) has an output delay of a few seconds.
The following procedure enables the technician to check and graph the voltage outputs of both the heated oxygen sensors.To display the graph, select the following menu items on the tester: View / Line Graph.Output voltage of heated oxygen sensor (sensor 1: front sensor)
Output voltage of heated oxygen sensor (sensor 2: rear sensor)
Mainly suspected trouble area
Case 1
Injection Volume
+25 %
-12.5 %

Injection Volume
+25 %
-12.5 %
-
Output voltage
More than 0.5 V
Less than 0.4 V

Output voltage
More than 0.5 V
Less than 0.4 V

Case 2
Injection Volume
+25 %
-12.5 %
Injection Volume
+25 %
-12.5 %
- Heated oxygen sensor (Sensor 2)
Output voltage
Almost no reaction
Output voltage
More than 0.5 V
Less than 0.4 V
Case 3
Injection Volume
+25 %
-12.5 %
Injection Volume
+25 %
-12.5 %
- Extremely rich or lean actual air-fuel ratio
- Injector leakage or blockage
- Gas leakage from exhaust system
- Ignition system
- Fuel pressure
- Manifold absolute pressure sensor
- Engine coolant temperature sensor
Output voltage
Almost no reaction
Output voltage
Almost no reaction
- HINT:
- If the vehicle is short of fuel, the air-fuel ratio becomes lean and the heated oxygen sensor DTCs are recorded, and then the MIL illuminates.
- Result:
Result
Proceed To
Case 1
C
Case 2
A
Case 3
B
|
|
||||
|
|
||||

| A | |
|
| Go to step 2 |
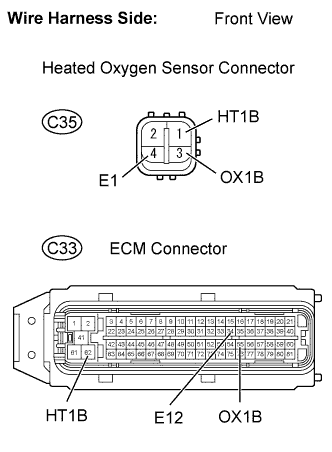
| 3. CHECK HARNESS AND CONNECTOR (HEATED OXYGEN SENSOR (SENSOR 2) - ECM) |
 |
Disconnect the heated oxygen sensor (sensor 2) connector.
Disconnect the ECM connector.
Check the resistance.
- Standard resistance (Check for open):
Tester Connection
Specified Condition
OX1B (C35-3) - OX1B (C33-55)
Below 1 Ω
HT1B (C35-1) - HT1B (C33-62)
Below 1 Ω
E1 (C35-4) - E12 (C33-34)
Below 1 Ω
- Standard resistance (Check for short):
Tester Connection
Specified Condition
OX1B (C35-3) or OX1B (C33-55) - Body ground
10 kΩ or higher
HT1B (C35-1) or HT1B (C33-62) - Body ground
10 kΩ or higher
Reconnect the heated oxygen sensor (sensor 2) connector.
Reconnect the ECM connector.
|
|
||||
| OK | |
|
| 4. REPLACE HEATED OXYGEN SENSOR (SENSOR 2) |
| NEXT | |
|
| 5. CHECK WHETHER DTC OUTPUT RECURS (DTC P0139) |
Connect the intelligent tester to the DLC3.
Turn the ignition switch on (IG) and turn the tester ON.
Clear the DTCs.
Perform the CONFIRMATION DRIVING PATTERN.
Select the following menu items: Powertrain / Engine and ECT / DTC / Pending.
Read DTCs.
- Result:
Display (DTC Output)
Proceed To
No DTC output
A
P0139
B
|
|
||||
| A | ||
 |
||
| ||
| 6. CHECK WHETHER MISFIRE OCCURS |
Check the idling condition.
- OK:
- Rough idling does not occur.
|
|
||||
| OK | |
|
| 7. CHECK FUEL PRESSURE |
Check fuel pressure (Click here).
- Standard:
- 304 to 343 kPa (3.1 to 3.5 kgf/cm2, 44.1 to 49.7 psi)
|
|
||||
| OK | |
|
| 8. INSPECT FUEL INJECTOR |
Check the injector volume (Click here).
- Standard:
- 47 to 58 mm3 (2.87 to 3.54 cu in.) in 15 seconds
|
|
||||
| OK | ||
|
||
| ||
| 9. PERFORM CONFIRMATION DRIVING PATTERN |
- HINT:
- Clear all DTCs prior to performing the confirmation driving pattern.
| NEXT | |
|
| 10. CHECK WHETHER DTC OUTPUT RECURS (DTC P0139) |
Connect the intelligent tester to the DLC3.
Turn the ignition switch on (IG) and turn the tester ON.
Select the following menu items: Powertrain / Engine and ECT / DTC / Pending.
Read DTCs.
- Result:
Display (DTC Output)
Proceed To
P0139
A
No DTC output
B
|
|
||||
| A | ||
|
||
| ||