IG Signal Circuit
Circuit diagnosis · Vehicles built from Nov 2005
DESCRIPTION
When the ignition switch is turned on (IG), the battery voltage is applied to terminal IG of the transmission control ECU. Power is supplied to the transmission control ECU via terminal +B and IG. The transmission control ECU interprets the ignition switch condition according to the potential at IG terminal.WIRING DIAGRAM
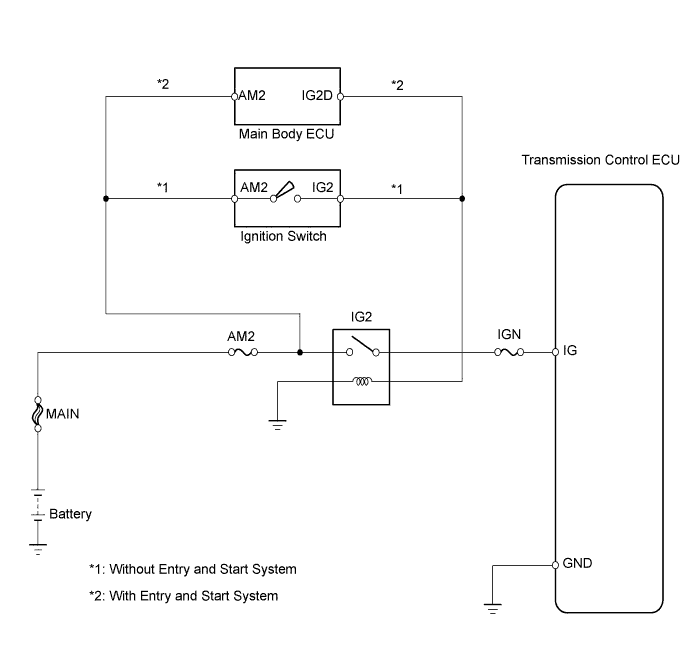

INSPECTION PROCEDURE
| 1. READ VALUE USING INTELLIGENT TESTER |

Connect the intelligent tester to the DLC3
Turn the ignition switch on (IG) and turn the tester ON.
Select the following menu items: Powertrain / Multi-Mode M/T / Data List / Ignition Signal.
Read the value.
Items
[Abbreviation]
Measurement Items: Display
Normal Conditions
Diagnostic Notes
Ignition Signal
[Ignition Sig]
Ignition switch signal:
OFF or ON
ON: Ignition switch on (IG)
-
- OK:
- [ON] displays in the item [Ignition Signal] when the ignition switch is turned on (IG).
|
|
||||

| NG | |
 |
| 2. INSPECT TRANSMISSION CONTROL ECU ASSEMBLY (IG TERMINAL VOLTAGE) |
Disconnect the transmission control ECU connector.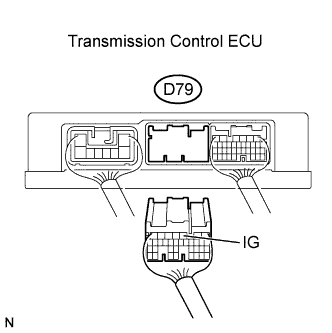
Turn the ignition switch on (IG).
Measure the voltage between the terminal of the transmission control ECU connector and the body ground.
- Standard voltage:
Tester Connections
Ignition Switch Conditions
Specified Conditions
IG (D79-3) - Body ground
Ignition switch off
Below 1 V
IG (D79-3) - Body ground
Ignition switch on (IG)
10 to 14 V
Reconnect the transmission control ECU connector.
|
|
||||
| NG | |
|
| 3. INSPECT INTEGRATION RELAY |
Remove the integration relay from the engine room relay block.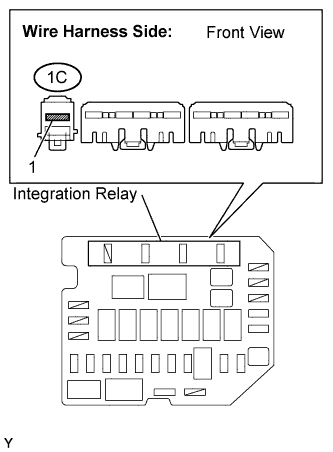
Measure the voltage between the terminal of the integration relay and the body ground.
- Standard voltage:
Tester Connections
Specified Conditions
Integration relay (1C-1) - Body ground
10 to 14 V
Reinstall the integration relay.
|
|
||||
| OK | |
|
| 4. INSPECT INTEGRATION RELAY (AM2 FUSE AND IG2 RELAY) |
Inspect the AM2 fuse.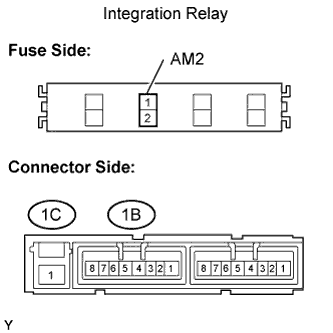
Remove the AM2 fuse.
Check the fuse resistance.
- Standard resistance:
- Below 1 Ω
Reinstall the fuse.
Inspect the relay.
Check the relay resistance.
- Standard resistance:
Tester Connections
Specified Conditions
1C-1 - 1B-4
10 kΩ or higher
1C-1 - 1B-4
Below 1 Ω
(When battery voltage applied to terminals 1B-2 and 1B-3)
|
|
||||
| OK | |
|
| 5. INSPECT FUSE (IGN FUSE) |
Remove the IGN fuse from the main body ECU.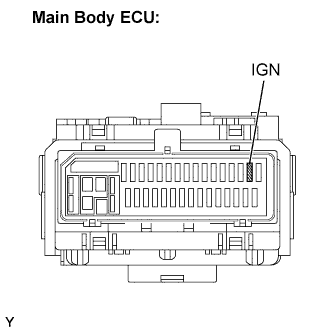
Check the fuse resistance.
- Standard resistance:
- Below 1 Ω
Reinstall the IGN fuse.
|
|
||||
| OK | |
|
| 6. CHECK HARNESS AND CONNECTOR (TRANSMISSION CONTROL ECU - INTEGRATION RELAY) |
Remove the integration relay.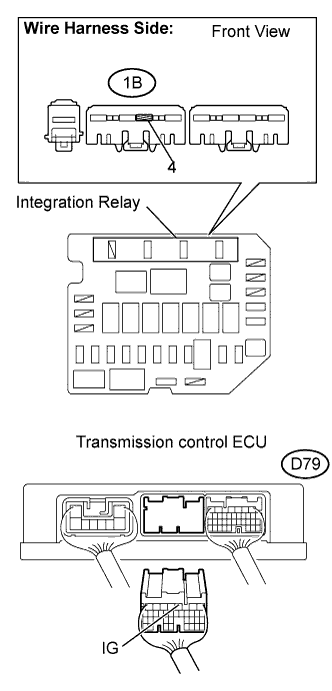
Disconnect the transmission control ECU connector.
Check the resistance.
- Standard resistance (Check for open):
Tester Connections
Specified Conditions
Integration relay (1B-4) - IG (D79-3)
Below 1 Ω
- Standard resistance (Check for short):
Tester Connections
Specified Conditions
IG (D79-3) - Body ground
10 kΩ or higher
Reinstall the integration relay.
Reconnect the ECU connector
- Result:
Result
Proceed To
Outside normal range
A
Within normal range (with Entry and Start System)
B
Within normal range (without Entry and Start System)
C
|
|
||||
|
|
||||

| A | ||
 |
||
| ||
| 7. CHECK HARNESS AND CONNECTOR (INTEGRATION RELAY - MAIN BODY ECU) |
Remove the integration relay.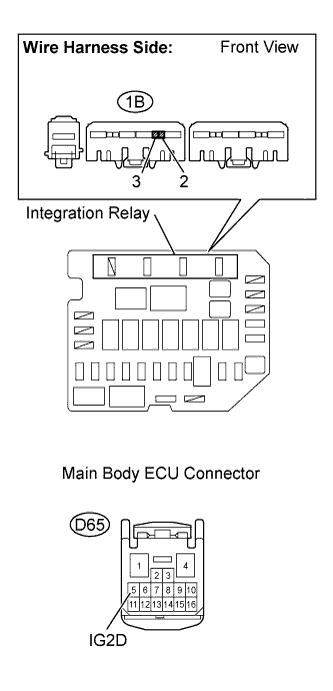
Remove the main body ECU.
Check the resistance.
- Standard resistance (Check for open):
Tester Connections
Specified Conditions
Integration relay (1B-2) - IG2D (D65-5)
Below 1 Ω
Integration relay (1B-3) - Body ground
Below 1 Ω
- Standard resistance (Check for short):
Tester Connections
Specified Conditions
IG2D (D65-5) - Body ground
10 kΩ or higher
Reinstall the integration relay.
Reinstall the main body ECU.
|
|
||||
| OK | ||
|
||
| ||
| 8. CHECK HARNESS AND CONNECTOR (INTEGRATION RELAY - IGNITION SWITCH) |
Remove the integration relay.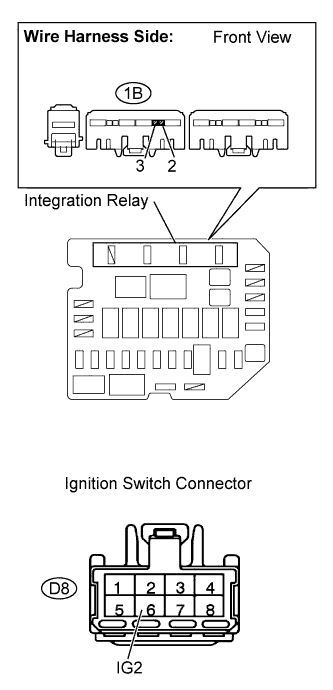
Disconnect the ignition switch connector.
Check the resistance.
- Standard resistance (Check for open):
Tester Connections
Specified Conditions
Integration relay (1B-2) - Ignition switch IG2 (D8-6)
Below 1 Ω
Integration relay (1B-3) - Body ground
Below 1 Ω
- Standard resistance (Check for short):
Tester Connections
Specified Conditions
Ignition switch IG2 (D8-6) - Body ground
10 kΩ or higher
Reinstall the integration relay.
Reconnect the ignition switch connector.
|
|
||||
| OK | |
|
| 9. INSPECT IGNITION SWITCH |
Remove the ignition switch.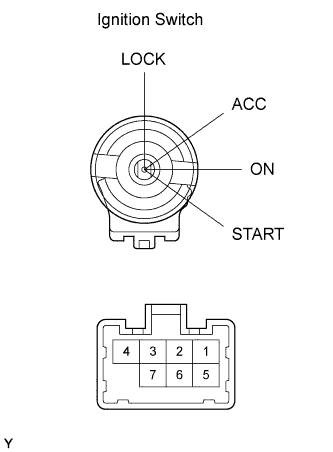
Measure the resistance between the terminals of the ignition switch.
- Standard resistance:
Switch Positions
Tester Connections
Specified Conditions
LOCK
-
10 kΩ or higher
ACC
2 - 4
Below 1 Ω
ON
1 - 2 - 4
Below 1 Ω
5 - 6
Below 1 Ω
START
1 - 3 - 4
Below 1 Ω
5 - 6 - 7
Below 1 Ω
Reinstall the ignition switch.
|
|
||||
| OK | ||
|
||
| ||