PRECAUTION
Precautions · Vehicles built from Nov 2006
| 1.IGNITION SWITCH EXPRESSIONS |
The type of ignition switch used on this model differs according to the specifications of the vehicle. The expressions listed in the table below are used in this section.
Expression
Ignition Switch (position)
Engine Switch (condition)
Ignition Switch off
LOCK
Off
Ignition Switch on (IG)
ON
On (IG)
Ignition Switch on (ACC)
ACC
On (ACC)
Engine Start
START
Start
| 2.PRECAUTIONS |
Before working on the fuel system, disconnect the cable from the negative battery terminal.
Do not work on the fuel system near any naked flames. Never smoke during the work.
Keep rubber and leather parts away from gasoline.
| 3.DISCHARGE FUEL SYSTEM PRESSURE |
- CAUTION:
- Before removing any fuel system parts, take precautions to prevent gasoline spillage.
- As some pressure remains in the fuel line even after taking precautions to prevent gasoline spillage, use a piece of cloth or shop rag to prevent gasoline splashes when disconnecting the fuel line.
- Before removing any fuel system parts, take precautions to prevent gasoline spillage.
Remove the rear No. 1 seat leg cover (Click here).
Remove the rear No. 2 seat leg cover (Click here).
Remove the rear seat assembly (Click here).
Remove the rear floor service hole cover (Click here).
Disconnect the connector from the fuel pump assembly.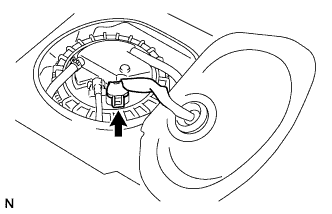

Start the engine. After the engine stops naturally, turn the ignition switch off.
- HINT:
- DTC P0171 may be set.
Crank the engine again and make sure that the engine does not start.
Remove the fuel tank cap and discharge the pressure from the fuel tank.
Disconnect the cable from the negative battery terminal.
Connect the connector to the fuel pump assembly.
| 4.FUEL SYSTEM |
When disconnecting the high-pressure fuel line, a large amount of gasoline will splash. So take the following precautions:
Discharge the fuel system pressure.
Disconnect the fuel tube.
Drain the fuel remaining inside the fuel pump tube into a container.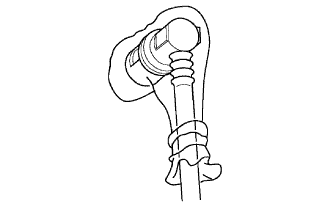
Cover the disconnected fuel tube connector and pipe with a vinyl bag to prevent damage and the intrusion of foreign objects.
Observe the following precautions when removing and installing the fuel injector.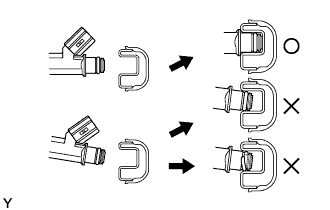
Do not reuse the O-ring.
When placing a new O-ring onto the injector, do not damage the O-ring.
Coat the new O-ring with grease or gasoline before installing it. Do not use engine, gear or brake oil.
Install the injector into the delivery pipe and cylinder head, as shown in the illustration. Apply grease or gasoline oil to the contact surfaces of the delivery pipe and the injector before installing the injector.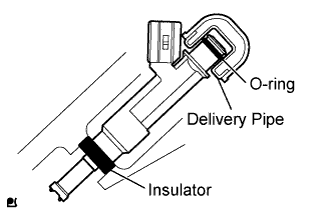
Observe these precautions when disconnecting the fuel tube connector.
Remove the fuel pipe clamp.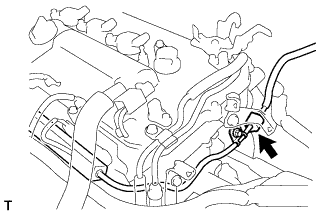
Wipe off dirt on the fuel tube connector.
Hold the fuel tube connector, and then install SST.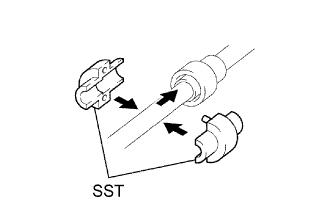
- SST
- 09268-21010
Turn the SST to release the retainer inside the fuel tube connector with the chamfered part of the SST.
Insert the SST into the fuel tube and hold it. Then push the fuel tube connector against the SST.
Mount the retainer of the fuel tube connector onto the chamfered part of the SST.
Slide the SST and fuel tube connector together towards the fuel tube until they make a click sound, and then disconnect the fuel tube.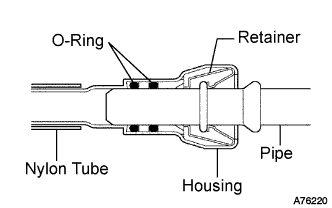
Drain the fuel remaining inside the fuel tube.
Cover the fuel tube and fuel pipe with a plastic bag to protect the disconnected part.
Observe these precautions when disconnecting the fuel tube connector.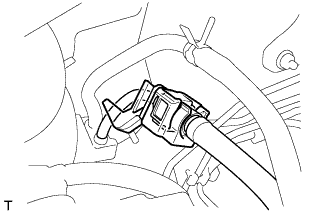
Remove the No.1 fuel pipe clamp.
Check whether there is any dirt in the pipe around the connector before disconnecting it and clean it as necessary.
If the connector and pipe are stuck, pinch the retainer with your hand, then push and pull the connector to disconnect them. Do not use any tools.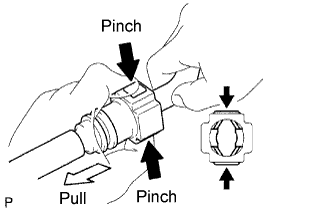
Check the sealing surface of the pipe for dirt and mud. If dirty, wipe it with a shop rag or piece of cloth.
Cover the disconnected fuel tube connector and pipe with a plastic bag to prevent damage and the intrusion of foreign objects.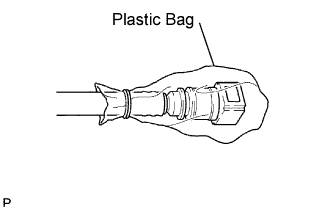
Observe the following precautions when connecting the fuel tube connector.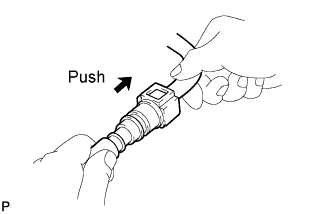
Check that there is no damage or foreign matter on the part of the pipe that comes into contact with the connector.
Align the axis of the connector with the axis of the pipe. Push the pipe into the connector until the connector makes a click sound. If the connection is too tight, apply a small amount of fresh engine oil to the tip of the pipe.
After connecting the pipe and connector, try to pull them apart to confirm that they are securely connected.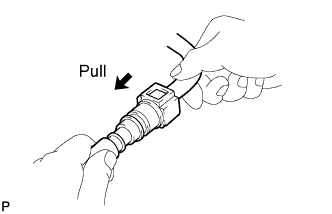
Attach the lock claws to the connector by pushing down on the cover.
| 5.INSPECT FOR FUEL LEAK |
Check that there is no fuel leakage after performing maintenance anywhere on the fuel system (Click here).