PTC Heater Circuit
Circuit diagnosis · Vehicles built from Aug 2005
DESCRIPTION
PTC heater relays are closed in accordance with signals from the air conditioning amplifier and power is supplied to the PTC heater assembly installed on the radiator heater unit.WIRING DIAGRAM
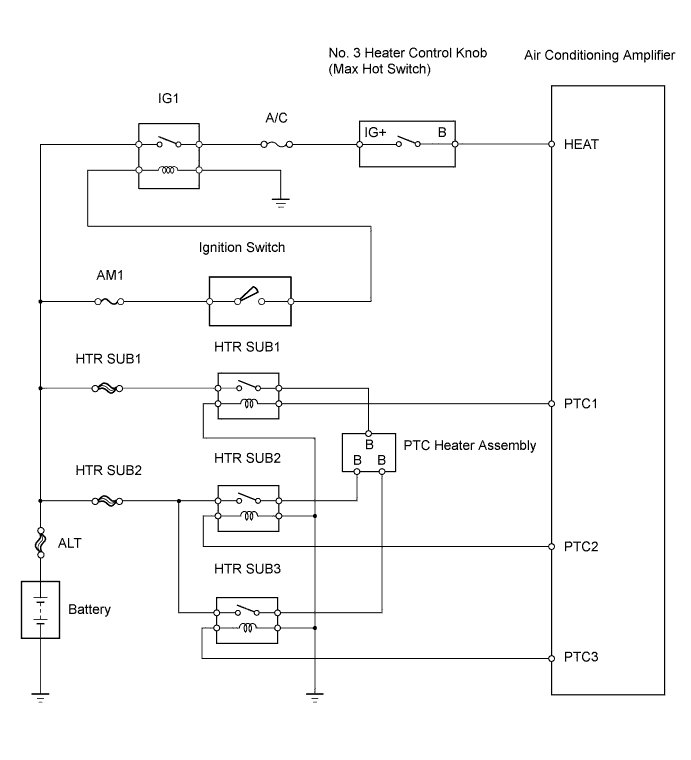

INSPECTION PROCEDURE
| 1. INSPECT FUSE (A/C, HTR SUB1, HTR SUB2) |

Remove the A/C fuse from the main body ECU.
Remove the HTR SUB1 and HTR SUB2 fuses from the engine room R/B and J/B.
Measure the resistance.
- Standard resistance:
Tester Item
Specified Condition
A/C fuse
Below 1 Ω
HTR SUB1 fuse
Below 1 Ω
HTR SUB2 fuse
Below 1 Ω
Reinstall the A/C fuse.
Reinstall the HTR SUB1 and HTR SUB2 fuses.
|
|
||||

| OK | |
 |
| 2. INSPECT NO. 3 HEATER CONTROL KNOB (MAX HOT SWITCH) |
Remove the No. 3 heater control knob.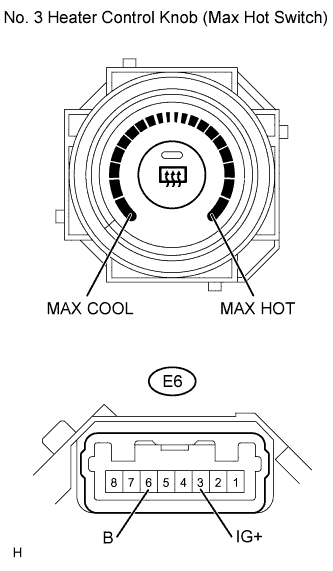
Measure the resistance.
- Standard resistance:
Tester Connection
Condition
Specified Condition
E6-3 (IG+) - E6-6 (B)
Max hot position
Below 1 Ω
E6-3 (IG+) - E6-6 (B)
Other than max hot position
10 kΩ or higher
Reinstall the No. 3 heater control knob.
|
|
||||
| OK | |
|
| 3. CHECK HARNESS AND CONNECTOR (MAIN BODY ECU - No. 3 HEATER CONTROL KNOB) |
Disconnect the E6 No. 3 heater control knob connector.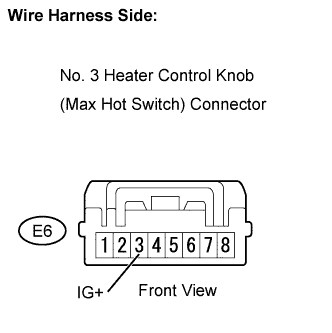
Measure the voltage.
- Standard voltage:
Tester Connection
Condition
Specified Condition
E6-3 (IG+) - Body ground
Ignition switch on (IG)
10 to 14 V
Reconnect the No. 3 heater control knob connector.
|
|
||||
| OK | |
|
| 4. CHECK HARNESS AND CONNECTOR (No. 3 HEATER CONTROL KNOB - AIR CONDITIONING AMPLIFIER) |
Disconnect the E6 No. 3 heater control knob connector.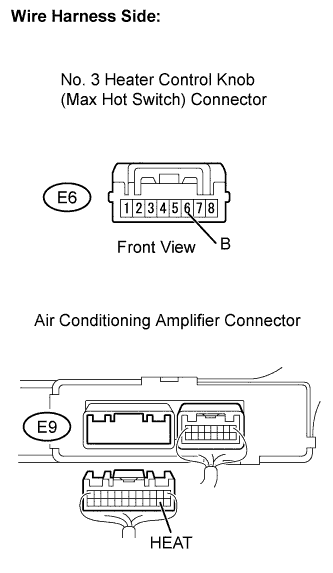
Disconnect the E9 air conditioning amplifier connector.
Measure the resistance.
- Standard resistance:
Tester Connection
Specified Condition
E6-6 (B) - E9-14 (HEAT)
Below 1 Ω
Reconnect the No. 3 heater control knob connector.
Reconnect the air conditioning amplifier connector.
|
|
||||
| OK | |
|
| 5. INSPECT AIR CONDITIONING AMPLIFIER |
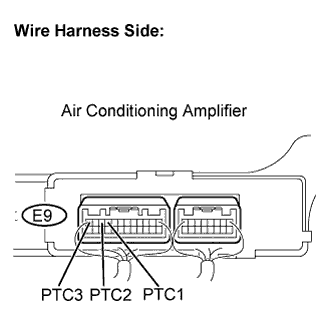 |
Remove the air conditioning amplifier with its connectors still connected.
Turn the ignition switch on (IG).
When the PTC heater operating conditions are met (engine at idle speed or faster, ambient temperature is 10°C (50°F) or less, engine coolant temperature is 65°C (149°F) or less, No. 3 heater control knob setting is MAX HOT), turn the blower switch to the Lo setting.
Wait 30 seconds.
Measure the voltage.
- Standard voltage:
Tester Connection
Specified Condition
E9-9 (PTC1) - Body ground
10 to 14 V
E9-10 (PTC2) - Body ground
10 to 14 V
E9-12 (PTC3) - Body ground
10 to 14 V
Reinstall the air conditioning amplifier.
|
|
||||
| OK | |
|
| 6. INSPECT PTC HEATER RELAY (HTR SUB1, HTR SUB2, HTR SUB3) |
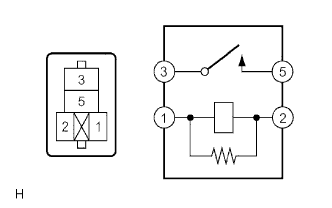 |
Remove the HTR SUB1 relay.
Remove the HTR SUB2 and HTR SUB3 relays.
Measure the resistance.
- Standard resistance:
Tester Connection
Specified Condition
3 - 5
10 kΩ or higher
3 - 5
Below 1 Ω
(when battery voltage is applied to terminals 1 and 2)
Reinstall the HTR SUB1 relay.
Reinstall the HTR SUB2 and HTR SUB3 relays.
|
|
||||
| OK | |
|
| 7. CHECK HARNESS AND CONNECTOR (AIR CONDITIONING AMPLIFIER - PTC HEATER RELAY) |
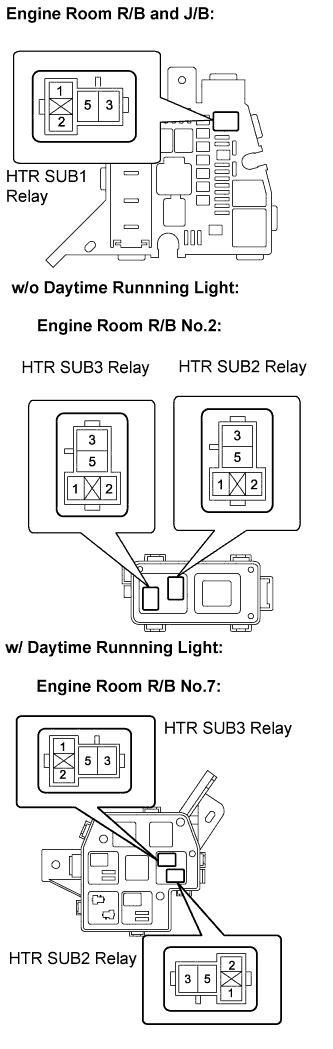 |
Remove the HTR SUB1 relay.
Remove the HTR SUB2 and HTR SUB3 relays.
Turn the ignition switch on (IG).
When the PTC heater operating conditions are met (engine at idle speed or faster, ambient temperature is 10°C (50°F) or less, engine coolant temperature is 65°C (149°F) or less, No. 3 heater control knob setting is MAX HOT), turn the blower switch to the Lo setting.
Wait 30 seconds.
Measure the voltage.
- Standard voltage:
Tester Connection
Specified Condition
HTR SUB1-2 - Body ground
10 to 14 V
HTR SUB2-2 - Body ground
10 to 14 V
HTR SUB3-2 - Body ground
10 to 14 V
Reinstall the HTR SUB1 relay.
Reinstall the HTR SUB2 and HTR SUB3 relays.
|
|
||||
| OK | |
|
| 8. CHECK HARNESS AND CONNECTOR (PTC HEATER RELAY - BODY GROUND) |
|
|
Remove the HTR SUB1 relay.
Remove the HTR SUB2 and HTR SUB3 relays.
Measure the resistance.
- Standard resistance:
Tester Connection
Specified Condition
HTR SUB1-1 - Body ground
Below 1 Ω
HTR SUB2-1 - Body ground
Below 1 Ω
HTR SUB3-1 - Body ground
Below 1 Ω
Reinstall the HTR SUB2 and HTR SUB3 relays.
|
|
||||
| OK | |
|
| 9. INSPECT PTC HEATER ASSEMBLY |
Disconnect the A17 PTC heater assembly connector.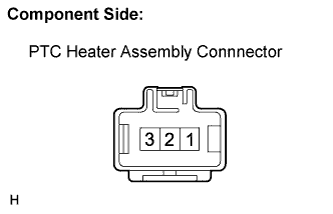
Measure the resistance.
- Standard resistance:
Tester Connection
Specified Condition
1 - 2
Below 1 Ω
1 - 3
Below 1 Ω
2 - 3
Below 1 Ω
Reconnect the PTC heater assembly connector.
|
|
||||
| OK | |
|
| 10. CHECK HARNESS AND CONNECTOR (BATTERY - PTC HEATER RELAY) |
Remove the HTR SUB1 relay.
Remove the HTR SUB2 and HTR SUB3 relays.
Measure the voltage.
- Standard voltage:
Tester Connection
Condition
Specified Condition
HTR SUB1-5 - Body ground
Always
10 to 14 V
HTR SUB2-5 - Body ground
Always
10 to 14 V
HTR SUB3-5 - Body ground
Always
10 to 14 V
Reinstall the HTR SUB1 relay.
Reinstall the HTR SUB2 and HTR SUB3 relays.
|
|
||||
| OK | |
|
| 11. CHECK HARNESS AND CONNECTOR (PTC HEATER ASSEMBLY - PTC HEATER RELAY) |
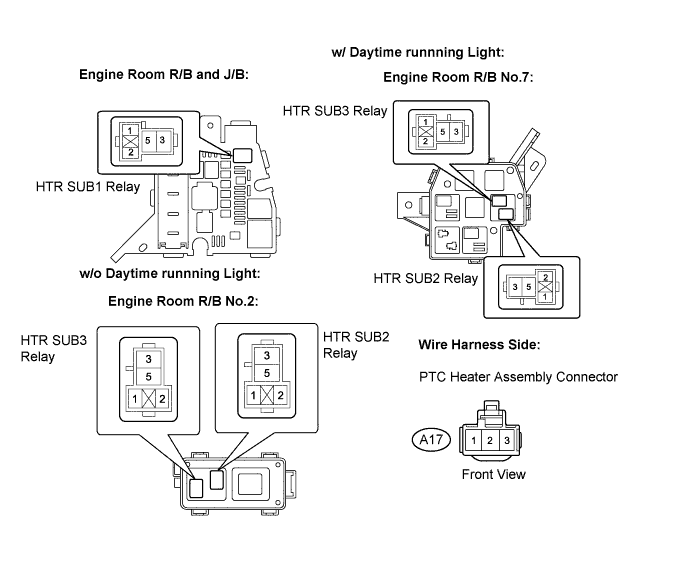
Remove the HTR SUB1 relay.
Remove the HTR SUB2 and HTR SUB3 relays.
Disconnect the A17 PTC heater assembly connector.
Measure the resistance.
- Standard resistance:
Tester Connection
Specified Condition
HTR SUB1-3 - A17-2 (B)
Below 1 Ω
HTR SUB2-3 - A17-3 (B)
Below 1 Ω
HTR SUB3-3 - A17-1 (B)
Below 1 Ω
Reinstall the HTR SUB1 relay.
Reinstall the HTR SUB2 and HTR SUB3 relays.
Reconnect the PTC heater assembly connector.
|
|
||||
| OK | ||
 |
||
| ||