Blower Motor Circuit
Circuit diagnosis · Vehicles built from Aug 2005
DESCRIPTION
The blower motor is operated by signals from the air conditioning amplifier. Blower motor speed signals are transmitted in accordance with changes in the duty ratio.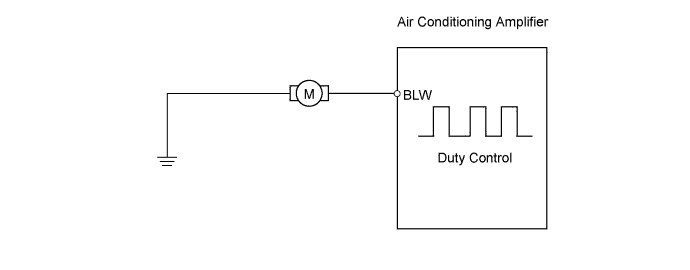

WIRING DIAGRAM
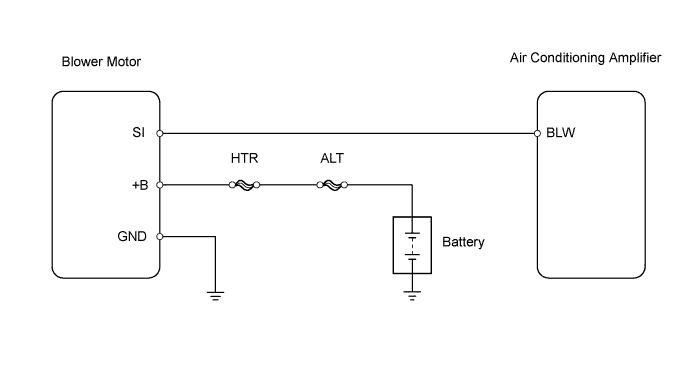
INSPECTION PROCEDURE
| 1. PERFORM ACTIVE TEST USING INTELLIGENT TESTER (BLOWER MOTOR) |

Connect the intelligent tester to the DLC3.
Turn the ignition switch on (IG) and turn the intelligent tester main switch ON.
Select the item below in the Active Test and then check that the blower motor operates.
- Active Test / Air Conditioner:
Item
Test Details / Display
Diagnostic Note
Blower Motor
Blower motor /
Min.: 0 level, Max.: 31 level
-
- Result:
Result
Proceed to
OK
A
NG (blower motor does not operate)
B
NG (blower motor operates but does not change speed)
C
|
|
||||
|
|
||||

| A | ||
 |
||
| ||
| 2. INSPECT FUSE (HTR) |
Remove the HTR fuse from the engine room relay block.
Measure the resistance.
- Standard resistance:
Tester Item
Specified Condition
HTR fuse
Below 1 Ω
Reinstall the HTR fuse.
|
|
||||

| OK | |
 |
| 3. CHECK HARNESS AND CONNECTOR (BLOWER MOTOR - BODY GROUND) |
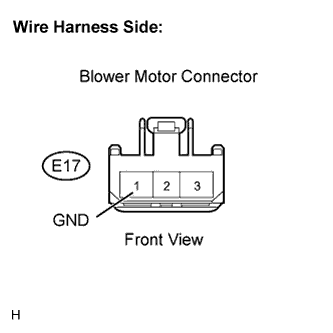 |
Disconnect the E17 blower motor connector.
Measure the resistance of the wire harness side connector.
- Standard resistance:
Tester Connection
Specified Condition
E17-1 (GND) - Body ground
Below 1 Ω
Reconnect the blower motor connector.
|
|
||||
| OK | |
|
| 4. CHECK HARNESS AND CONNECTOR (BLOWER MOTOR - BATTERY) |
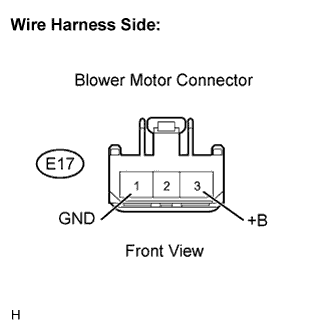 |
Disconnect the E17 blower motor connector.
Turn the ignition switch on (IG).
Measure the voltage.
- Standard voltage:
Tester Connection
Specified Condition
E17-3 (+B) - E17-1 (GND)
10 to 14 V
Reconnect the blower motor connector.
|
|
||||
| OK | |
|
| 5. INSPECT BLOWER MOTOR |
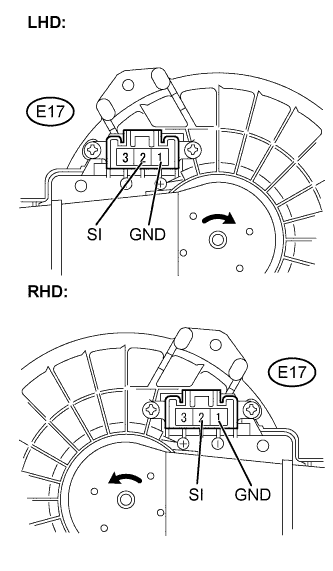 |
Disconnect the E11 air conditioning amplifier connector.
Connect the E17 blower motor connector.
Turn the ignition switch on (IG).
Measure the voltage.
- Standard voltage:
Tester Connection
Specified Condition
E17-2 (SI) - E17-1 (GND)
4.5 to 5.5 V
Reconnect the air conditioning amplifier connector.
|
|
||||
| OK | |
|
| 6. CHECK HARNESS AND CONNECTOR (BLOWER MOTOR - AIR CONDITIONING AMPLIFIER) |
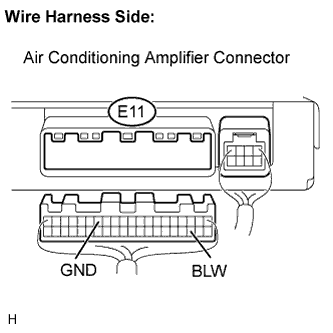 |
Disconnect the E11 air conditioning amplifier connector.
Turn the ignition switch on (IG).
Measure the voltage.
- Standard voltage:
Tester Connection
Specified Condition
E11-23 (BLW) - E11-14 (GND)
4.5 to 5.5 V
Reconnect the air conditioning amplifier connector.
|
|
||||
| OK | |
|
| 7. INSPECT AIR CONDITIONING AMPLIFIER |
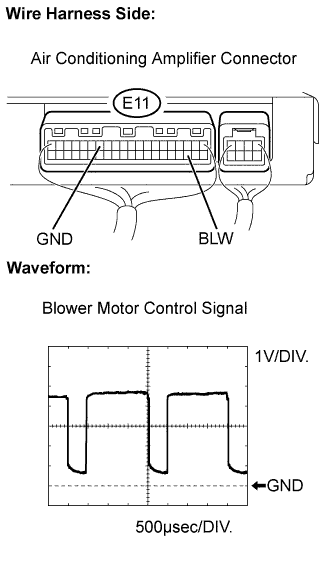 |
Remove the air conditioning amplifier with its connectors still connected.
Turn the ignition switch on (IG).
Check the waveform between terminal E11-23 (BLW) of the air conditioning amplifier and the body ground.
- OK:
- Waveform is as shown in the illustration.
- HINT:
- The waveform varies with the blower level.
Item
Contents
Tester range
1V / DIV., 500 μs / DIV.
Condition
Ignition switch on (IG)
Blower switch ON (Lo)
Reinstall the air conditioning amplifier.
|
|
||||
| OK | ||
|
||
| ||