Home › BODY ELECTRICAL › LIGHTING › LIGHTING SYSTEMTaillight Circuit
Circuit diagnosis · Vehicles built from Nov 2006
Versions by build date: Aug 2005 – Oct 2006 from Nov 2006
DESCRIPTION
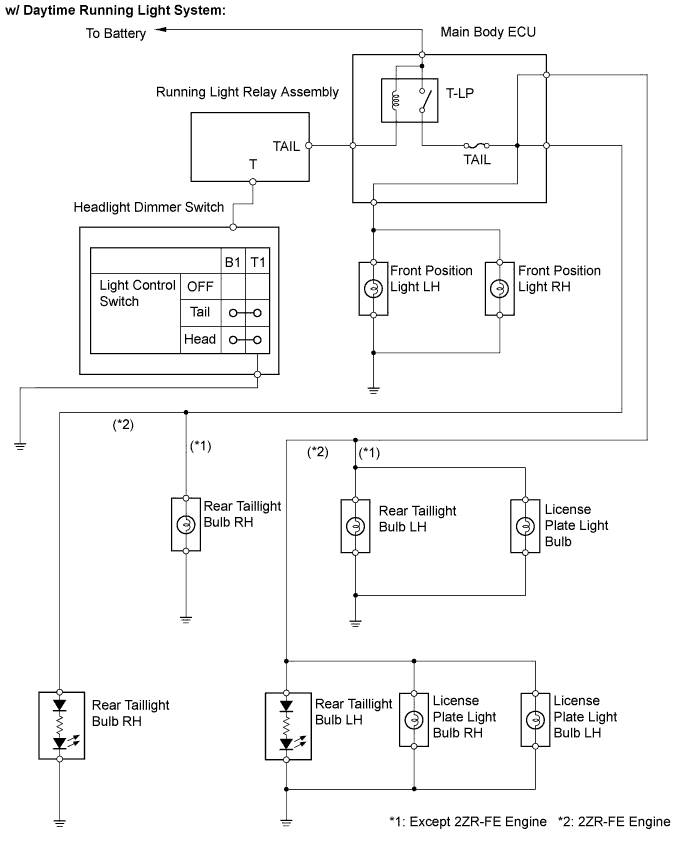
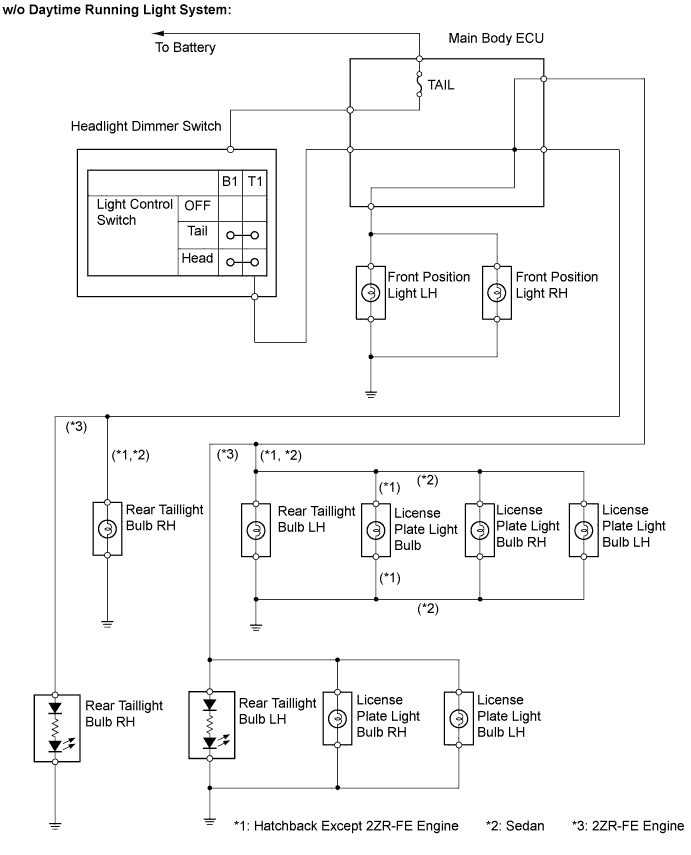
Vehicles equipped with the daytime running light system: When the light control switch, located on the headlight dimmer switch, is turned to the TAIL position, the taillight relay turns on to illuminate the front position lights, rear taillights and license plate light. Vehicles without the daytime running light system: When the light control switch, located on the headlight dimmer switch, is turned to the TAIL position, the front position lights, rear taillights and license plate light illuminate. WIRING DIAGRAM
INSPECTION PROCEDURE
1. CHECK WHETHER LIGHTS ILLUMINATE
Check whether the following lights illuminate: Front position lights, Rear taillights and License plate light.
Result:
Illumination Condition
Proceed To
All lights illuminate
A
No lights illuminate
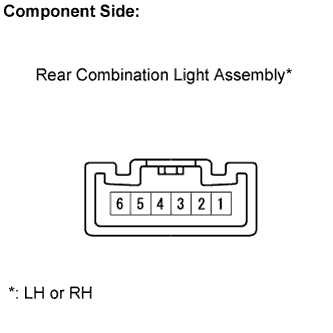
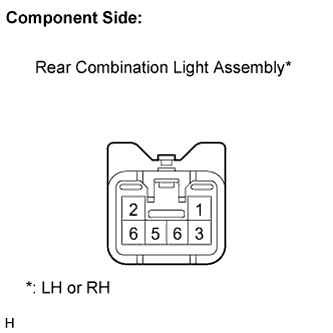
B
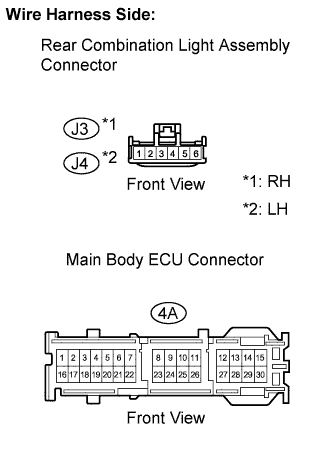
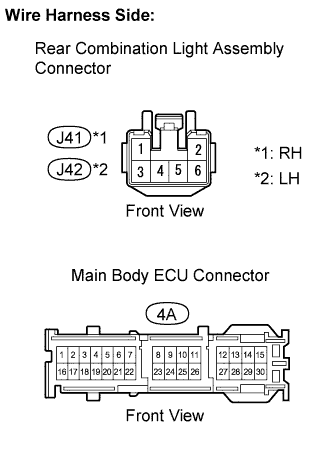
Front position lights do not illuminate
C
Rear taillights do not illuminate
D
License plate light does not illuminate
E
A
PROCEED TO NEXT CIRCUIT INSPECTION SHOWN IN PROBLEM SYMPTOMS TABLE
2. CHECK VEHICLE SPECIFICATIONS
Check whether the vehicle is equipped with the daytime running light system.
Result:
Daytime running light system
Proceed To
Yes
A
No
B
B
A
3. INSPECT FUSE (TAIL)
Remove the TAIL fuse from the main body ECU.
Measure the resistance.
Standard resistance:
Below 1 Ω
Reconnect the TAIL fuse.
NG
OK
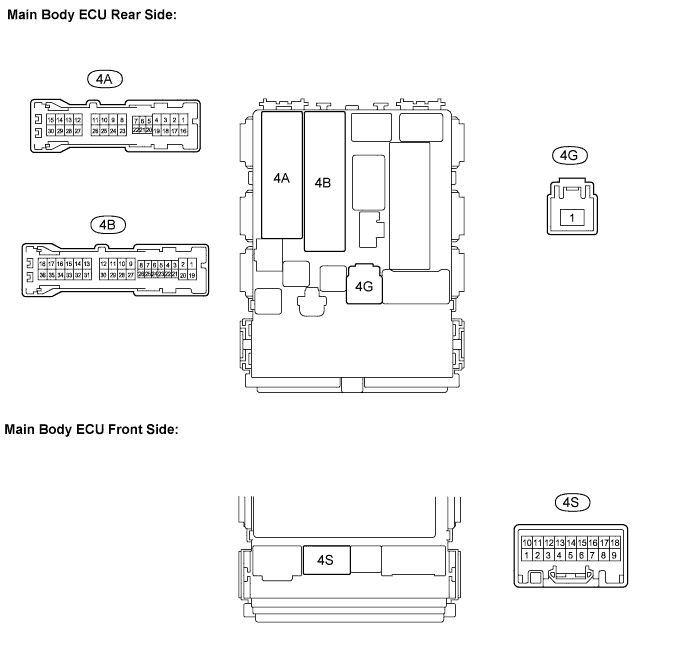
4. INSPECT MAIN BODY ECU
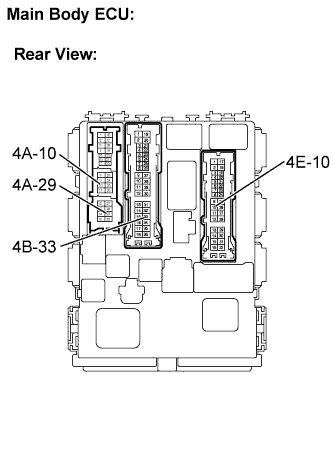
Measure the voltage.
Standard voltage:
Tester Connection
Condition
Specified Condition
4A-10 - Body ground
Ignition switch on (IG)
10 to 14 V
4A-29 - Body ground
Ignition switch on (IG)
10 to 14 V
4B-33 - Body ground
Ignition switch on (IG)
10 to 14 V
4G-1 - Body ground
Always
10 to 14 V
4S-9 - Body ground
Always
10 to 14 V
NG
OK
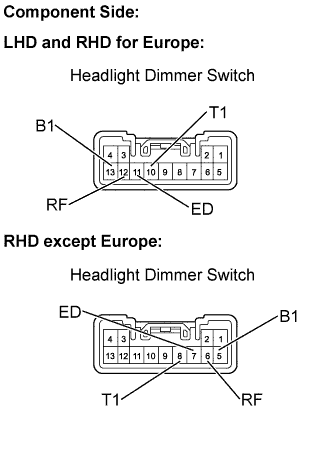
5. INSPECT HEADLIGHT DIMMER SWITCH
Remove the headlight dimmer switch. Inspect the light control switch.
Measure the resistance.
Standard resistance:
LHD and RHD for Europe:
Tester Connection
Condition
Specified Condition
10 (T1) - 13 (B1)
TAIL
Below 1 Ω
10 (T1) - 13 (B1)
OFF
10 kΩ or higher
10 (T1) - 13 (B1)
HEAD
Below 1 Ω
10 (T1) - 13 (B1)
OFF
10 kΩ or higher
11 (ED) - 12 (RF)
HEAD
Below 1 Ω
11 (ED) - 12 (RF)
OFF
10 kΩ or higher
RHD except Europe:
Tester Connection
Condition
Specified Condition
5 (B1) - 8 (T1)
TAIL
Below 1 Ω
5 (B1) - 8 (T1)
OFF
10 kΩ or higher
5 (B1) - 8 (T1)
HEAD
Below 1 Ω
5 (B1) - 8 (T1)
OFF
10 kΩ or higher
6 (RF) - 7 (ED)
HEAD
Below 1 Ω
6 (RF) - 7 (ED)
OFF
10 kΩ or higher
Reinstall the headlight dimmer switch.
NG
REPLACE HEADLIGHT DIMMER SWITCH
OK
6. CHECK HARNESS AND CONNECTOR (MAIN BODY ECU - RUNNING LIGHT RELAY ASSEMBLY)
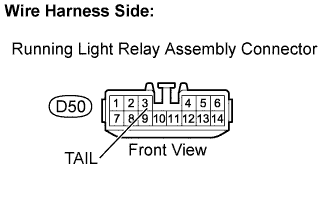
Disconnect the D50 running light relay assembly connector. Measure the voltage.
Standard voltage:
Tester Connection
Condition
Specified Condition
D50-3 (TAIL) - Body ground
Always
10 to 14 V
Reconnect the running light relay assembly connector.
NG
REPAIR OR REPLACE HARNESS OR CONNECTOR
OK
7. CHECK HARNESS AND CONNECTOR (RUNNING LIGHT RELAY ASSEMBLY - HEADLIGHT DIMMER SWITCH)
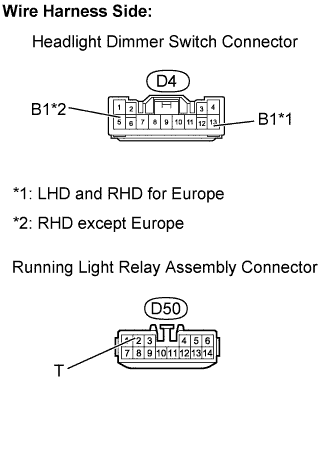
Disconnect the D50 running light relay assembly connector. Disconnect the D4 headlight dimmer switch connector.
Measure the resistance.
Standard resistance:
LHD and RHD for Europe:
Tester Connection
Specified Condition
D50-2 (T) - D4-13 (B1)
Below 1 Ω
D50-2 (T) or D4-13 (B1) - Body ground
10 kΩ or higher
RHD except Europe:
Tester Connection
Specified Condition
D50-2 (T) - D4-5 (B1)
Below 1 Ω
D50-2 (T) or D4-5 (B1) - Body ground
10 kΩ or higher
Reconnect the running light relay assembly connector.
Reconnect the headlight dimmer switch connector.
NG
REPAIR OR REPLACE HARNESS OR CONNECTOR
OK
REPAIR OR REPLACE HARNESS OR CONNECTOR (HEADLIGHT DIMMER SWITCH - BODY GROUND)
8. INSPECT FUSE (TAIL)
Remove the TAIL fuse from the main body ECU.
Measure the resistance.
Standard resistance:
Below 1 Ω
Reconnect the TAIL fuse.
NG
OK
9. INSPECT HEADLIGHT DIMMER SWITCH
Remove the headlight dimmer switch. Inspect the light control switch.
Measure the resistance.
Standard resistance:
LHD and RHD for Europe:
Tester Connection
Condition
Specified Condition
10 (T1) - 13 (B1)
TAIL
Below 1 Ω
10 (T1) - 13 (B1)
OFF
10 kΩ or higher
10 (T1) - 13 (B1)
HEAD
Below 1 Ω
10 (T1) - 13 (B1)
OFF
10 kΩ or higher
11 (ED) - 12 (RF)
HEAD
Below 1 Ω
11 (ED) - 12 (RF)
OFF
10 kΩ or higher
RHD except Europe:
Tester Connection
Condition
Specified Condition
5 (B1) - 8 (T1)
TAIL
Below 1 Ω
5 (B1) - 8 (T1)
OFF
10 kΩ or higher
5 (B1) - 8 (T1)
HEAD
Below 1 Ω
5 (B1) - 8 (T1)
OFF
10 kΩ or higher
6 (RF) - 7 (ED)
HEAD
Below 1 Ω
6 (RF) - 7 (ED)
OFF
10 kΩ or higher
Reinstall the headlight dimmer switch.
NG
REPLACE HEADLIGHT DIMMER SWITCH
OK
10. CHECK HARNESS AND CONNECTOR (MAIN BODY ECU - HEADLIGHT DIMMER SWITCH)
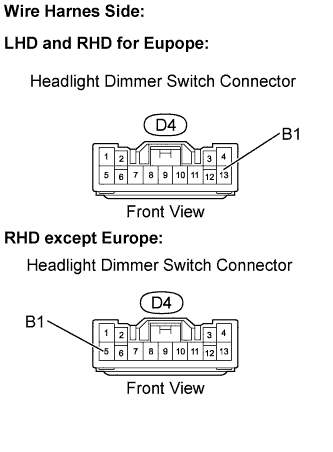
Disconnect the D4 headlight dimmer switch. Measure the voltage.
Standard voltage:
LHD and RHD for Europe:
Tester Connection
Specified Condition
D4-13 (B1) - Body Ground
10 to 14 V
RHD except Europe:
Tester Connection
Specified Condition
D4-5 (B1) - Body Ground
10 to 14 V
Reconnect the headlight dimmer switch.
NG
REPAIR OR REPLACE HARNESS OR CONNECTOR
OK
11. INSPECT MAIN BODY ECU
Disconnect the 4A, 4B and 4E main body ECU connectors.
Measure the resistance.
Standard resistance:
Tester Connection
Specified Condition
4A-10 - 4E-10
Below 1 Ω
4A-29 - 4E10
Below 1 Ω
4B-33 - 4E-10
Below 1 Ω
Reconnect the main body ECU connectors.
NG
OK
REPAIR OR REPLACE HARNESS OR CONNECTOR (HEADLIGHT DIMMER SWITCH - MAIN BODY ECU)
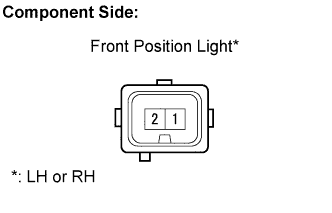
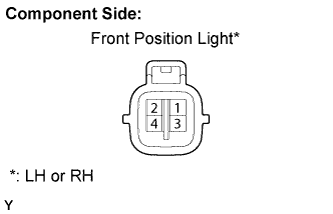
12. INSPECT BULB (FRONT POSITION LIGHT BULB)
Hatchback:
Remove the front position light. Apply battery voltage to the terminals and check that the front position light illuminates.
Standard:
Measurement Condition
Standard
Positive battery - Terminal 1
Front position light illuminates
Reinstall the front position light.
Sedan:
Remove the front position light. Apply battery voltage to the terminals and check that the front position light illuminates.
Standard:
Measurement Condition
Standard
Positive battery - Terminal 3
Front position light illuminates
Reinstall the front position light.
NG
OK
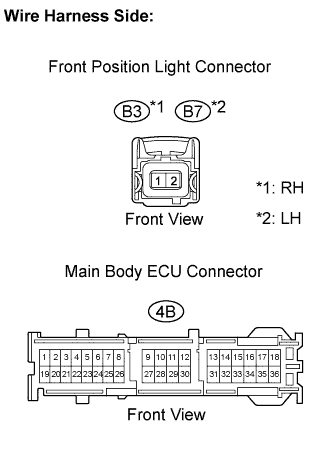
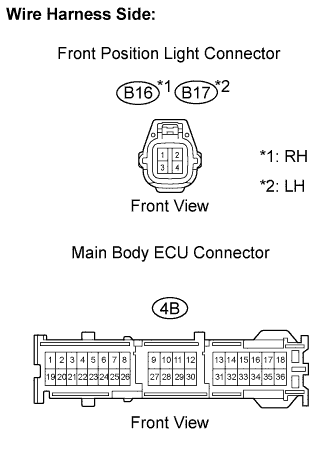
13. CHECK HARNESS AND CONNECTOR (MAIN BODY ECU - FRONT POSITION LIGHT)
Hatchback:
Disconnect the B3 and B7 front position light connectors. Disconnect the 4B main body ECU connector.
Measure the resistance.
Standard resistance:
Tester Connection
Specified Condition
4B-33 - B3-1
Below 1 Ω
4B-33 - B7-1
Below 1 Ω
4B-33 or B3-1 - Body ground
10 kΩ or higher
4B-33 or B7-1 - Body ground
10 kΩ or higher
Reconnect the front position light connectors.
Reconnect the main body ECU connector.
Sedan:
Disconnect the B16 and B17 front position light connectors. Disconnect the 4B main body ECU connector.
Measure the resistance.
Standard resistance:
Tester Connection
Specified Condition
4B-33 - B16-3
Below 1 Ω
4B-33 - B17-3
Below 1 Ω
4B-33 or B16-3 - Body ground
10 kΩ or higher
4B-33 or B17-3 - Body ground
10 kΩ or higher
Reconnect the front position light connectors.
Reconnect the main body ECU connector.
NG
REPAIR OR REPLACE HARNESS OR CONNECTOR
OK
REPAIR OR REPLACE HARNESS OR CONNECTOR (FRONT POSITION LIGHT - BODY GROUND)
14. INSPECT BULB (REAR TAILLIGHT BULB)
Hatchback (Except 2ZR-FE Engine):
Remove the rear combination light assembly. Apply battery voltage to the terminals and check that the rear taillight illuminates.
Standard:
Measurement Condition
Standard
Positive battery - Terminal 4
Rear taillight illuminates
Reinstall the rear combination light assembly.
Sedan, Hatchback (2ZR-FE Engine):
Remove the rear combination light assembly. Apply battery voltage to the terminals and check that the rear taillight illuminates.
Standard:
Measurement Condition
Standard
Positive battery - Terminal 4
Rear taillight illuminates
Reinstall the rear combination light assembly.
NG
OK
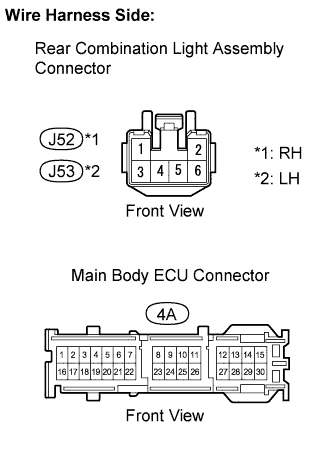
15. CHECK HARNESS AND CONNECTOR (MAIN BODY ECU - REAR TAILLIGHT)
Hatchback (Except 2ZR-FE Engine):
Disconnect the J3 and J4 rear combination light assembly connectors. Disconnect the 4A main body ECU connector.
Measure the resistance.
Standard resistance:
Tester Connection
Specified Condition
4A-10 - J3-4
Below 1 Ω
4A-29 - J4-4
Below 1 Ω
4A-10 or J3-4 - Body ground
10 kΩ or higher
4A-29 or J4-4 - Body ground
10 kΩ or higher
Reconnect the rear combination light assembly connectors.
Reconnect the main body ECU connector.
Sedan:
Disconnect the J41 and J42 rear combination light assembly connectors. Disconnect the 4A main body ECU connector.
Measure the resistance.
Standard resistance:
Tester Connection
Specified Condition
4A-10 - J41-4
Below 1 Ω
4A-29 - J42-4
Below 1 Ω
4A-10 or J41-4 - Body ground
10 kΩ or higher
4A-29 or J42-4 - Body ground
10 kΩ or higher
Reconnect the rear combination light assembly connectors.
Reconnect the main body ECU connector.
Hatchback (2ZR-FE Engine)
Disconnect the J52 and J53 rear combination light assembly connectors.
Disconnect the 4A main body ECU connector.
Measure the resistance.
Standard resistance:
Tester Connection
Specified Condition
4A-10 - J52-4
Below 1 Ω
4A-29 - J53-4
Below 1 Ω
4A-10 or J52-4 - Body ground
10 kΩ or higher
4A-29 or J53-4 - Body ground
10 kΩ or higher
Reconnect the rear combination light assembly connectors.
Reconnect the main body ECU connector.
NG
REPAIR OR REPLACE HARNESS OR CONNECTOR
OK
REPAIR OR REPLACE HARNESS OR CONNECTOR (REAR TAILLIGHT - BODY GROUND)
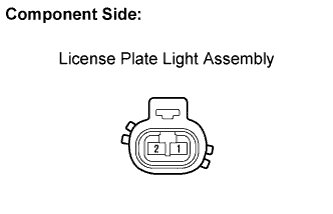
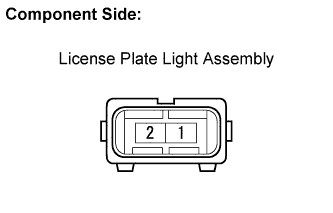
16. INSPECT BULB (LICENSE PLATE LIGHT BULB)
Hatchback (G. C. C. Countries):
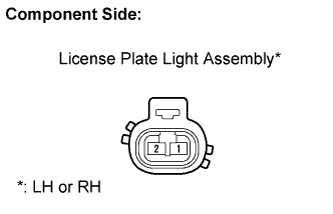
Remove the license plate light assembly. Apply battery voltage to the terminals and check that the license plate light illuminates.
Standard:
Measurement Condition
Standard
Positive battery - Terminal 2
License plate light illuminates
Reinstall the license plate light assembly.
Hatchback (Except G. C. C. Countries, Except 2ZR-FE Engine):
Remove the license plate light assembly. Apply battery voltage to the terminals and check that the license plate light illuminates.
Standard:
Measurement Condition
Standard
Positive battery - Terminal 2
License plate light illuminates
Reinstall the license plate light assembly.
Sedan:
Remove the license plate light assembly. Apply battery voltage to the terminals and check that the license plate light illuminates.
Standard:
Measurement Condition
Standard
Positive battery - Terminal 2
License plate light illuminates
Reinstall the license plate light assembly.
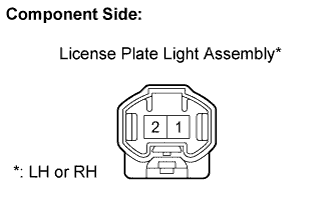
Hatchback (2ZR-FE Engine):
Remove the license plate light assembly.
Apply battery voltage to the terminals and check that the license plate light illuminates.
Standard:
Measurement Condition
Standard
Positive battery - Terminal 2
License plate light illuminates
Reinstall the license plate light assembly.
NG
OK
17. CHECK HARNESS AND CONNECTOR (MAIN BODY ECU - LICENSE PLATE LIGHT ASSEMBLY)
Hatchback (G. C. C. Countries):
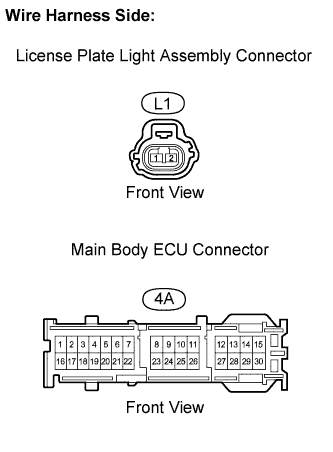
Disconnect the L1 license plate light assembly connector. Disconnect the 4A main body ECU connector.
Measure the resistance.
Standard resistance:
Tester Connection
Specified Condition
4A-29 - L1-2
Below 1 Ω
4A-29 or L1-2 - Body ground
10 kΩ or higher
Reconnect the license plate light assembly connector.
Reconnect the main body ECU connector.
Hatchback (Except G. C. C. Countries, Except 2ZR-FE Engine):
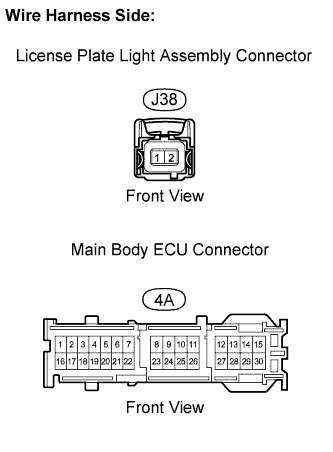
Disconnect the J38 license plate light assembly connector. Disconnect the 4A main body ECU connector.
Measure the resistance.
Standard resistance:
Tester Connection
Specified Condition
4A-29 - J38-2
Below 1 Ω
4A-29 or J38-2 - Body ground
10 kΩ or higher
Reconnect the license plate light assembly connector.
Reconnect the main body ECU connector.
Sedan:
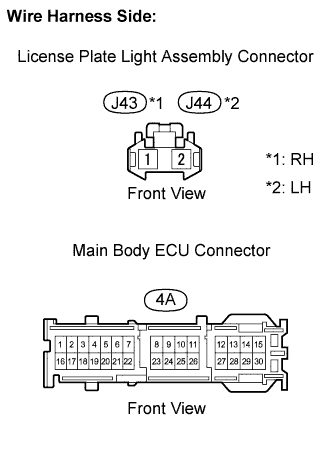
Disconnect the J43 and J44 license plate light assembly connectors. Disconnect the 4A main body ECU connector.
Measure the resistance.
Standard resistance:
Tester Connection
Specified Condition
4A-29 - J43-2
Below 1 Ω
4A-29 - J44-2
Below 1 Ω
4A-29 or J43-2 - Body ground
10 kΩ or higher
4A-29 or J44-2 - Body ground
10 kΩ or higher
Reconnect the license plate light assembly connectors.
Reconnect the main body ECU connector.
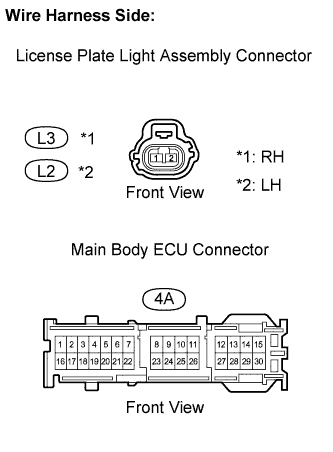
Hatchback (2ZR-FE Engine):
Disconnect the L2and L3 license plate light assembly connectors.
Disconnect the 4A main body ECU connector.
Measure the resistance.
Standard resistance:
Tester Connection
Specified Condition
4A-29 - L2-2
Below 1 Ω
4A-29 - L3-2
Below 1 Ω
4A-29 or L2-2 - Body ground
10 kΩ or higher
4A-29 or L3-2 - Body ground
10 kΩ or higher
Reconnect the license plate light assembly connectors.
Reconnect the main body ECU connector.
NG
REPAIR OR REPLACE HARNESS OR CONNECTOR
OK
REPAIR OR REPLACE HARNESS OR CONNECTOR (LICENSE PLATE LIGHT ASSEMBLY - BODY GROUND)