Open in One Side of CAN Branch Line
Circuit diagnosis · Vehicles built from Aug 2005
DESCRIPTION
If 2 or more ECUs and/or sensors do not appear on the intelligent tester "Communication Bus Check" screen, one side of the CAN branch wire may be open. (one side of the CAN-H [branch wire] / CAN-L [branch wire] of the ECU and/or sensor is open.)| Symptom |
Trouble Area |
| 2 or more ECUs and/or sensors do not appear on intelligent tester "Communication Bus Check" screen |
|
- HINT:
- *1: w/ ABS
- *2: w/ VSC
- *3: w/ VSC (TMC Made)
- *4: w/ Air conditioning or PTC heater
- *5: w/ Entry and start system
- *1: w/ ABS
WIRING DIAGRAM
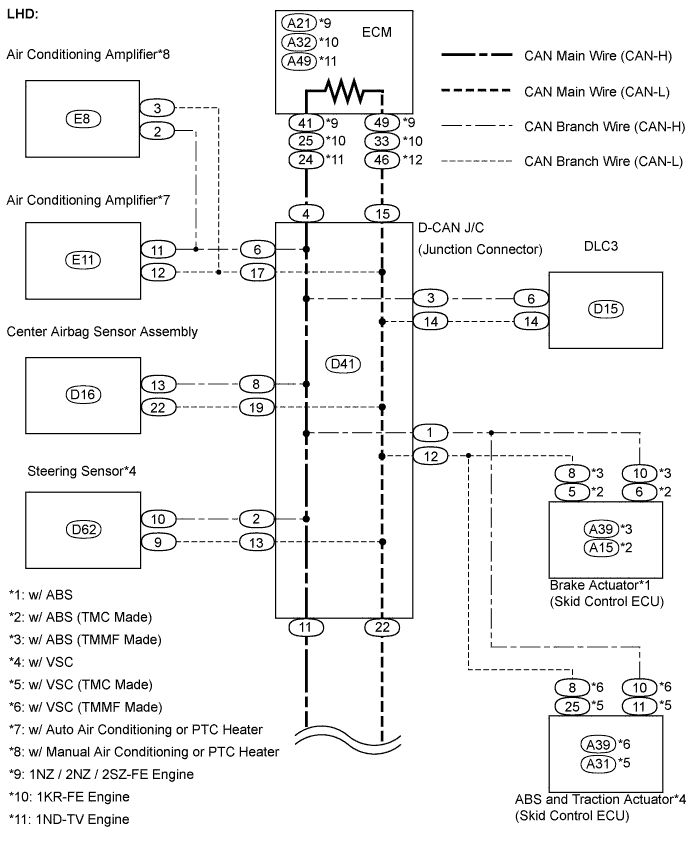

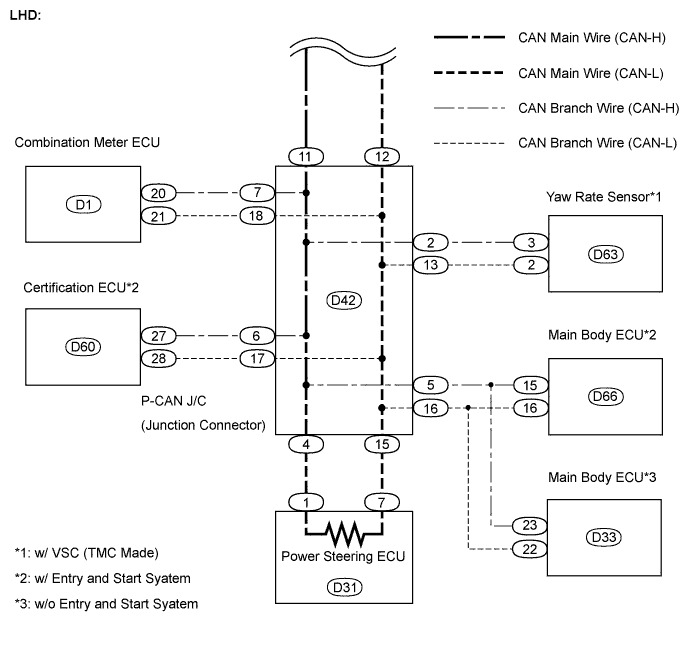
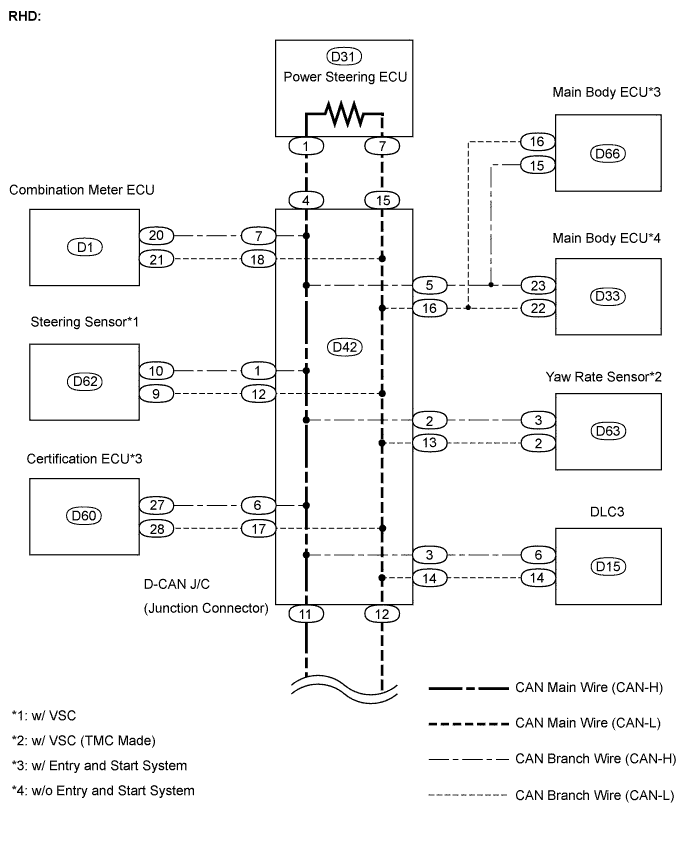
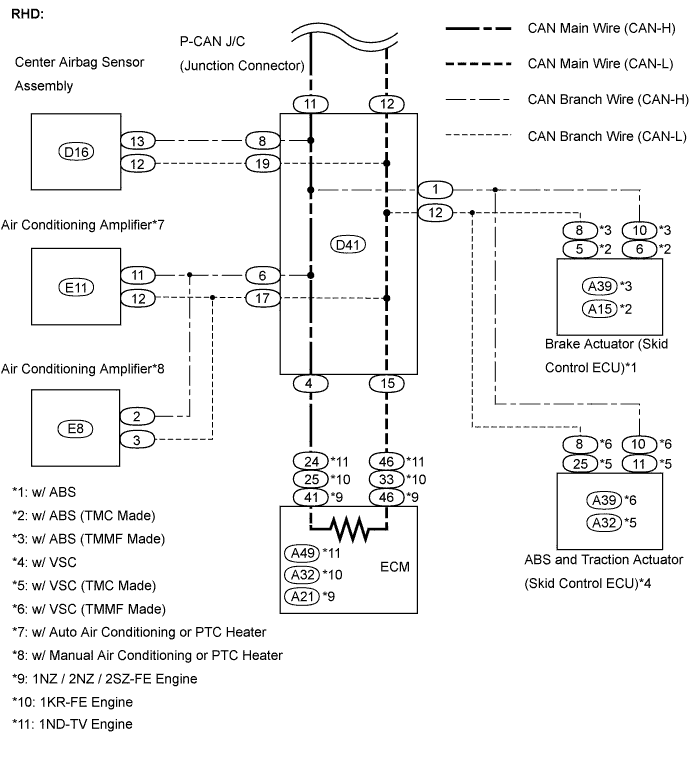
INSPECTION PROCEDURE
- NOTICE:
- Turn the ignition switch off before measuring the resistances of the CAN main wire and the CAN branch wire.
- After the ignition switch is turned off, check that the key reminder warning system and light reminder warning system are not in operation.
- Before measuring the resistance, leave the vehicle as is for at least 1 minute and do not operate the ignition switch, any other switches or the doors. If doors need to be opened in order to check connectors, open the doors and leave them open.
- HINT:
- Operating the ignition switch, any switches or any doors triggers related ECU and sensor communication with the CAN, which causes resistance variation.
- Turn the ignition switch off before measuring the resistances of the CAN main wire and the CAN branch wire.
- HINT:
- Perform the following inspection for the ECUs (sensors) which are not displayed on the intelligent tester. If a malfunction cannot be identified, perform the following inspections for the ECUs (sensors) connected to the CAN communication system.
- Do not remove the power steering ECU and ECM, as they are the end parts of the circuit. If removed, CAN communication will not be possible.
- The open circuit confirmation of the power steering ECU, ECM and main wire is performed in the CHECK CAN BUS LINE procedure of HOW TO PROCEED WITH TROUBLESHOOTING. This inspection only has procedures for checking for an open circuit on one side of the CAN branch wire.
- Perform the following inspection for the ECUs (sensors) which are not displayed on the intelligent tester. If a malfunction cannot be identified, perform the following inspections for the ECUs (sensors) connected to the CAN communication system.
| 1. CHECK OPEN IN ONE SIDE OF CAN BRANCH WIRE (BRAKE ACTUATOR (SKID CONTROL ECU)) |

- NOTICE:
- For vehicles without ABS, go to step 3.
TMC Made:
Disconnect the A15 brake actuator (skid control ECU) connector.
Select "Communication Bus Check" on the intelligent tester (Click here).
- Result:
Result
Proceed to
ABS/VSC/TRC not displayed on intelligent tester.
A
Several ECUs and sensors other than ABS/VSC/TRC not displayed on intelligent tester.
B
TMMF Made:
Disconnect the A39 brake actuator (skid control ECU) connector.
Select "Communication Bus Check" on the intelligent tester (Click here).
- Result:
Result
Proceed to
ABS/VSC/TRC not displayed on intelligent tester.
A
Several ECUs and sensors other than ABS/VSC/TRC not displayed on intelligent tester.
B
|
|
||||

| A | |
 |
| 2. CHECK OPEN IN ONE SIDE OF CAN BRANCH WIRE (BRAKE ACTUATOR (SKID CONTROL ECU) BRANCH WIRE) |
TMC Made: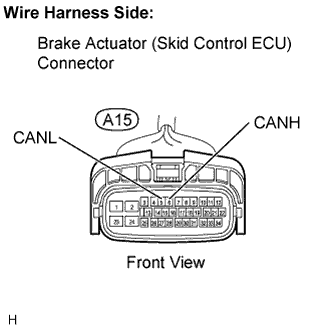
Measure the resistance.
- HINT:
- The resistance must be measured after the A15 brake actuator (skid control ECU) connector is disconnected.
- Standard resistance:
Tester Connection
Condition
Specified Condition
A15-6 (CANH) - A15-5 (CANL)
Ignition switch off
54 to 69 Ω
TMMF Made: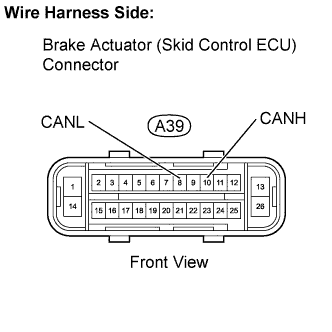
Measure the resistance.
- HINT:
- The resistance must be measured after the A39 brake actuator (skid control ECU) connector is disconnected.
- Standard resistance:
Tester Connection
Condition
Specified Condition
A39-10 (CANH) - A39-8 (CANL)
Ignition switch off
54 to 69 Ω
|
|
||||

| OK | ||
 |
||
| ||
| 3. CHECK OPEN IN ONE SIDE OF CAN BRANCH WIRE (ABS AND TRACTION ACTUATOR (SKID CONTROL ECU)) |
- NOTICE:
- For vehicles without VSC, go to step 5.
TMC Made:
Disconnect the A31 ABS and traction actuator (skid control ECU) connector.
Select "Communication Bus Check" on the intelligent tester (Click here).
- Result:
Result
Proceed to
ABS/VSC/TRC not displayed on intelligent tester.
A
Several ECUs and sensors other than ABS/VSC/TRC not displayed on intelligent tester.
B
TMMF Made:
Disconnect the A39 ABS and traction actuator (skid control ECU) connector.
Select "Communication Bus Check" on the intelligent tester (Click here).
- Result:
Result
Proceed to
ABS/VSC/TRC not displayed on intelligent tester.
A
Several ECUs and sensors other than ABS/VSC/TRC not displayed on intelligent tester.
B
|
|
||||
| A | |
|
| 4. CHECK OPEN IN ONE SIDE OF CAN BRANCH WIRE (ABS AND TRACTION ACTUATOR (SKID CONTROL ECU) BRANCH WIRE) |
TMC Made: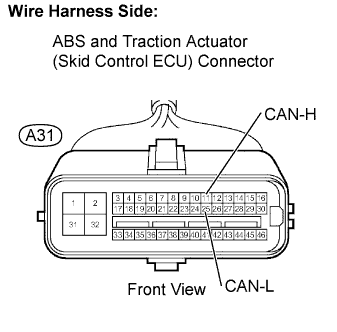
Measure the resistance.
- HINT:
- The resistance must be measured after the A31 ABS and traction actuator (skid control ECU) connector is disconnected.
- Standard resistance:
Tester Connection
Condition
Specified Condition
A31-11 (CANH) - A31-25 (CANL)
Ignition switch off
54 to 69 Ω
TMMF Made: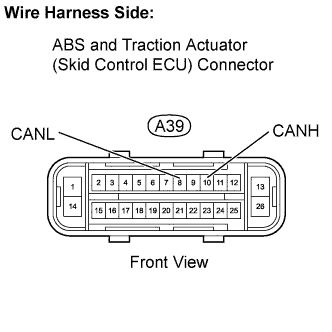
Measure the resistance.
- HINT:
- The resistance must be measured after the A39 ABS and traction actuator (skid control ECU) connector is disconnected.
- Standard resistance:
Tester Connection
Condition
Specified Condition
A39-10 (CANH) - A39-8 (CANL)
Ignition switch off
54 to 69 Ω
|
|
||||
| OK | ||
|
||
| ||
| 5. CHECK OPEN IN ONE SIDE OF CAN BRANCH WIRE (AIR CONDITIONING AMPLIFIER) |
- NOTICE:
- For vehicles without air conditioning or PTC heater, go to step 7.
w/ Auto air conditioning:
Disconnect the E11 air conditioning amplifier connector.
Select "Communication Bus Check" on the intelligent tester (Click here).
- Result:
Result
Proceed to
Air Conditioner not displayed on intelligent tester.
A
Several ECUs and sensors other than Air conditioner not displayed on intelligent tester.
B
w/ Manual air conditioning:
Disconnect the E8 air conditioning amplifier connector.
Select "Communication Bus Check" on the intelligent tester (Click here).
- Result:
Result
Proceed to
Air Conditioner not displayed on intelligent tester.
A
Several ECUs and sensors other than Air Conditioner not displayed on intelligent tester.
B
|
|
||||
| A | |
|
| 6. CHECK OPEN IN ONE SIDE OF CAN BRANCH WIRE (AIR CONDITIONING AMPLIFIER BRANCH WIRE) |
w/ Auto air conditioning: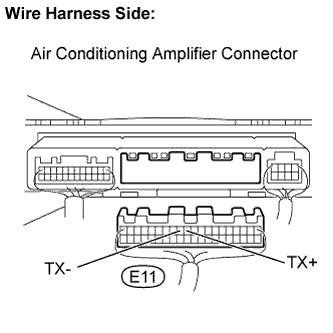
Measure the resistance.
- HINT:
- The resistance must be measured after the E11 air conditioning amplifier connector is disconnected.
- Standard resistance:
Tester Connection
Condition
Specified Condition
E11-11 (TX+) - E11-12 (TX-)
Ignition switch off
54 to 69 Ω
w/ Manual air conditioning: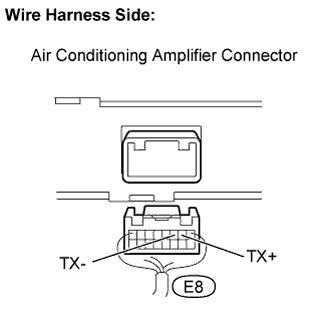
Measure the resistance.
- HINT:
- The resistance must be measured after the E8 air conditioning amplifier connector is disconnected.
- Standard resistance:
Tester Connection
Condition
Specified Condition
E8-2 (TX+) - E8-3 (TX-)
Ignition switch off
54 to 69 Ω
|
|
||||
| OK | ||
|
||
| ||
| 7. CHECK OPEN IN ONE SIDE OF CAN BRANCH WIRE (CENTER AIRBAG SENSOR ASSEMBLY) |
Disconnect the D16 center airbag sensor assembly connector.
Select "Communication Bus Check" on the intelligent tester (Click here).
- Result:
Result
Proceed to
SRS Airbag not displayed on intelligent tester.
A
Several ECUs and sensors other than SRS Airbag not displayed on intelligent tester.
B
|
|
||||
| A | |
|
| 8. CHECK OPEN IN ONE SIDE OF CAN BRANCH WIRE (CENTER AIRBAG SENSOR ASSEMBLY BRANCH WIRE) |
Measure the resistance.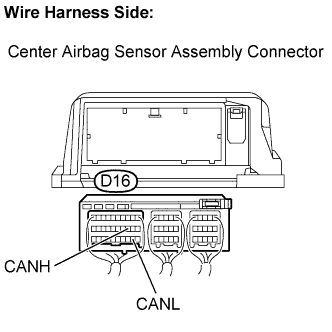
- HINT:
- The resistance must be measured after the D16 center airbag sensor assembly connector is disconnected.
- Standard resistance:
Tester Connection
Condition
Specified Condition
D16-13 (CANH) - D16-22 (CANL)
Ignition switch off
54 to 69 Ω
|
|
||||
| OK | ||
|
||
| ||
| 9. CHECK OPEN IN ONE SIDE OF CAN BRANCH WIRE (STEERING SENSOR) |
- NOTICE:
- For vehicles without VSC, go to step 11.
- HINT:
- For vehicle with VSC only.
Disconnect the D62 steering sensor connector.
Select "Communication Bus Check" on the intelligent tester (Click here).
- Result:
Result
Proceed to
Steering Angle Sensor not displayed on intelligent tester.
A
Several ECUs and sensors other than Steering Angle Sensor not displayed on intelligent tester.
B
|
|
||||
| A | |
|
| 10. CHECK OPEN IN ONE SIDE OF CAN BRANCH WIRE (STEERING SENSOR BRANCH WIRE) |
Measure the resistance.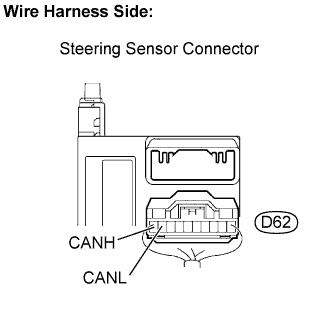
- HINT:
- The resistance must be measured after the D62 steering sensor connector is disconnected.
- Standard resistance:
Tester Connection
Condition
Specified Condition
D62-10 (CANH) - D62-9 (CANL)
Ignition switch off
54 to 69 Ω
|
|
||||
| OK | ||
|
||
| ||
| 11. CHECK OPEN IN ONE SIDE OF CAN BRANCH WIRE (MAIN BODY ECU) |
w/ Entry and start system:
Disconnect the D66 main body ECU connector.
Select "Communication Bus Check" on the intelligent tester (Click here).
- Result:
Result
Proceed to
Integrated J/B not displayed on intelligent tester.
A
Several ECUs and sensors other than Integrated J/B not displayed on intelligent tester.
B
w/o Entry and start system:
Disconnect the D33 main body ECU connector.
Select "Communication Bus Check" on the intelligent tester (Click here).
- Result:
Result
Proceed to
Integrated J/B not displayed on intelligent tester.
A
Several ECUs and sensors other than Integrated J/B not displayed on intelligent tester.
B
|
|
||||
| A | |
|
| 12. CHECK OPEN IN ONE SIDE OF CAN BRANCH WIRE (MAIN BODY ECU BRANCH WIRE) |
w/ Entry and start system: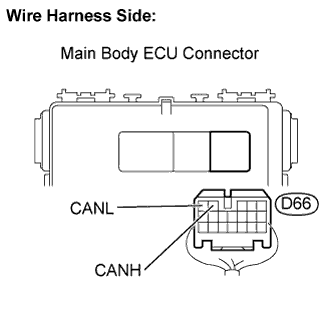
Measure the resistance.
- HINT:
- The resistance must be measured after the D66 main body ECU connector is disconnected.
- Standard resistance:
Tester Connection
Condition
Specified Condition
D66-15 (CANH) - D66-16 (CANL)
Ignition switch off
54 to 69 Ω
w/o Entry and start system: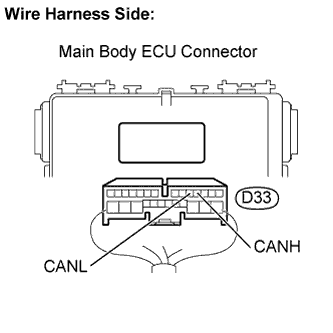
Measure the resistance.
- HINT:
- The resistance must be measured after the D33 main body ECU connector is disconnected.
- Standard resistance:
Tester Connection
Condition
Specified Condition
D33-23 (CANH) - D33-22 (CANL)
Ignition switch off
54 to 69 Ω
|
|
||||
| OK | ||
|
||
| ||
| 13. CHECK OPEN IN ONE SIDE OF CAN BRANCH WIRE (YAW RATE SENSOR) |
- NOTICE:
- For vehicles without VSC (TMC made), go to step 15.
Disconnect the D63 yaw rate sensor connector.
Select "Communication Bus Check" on the intelligent tester (Click here).
- Result:
Result
Proceed to
Yaw Rate / Deceleration Sensor not displayed on intelligent tester.
A
Several ECUs and sensors other than Yaw Rate / Deceleration Sensor not displayed on intelligent tester.
B
|
|
||||
| A | |
|
| 14. CHECK OPEN IN ONE SIDE OF CAN BRANCH WIRE (YAW RATE SENSOR BRANCH WIRE) |
Measure the resistance.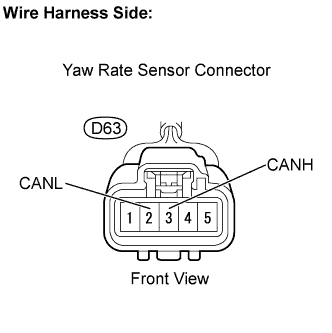
- HINT:
- The resistance must be measured after the D63 yaw rate sensor connector is disconnected.
- Standard resistance:
Tester Connection
Condition
Specified Condition
D63-3 (CANH) - D63-2 (CANL)
Ignition switch off
54 to 69 Ω
|
|
||||
| OK | ||
|
||
| ||
| 15. CHECK OPEN IN ONE SIDE OF CAN BRANCH WIRE (CERTIFICATION ECU) |
- NOTICE:
- For vehicles without entry and start system, go to step 17.
Disconnect the D60 certification ECU connector.
Select "Communication Bus Check" on the intelligent tester (Click here).
- Result:
Result
Proceed to
Entry & Start not displayed on intelligent tester.
A
Several ECUs and sensors other than Entry & Start not displayed on intelligent tester.
B
|
|
||||
| A | |
|
| 16. CHECK OPEN IN ONE SIDE OF CAN BRANCH WIRE (CERTIFICATION ECU BRANCH WIRE) |
Measure the resistance.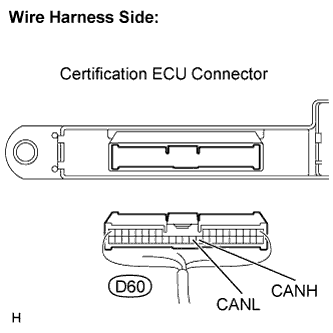
- HINT:
- The resistance must be measured after the D60 certification ECU connector is disconnected.
- Standard resistance:
Tester Connection
Condition
Specified Condition
D60-27 (CANH) - D60-28 (CANL)
Ignition switch off
54 to 69 Ω
|
|
||||
| OK | ||
|
||
| ||
| 17. CHECK OPEN IN ONE SIDE OF CAN BRANCH WIRE (COMBINATION METER ECU BRANCH WIRE) |
Disconnect the D1 combination meter ECU connector.
Measure the resistance.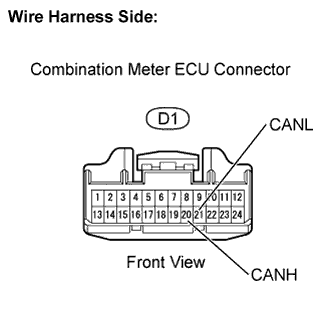
- Standard resistance:
Tester Connection
Condition
Specified Condition
D1-20 (CANH) - D1-20 (CANL)
Ignition switch off
54 to 69 Ω
|
|
||||
| OK | ||
|
||
| ||