INSTALLATION
Removal / installation · Vehicles built from Jan 2006
- CAUTION:
- Some of these service operations affect the SRS airbag system. Read the precautionary notices concerning the SRS airbag system before servicing (w/ Front Seat Side Airbag) (Click here).
- NOTICE:
- Always use "Torx" socket wrench E10 when installing the front seat.
- HINT:
- The procedure described below is for the LHD. Use the same procedure for both the RHD and LHD, unless otherwise specified.
| 1. INSTALL FRONT SEAT CUSHION COVER PAD (Built in Occupant Detection Sensor) |

Install the front seat cushion cover pad with the 2 clips.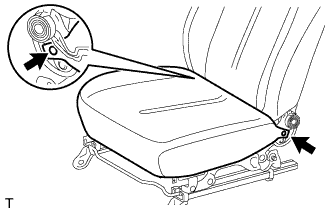

Engage the 2 claws and the 7 hooks.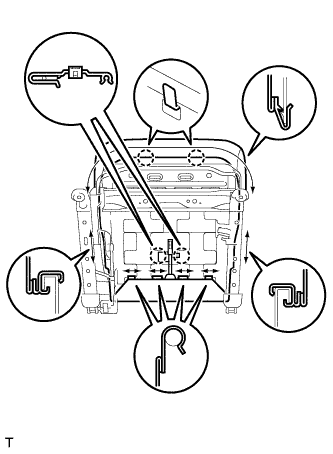
Engage the 2 claws and install the connector.
| 2. INSTALL FRONT SEAT CUSHION INNER SHIELD |
- HINT:
- Use the same procedure as for the driver side (Click here).
| 3. INSTALL FRONT SEAT INNER BELT ASSEMBLY |
- HINT:
- Use the same procedure as for the driver side (Click here).
| 4. INSTALL FRONT SEAT CUSHION OUTER SHIELD |
- HINT:
- Use the same procedure as for the driver side (Click here).
| 5. INSTALL RECLINING ADJUSTER RELEASE HANDLE |
- HINT:
- Use the same procedure as for the driver side (Click here).
| 6. INSTALL FRONT SEAT ASSEMBLY |
- HINT:
- Use the same procedure as for the driver side (Click here).
| 7. INSTALL FRONT SEAT HEADREST ASSEMBLY |
Push in the lock button of the front seat headrest support and install the front seat headrest.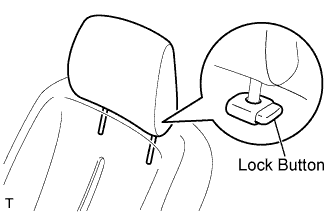
| 8. CONNECT CABLE TO NEGATIVE BATTERY TERMINAL |
- Torque:
- 5.4 N*m{ 55 kgf*cm , 48 in.*lbf }
| 9. INSPECT SRS WARNING LIGHT (w/ Front Seat Side Airbag) |