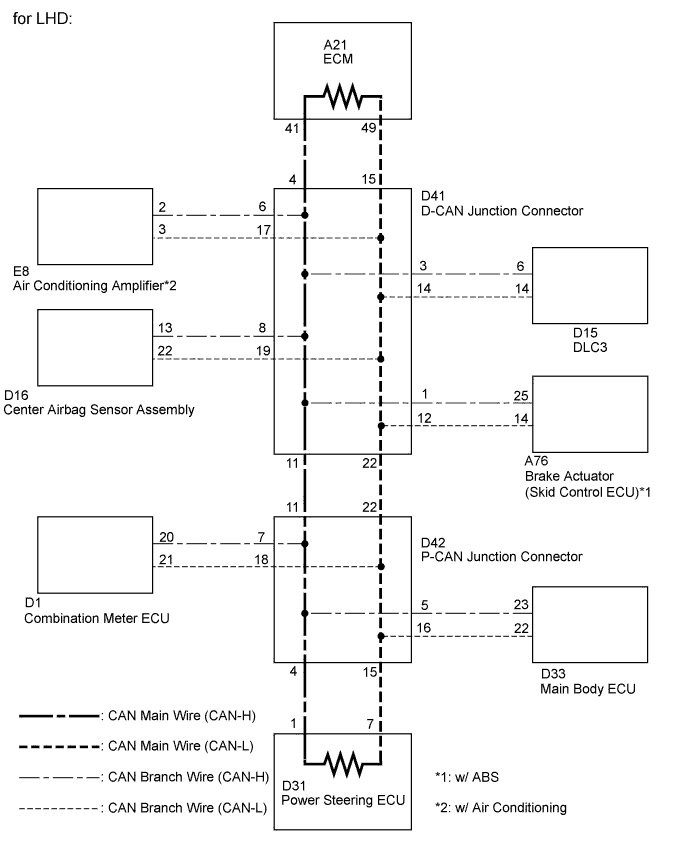
CAN COMMUNICATION SYSTEM > Open in One Side of CAN Branch Line |
| Symptom | Trouble Area |
| 2 or more ECUs and/or sensors do not appear on intelligent tester "Communication Bus Check" screen |
|
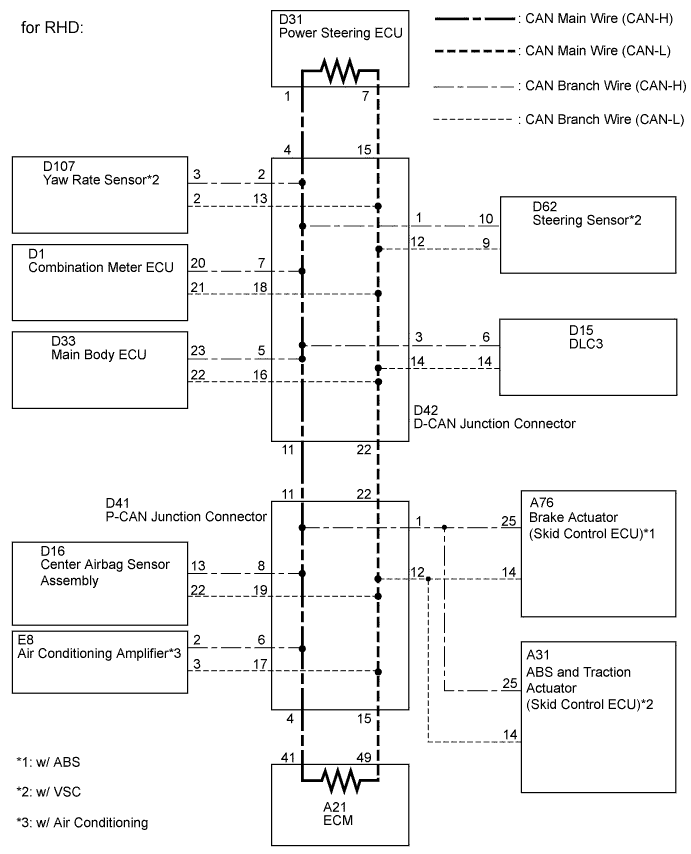
| 1.CHECK OPEN IN ONE SIDE OF CAN BRANCH WIRE (BRAKE ACTUATOR (SKID CONTROL ECU)) |
Disconnect the A76 brake actuator (skid control ECU) connector.
Select "Communication Bus Check" on the intelligent tester (Click here).
| Result | Proceed to |
| ABS/VSC/TRC not displayed on intelligent tester. | A |
| Several ECUs and sensors other than ABS/VSC/TRC not displayed on intelligent tester. | B |
|
| ||||
| A | |
 |
| 2.CHECK OPEN IN ONE SIDE OF CAN BRANCH WIRE (BRAKE ACTUATOR (SKID CONTROL ECU) BRANCH WIRE) |
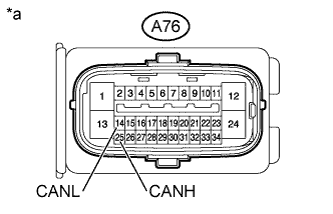 |
Measure the resistance according to the value(s) in the table below.
| Tester Connection | Switch Condition | Specified Condition |
| A76-25 (CANH) - A76-14 (CANL) | Ignition switch off | 54 to 69 Ω |
| *a | Front view of wire harness connector (to Brake Actuator (Skid Control ECU)) |
|
| ||||
| OK | ||
 | ||
| ||
| 3.CHECK OPEN IN ONE SIDE OF CAN BRANCH WIRE (ABS AND TRACTION ACTUATOR (SKID CONTROL ECU)) |
Disconnect the A31 ABS and traction actuator (skid control ECU) connector.
Select "Communication Bus Check" on the intelligent tester (Click here).
| Result | Proceed to |
| ABS/VSC/TRC not displayed on intelligent tester. | A |
| Several ECUs and sensors other than ABS/VSC/TRC not displayed on intelligent tester. | B |
|
| ||||
| A | |
|
| 4.CHECK OPEN IN ONE SIDE OF CAN BRANCH WIRE (ABS AND TRACTION ACTUATOR (SKID CONTROL ECU) BRANCH WIRE) |
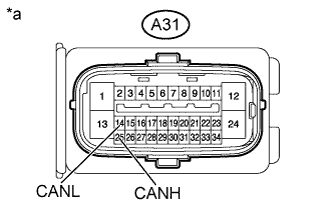 |
Measure the resistance according to the value(s) in the table below.
| Tester Connection | Switch Condition | Specified Condition |
| A31-25 (CANH) - A31-14 (CANL) | Ignition switch off | 54 to 69 Ω |
| *a | Front view of wire harness connector (to ABS and Traction Actuator (Skid Control ECU)) |
|
| ||||
| OK | ||
| ||
| ||
| 5.CHECK OPEN IN ONE SIDE OF CAN BRANCH WIRE (AIR CONDITIONING AMPLIFIER) |
Disconnect the E8 air conditioning amplifier connector.
Select "Communication Bus Check" on the intelligent tester (Click here).
| Result | Proceed to |
| Air conditioner not displayed on intelligent tester. | A |
| Several ECUs and sensors other than air conditioner not displayed on intelligent tester. | B |
|
| ||||
| A | |
|
| 6.CHECK OPEN IN ONE SIDE OF CAN BRANCH WIRE (AIR CONDITIONING AMPLIFIER BRANCH WIRE) |
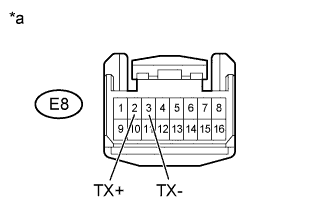 |
Measure the resistance according to the value(s) in the table below.
| Tester Connection | Switch Condition | Specified Condition |
| E8-2 (TX+) - E8-3 (TX-) | Ignition switch off | 54 to 69 Ω |
| *a | Front view of wire harness connector (to Air Conditioning Amplifier) |
|
| ||||
| OK | ||
| ||
| ||
| 7.CHECK OPEN IN ONE SIDE OF CAN BRANCH WIRE (CENTER AIRBAG SENSOR ASSEMBLY) |
Disconnect the D16 center airbag sensor assembly connector.
Select "Communication Bus Check" on the intelligent tester (Click here).
| Result | Proceed to |
| SRS airbag not displayed on intelligent tester. | A |
| Several ECUs and sensors other than SRS airbag not displayed on intelligent tester. | B |
|
| ||||
| A | |
|
| 8.CHECK OPEN IN ONE SIDE OF CAN BRANCH WIRE (CENTER AIRBAG SENSOR ASSEMBLY BRANCH WIRE) |
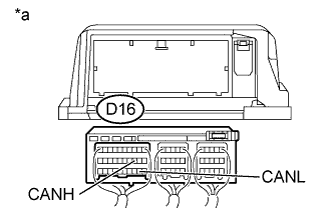 |
Measure the resistance according to the value(s) in the table below.
| Tester Connection | Switch Condition | Specified Condition |
| D16-13 (CANH) - D16-22 (CANL) | Ignition switch off | 54 to 69 Ω |
| *a | Rear view of wire harness connector (to Center Airbag Sensor Assembly) |
|
| ||||
| OK | ||
| ||
| ||
| 9.CHECK OPEN IN ONE SIDE OF CAN BRANCH WIRE (STEERING SENSOR) |
Disconnect the D62 steering sensor connector.
Select "Communication Bus Check" on the intelligent tester (Click here).
| Result | Proceed to |
| Steering angle sensor not displayed on intelligent tester. | A |
| Several ECUs and sensors other than steering angle sensor not displayed on intelligent tester. | B |
|
| ||||
| A | |
|
| 10.CHECK OPEN IN ONE SIDE OF CAN BRANCH WIRE (STEERING SENSOR BRANCH WIRE) |
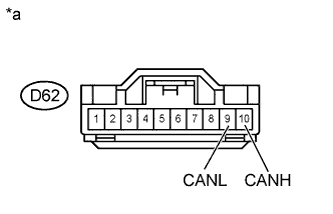 |
Measure the resistance according to the value(s) in the table below.
| Tester Connection | Switch Condition | Specified Condition |
| D62-10 (CANH) - D62-9 (CANL) | Ignition switch off | 54 to 69 Ω |
| *a | Front view of wire harness connector (to Steering Sensor) |
|
| ||||
| OK | ||
| ||
| ||
| 11.CHECK OPEN IN ONE SIDE OF CAN BRANCH WIRE (MAIN BODY ECU) |
Disconnect the D33 main body ECU connector.
Select "Communication Bus Check" on the intelligent tester (Click here).
| Result | Proceed to |
| Integrated J/B not displayed on intelligent tester. | A |
| Several ECUs and sensors other than integrated J/B not displayed on intelligent tester. | B |
|
| ||||
| A | |
|
| 12.CHECK OPEN IN ONE SIDE OF CAN BRANCH WIRE (MAIN BODY ECU BRANCH WIRE) |
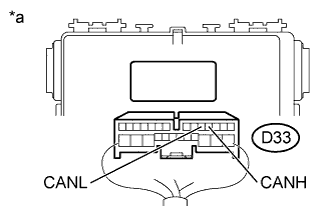 |
Measure the resistance according to the value(s) in the table below.
| Tester Connection | Switch Condition | Specified Condition |
| D33-23 (CANH) - D33-22 (CANL) | Ignition switch off | 54 to 69 Ω |
| *a | Rear view of wire harness connector (to Main Body ECU) |
|
| ||||
| OK | ||
| ||
| ||
| 13.CHECK OPEN IN ONE SIDE OF CAN BRANCH WIRE (YAW RATE SENSOR) |
Disconnect the D107 yaw rate sensor connector.
Select "Communication Bus Check" on the intelligent tester (Click here).
| Result | Proceed to |
| Yaw Rate / Deceleration Sensor not displayed on intelligent tester. | A |
| Several ECUs and sensors other than Yaw Rate / Deceleration Sensor not displayed on intelligent tester. | B |
|
| ||||
| A | |
|
| 14.CHECK OPEN IN ONE SIDE OF CAN BRANCH WIRE (YAW RATE SENSOR BRANCH WIRE) |
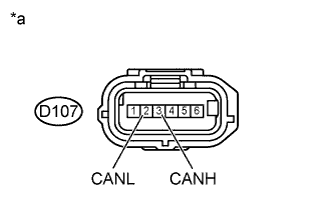 |
Measure the resistance according to the value(s) in the table below.
| Tester Connection | Switch Condition | Specified Condition |
| D107-3 (CANH) - D107-2 (CANL) | Ignition switch off | 54 to 69 Ω |
| *a | Front view of wire harness connector (to Yaw Rate Sensor) |
|
| ||||
| OK | ||
| ||
| ||
| 15.CHECK OPEN IN ONE SIDE OF CAN BRANCH WIRE (COMBINATION METER ECU BRANCH WIRE) |
Disconnect the D1 combination meter ECU connector.
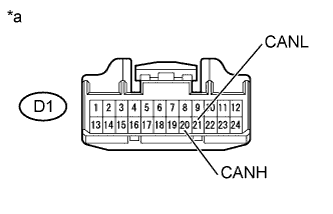 |
Measure the resistance according to the value(s) in the table below.
| Tester Connection | Switch Condition | Specified Condition |
| D1-20 (CANH) - D1-21 (CANL) | Ignition switch off | 54 to 69 Ω |
| *a | Front view of wire harness connector (to Combination Meter ECU) |
|
| ||||
| OK | ||
| ||
| ||

