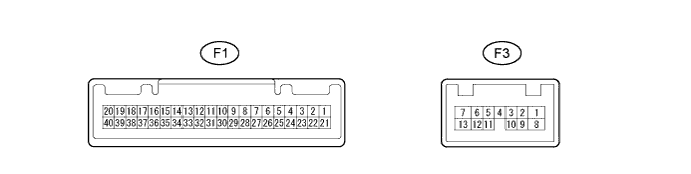
SEAT BELT WARNING SYSTEM > TERMINALS OF ECU |
| CHECK COMBINATION METER ASSEMBLY |
Disconnect the F1 combination meter assembly connector.
Measure the resistance and voltage according to the value(s) in the table below.
| Terminal No. (Symbol) | Wiring Color | Terminal Description | Condition | Specified Condition |
| F1-40 (B) - Body ground | L - Body ground | Combination meter +B line | Always | 11 to 14 V |
| F1-39 (IG+) - Body ground | P - Body ground | Combination meter IG line | Ignition switch ON | 11 to 14 V |
| F1-21 (ET) - Body ground | W-B - Body ground | Ground | Always | Below 1 Ω |
Reconnect the F1 combination meter assembly connector.
Measure the voltage according to the value(s) in the table below.
| Terminal No. (Symbol) | Wiring Color | Terminal Description | Condition | Specified Condition |
| F1-7 (P/SB) - Body ground | P - Body ground | Front passenger seat belt signal | Front passenger seat occupied, seat belt fastened | Below 1 V |
| Front passenger seat occupied, seat belt unfastened | 11 to 14 V |
| CHECK MAIN BODY ECU (MULTIPLEX NETWORK BODY ECU) |
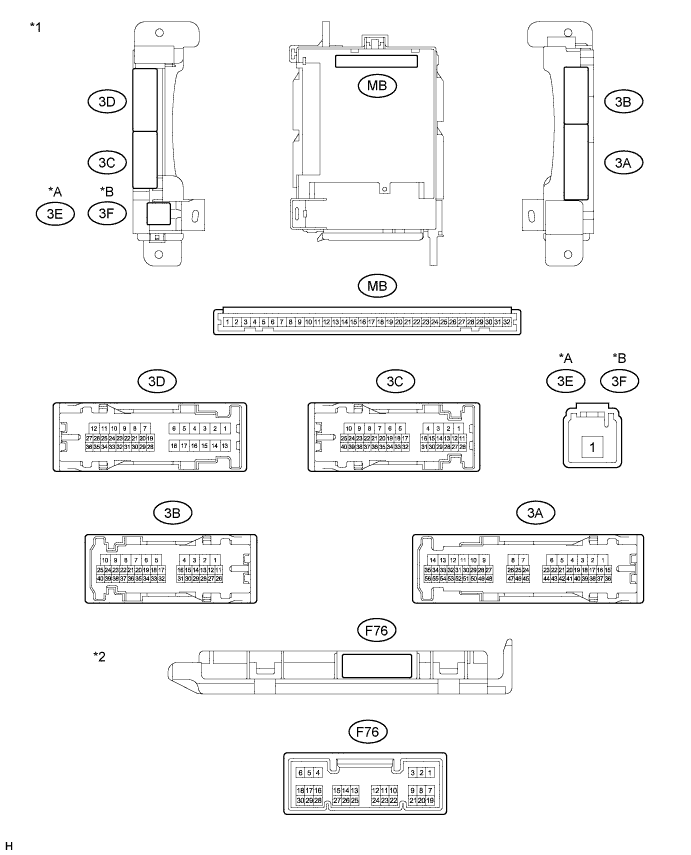
| *A | for LHD | *B | for RHD |
| *1 | Instrument Panel Junction Block Assembly | *2 | Main Body ECU (Multiplex Network Body ECU) |
Remove the main body ECU from the instrument panel junction block assembly (Click here).
Measure the resistance and voltage according to the value(s) in the table below.
| Terminal No. (Symbol) | Wiring Color | Terminal Description | Condition | Specified Condition |
| MB-2 (FLCY) - Body ground | - | Front door courtesy light switch LH signal | Front door LH open | Below 1 Ω |
| Front door LH closed | 10 kΩ or higher | |||
| MB-11 (GND1) - Body ground | - | Ground | Always | Below 1 Ω |
| MB-29 (ACC) - Body ground | - | Ignition power supply | Ignition switch ACC | 11 to 14 V |
| MB-30 (BECU) - Body ground | - | Battery (ECU power source) | Always | 11 to 14 V |
| MB-31 (ALTB) - Body ground | - | Battery (ECU power source) | Always | 11 to 14 V |
| MB-32 (IG) - Body ground | - | Ignition power supply | Ignition switch ON | 11 to 14 V |
| F76-19 (FRCY) - Body ground | Y - Body ground | Front door courtesy light switch RH signal | Front door RH open | Below 1 Ω |
| Front door RH closed | 10 kΩ or higher |
Install the main body ECU to the instrument panel junction block assembly (Click here).
Measure the voltage and check for pulse according to the value(s) in the table below.
| Terminal No. (Symbol) | Wiring Color | Terminal Description | Condition | Specified Condition |
| 3D-34 (DBKL) - Body ground | W - Body ground | Driver seat belt warning signal | Driver seat belt fastened | 11 to 14 V |
| Driver seat belt unfastened | Below 1 V | |||
| F76-13 (CANL) - Body ground | W - Body ground | CAN communication line | Ignition switch ON | Pulse generation |
| F76-14 (CANH) - Body ground | R - Body ground | CAN communication line | Ignition switch ON | Pulse generation |