 |
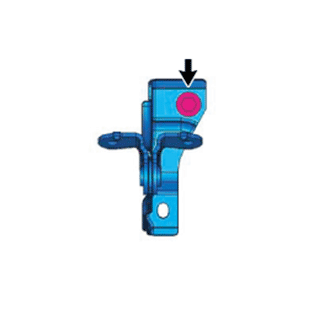
Temporarily install the rear seatback center hinge sub-assembly with the bolt shown in the illustration.
CHILD RESTRAINT SEAT ANCHOR BRACKET (for 3 Door) > INSTALLATION |
| 1. INSTALL REAR SEATBACK CENTER HINGE SUB-ASSEMBLY (for 60/40 Split Seat Type) |
|
Temporarily install the rear seatback center hinge sub-assembly with the bolt shown in the illustration.
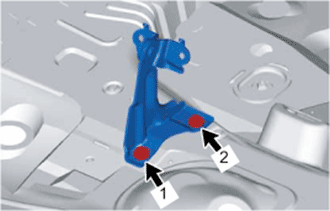 |
Install the bolt and tighten the 2 bolts in the order shown in the illustration.
| 2. INSTALL CHILD RESTRAINT SEAT ANCHOR BRACKET SUB-ASSEMBLY RH |
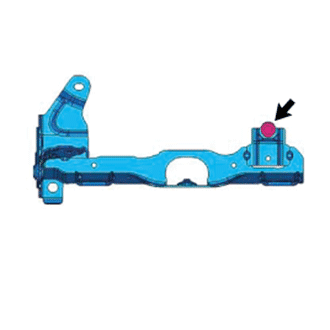 |
Temporarily install the child restraint seat anchor bracket sub-assembly RH with the bolt shown in the illustration.
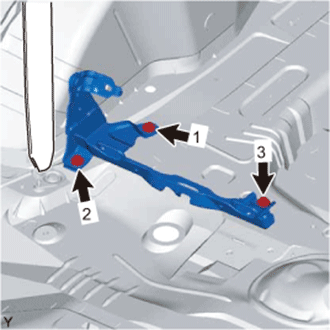 |
Install the 2 bolts and tighten the 3 bolts in the order shown in the illustration.
| 3. INSTALL CHILD RESTRAINT SEAT ANCHOR BRACKET SUB-ASSEMBLY LH |
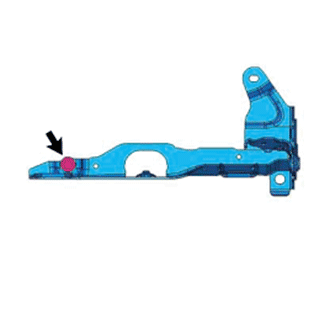 |
Temporarily install the child restraint seat anchor bracket sub-assembly LH with the bolt shown in the illustration.
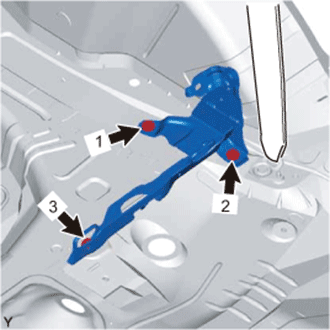 |
Install the 2 bolts and tighten the 3 bolts in the order shown in the illustration.
| 4. INSTALL DECK TRIM SIDE PANEL ASSEMBLY RH (for RH Side) |
Engage the 3 clips and the 3 claws and install the deck trim side panel.
Install the 3 screws.
| 5. INSTALL DECK TRIM SIDE PANEL ASSEMBLY LH (for LH Side) |
| 6. CONNECT REAR SEAT 3 POINT TYPE OUTER BELT ASSEMBLY RH |
Engage the 2 claws and install the rear seat 3 point type outer belt.
Tighten the bolt.
| 7. CONNECT REAR SEAT 3 POINT TYPE OUTER BELT ASSEMBLY LH |
| 8. INSTALL FRONT QUARTER TRIM PANEL ASSEMBLY RH |
Engage the 8 clips and the 10 claws.
Engage the 3 guides and install the quarter trim panel.
| 9. INSTALL FRONT QUARTER TRIM PANEL ASSEMBLY LH |
| 10. CONNECT FRONT SEAT OUTER BELT BAR SUB-ASSEMBLY RH |
Connect the floor anchor part of the front seat outer belt assembly and install the front seat belt outer bar sub-assembly with the 2 bolts.
| 11. CONNECT FRONT SEAT OUTER BELT BAR SUB-ASSEMBLY LH |
Connect the floor anchor part of the front seat outer belt assembly and install the front seat belt outer bar sub-assembly with the 2 bolts.
| 12. INSTALL FRONT DOOR OPENING TRIM WEATHERSTRIP RH |
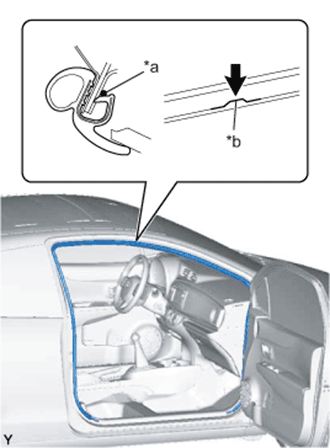 |
Align the paint mark on the front door opening trim weatherstrip with the flange position on the vehicle body and install the weatherstrip.
| *a | Paint Mark |
| *b | Flange Position |
| Area | Color |
| RH Side | Yellow |
| LH Side | White |
| 13. INSTALL FRONT DOOR OPENING TRIM WEATHERSTRIP LH |
| 14. INSTALL FRONT DOOR SCUFF PLATE RH |
Engage the 8 claws and install the front door scuff plate.
| 15. INSTALL FRONT DOOR SCUFF PLATE LH |
| 16. INSTALL REAR FLOOR FINISH PLATE |
Engage the 4 guides and the 4 claws to install the rear floor finish plate.
| 17. INSTALL JACK HANDLE (for RH Side) |
| 18. INSTALL NO. 2 ROOM LIGHT ASSEMBLY (w/ Luggage Compartment Room Light) |
Connect the connector.
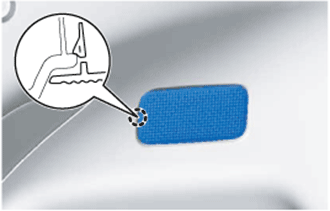 |
Engage the claw to install the No. 2 room light assembly.
| 19. INSTALL SPARE WHEEL COVER |
Install the spare wheel cover.
| 20. INSTALL DECK BOARD ASSEMBLY |
Install the deck board.
| 21. INSTALL REAR SEAT ASSEMBLY (for Fold Down Seat Type) |
| 22. INSTALL REAR SEAT ASSEMBLY (for 60/40 Split Seat Type LH Side) |
| 23. INSTALL REAR SEAT ASSEMBLY (for 60/40 Split Seat Type RH Side) |