 |
Engage the claw and install the air conditioning amplifier as shown in the illustration.
AIR CONDITIONING UNIT > INSTALLATION |
| 1. INSTALL NO. 2 AIR DUCT |
Engage the 3 claws and install the air duct.
| 2. INSTALL NO. 1 AIR DUCT |
Engage the 3 claws and install the air duct.
| 3. INSTALL COOLER AIR HOSE |
Install the cooler air hose.
| 4. INSTALL AIR CONDITIONING RADIATOR ASSEMBLY |
Install the air conditioning radiator with the 3 screws.
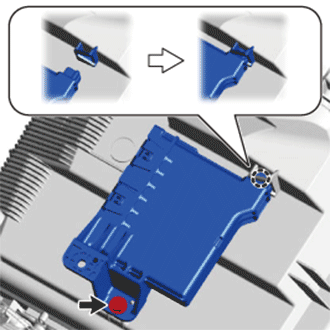
| 5. INSTALL AIR CONDITIONING AMPLIFIER ASSEMBLY (for Automatic Air Conditioning System) |
|
Engage the claw and install the air conditioning amplifier as shown in the illustration.
Tighten the screw.
| 6. INSTALL AIR CONDITIONING AMPLIFIER ASSEMBLY (for Manual Air Conditioning System) |
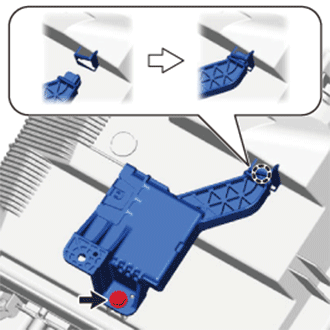 |
Engage the claw and install the air conditioning amplifier as shown in the illustration.
Tighten the screw.
| 7. INSTALL AIR CONDITIONING HARNESS ASSEMBLY (for LHD) |
Connect the connectors and engage the clamps, then install the air conditioning harness.
| 8. INSTALL AIR CONDITIONING HARNESS ASSEMBLY (for RHD) |
Connect the connectors and engage the clamps, then install the air conditioning harness.
| 9. TEMPORARILY TIGHTEN AIR CONDITIONER UNIT ASSEMBLY |
Temporarily tighten the air conditioning unit with the 3 bolts and nut.
| 10. INSTALL INSTRUMENT PANEL REINFORCEMENT |
Install the instrument panel reinforcement with the 8 bolts.
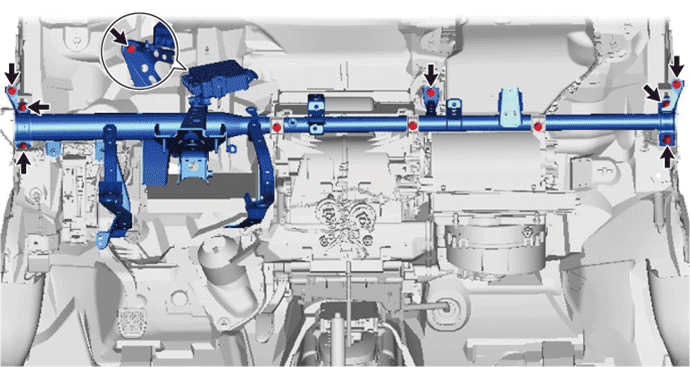
| 11. INSTALL NO. 1 INSTRUMENT PANEL BRACE SUB-ASSEMBLY |
Install the instrument panel brace with the 2 bolts, nut and screw.
| 12. INSTALL AIR CONDITIONER UNIT ASSEMBLY (for LHD) |
Install the air duct with the 2 bolts.
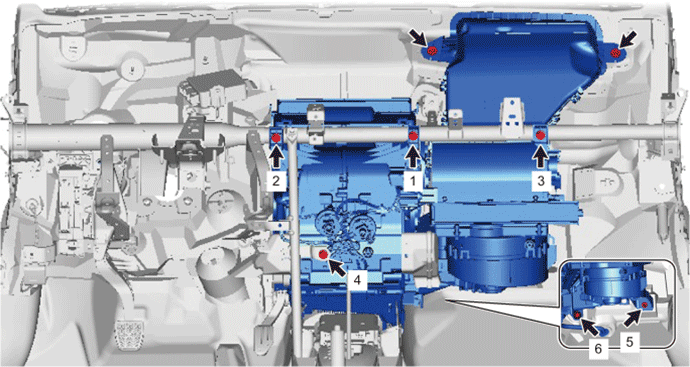
Install the bolt, nut and 4 screws in the order shown in the illustration.
| 13. INSTALL AIR CONDITIONER UNIT ASSEMBLY (for RHD) |
Install the air duct with the 2 bolts.
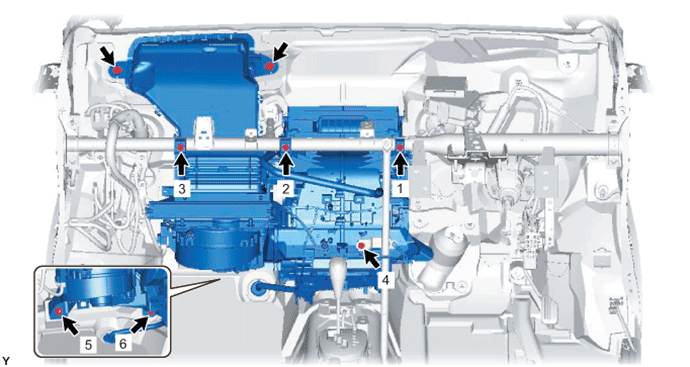
Install the bolt, nut and 4 screws in the order shown in the illustration.
| 14. INSTALL INSTRUMENT PANEL WIRE (for LHD) |
Connect the connectors and engage the clamps, then install the instrument panel wire.
Install the ground wire with the bolts.
for Automatic Air Conditioning System:
Engage the 2 clamps and connect the instrument panel wire.
Connect the 3 connectors.
for Manual Air Conditioning System:
Engage the 3 clamps and install the instrument panel wire.
Connect the 3 connectors.
Connect the 3 clamps and install the connector holders.
Tighten the bolt.
Connect the connectors.
Install the wire harness protector with the screw.
Engage the 2 clamps and install the connector holder.
Tighten the screw.
Connect the connectors.
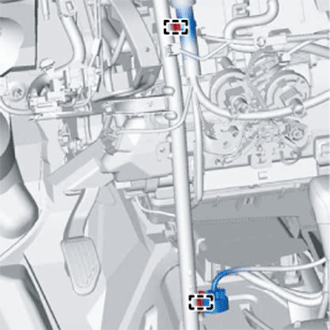 |
Connect the 2 clamps.
| 15. INSTALL INSTRUMENT PANEL WIRE (for RHD) |
Connect the connectors and engage the clamps, then install the instrument panel wire.
Install the ground wire with the bolts.
for Automatic Air Conditioning System:
Engage the 3 clamps and connect the instrument panel wire.
Connect the 2 connectors.
for Manual Air Conditioning System:
Engage the 5 clamps and install the instrument panel wire.
Connect the 3 connectors.
Connect the 3 clamps and install the connector holders.
Tighten the bolt.
Connect the connectors.
Install the wire harness protector with the screw.
Engage the 2 clamps and install the connector holder.
Tighten the screw.
Connect the connectors.
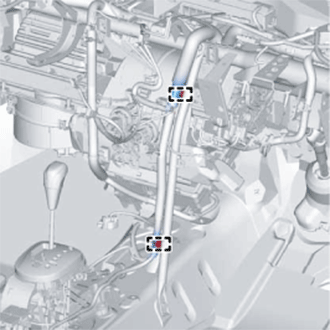 |
Connect the 2 clamps.
| 16. INSTALL INSTRUMENT PANEL JUNCTION BLOCK ASSEMBLY |
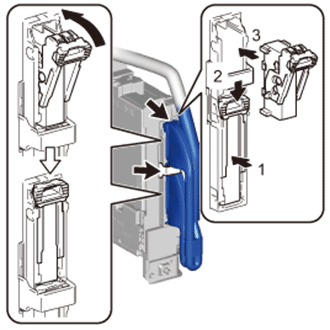 |
Connect the back side connectors and install the instrument panel junction block as shown in the illustration.
Install the instrument panel junction block with the bolt.
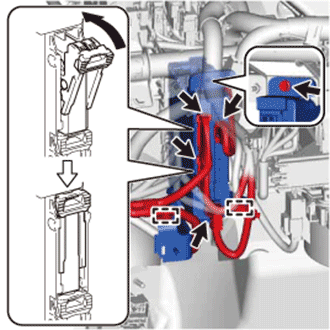 |
Connect the front side connectors as shown in the illustration.
Engage the clamps.
| 17. CONNECT DRAIN COOLER HOSE |
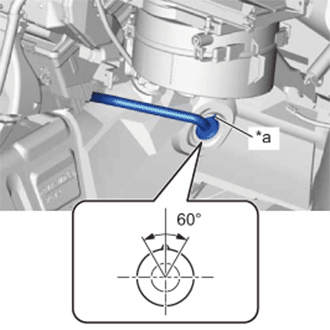 |
Install the drain cooler hose as shown in the illustration.
| *a | UP Mark |
| 18. INSTALL DEFROSTER NOZZLE ASSEMBLY |
Engage the 2 claws and 3 guides, then install the defroster nozzle.
Engage the clamps and connect the connectors, then connect the wire harness.
| 19. INSTALL HEATER TO REGISTER DUCT ASSEMBLY |
Engage the 3 claws and install the heater to register duct.
| 20. INSTALL STEERING COLUMN ASSEMBLY (for LHD) |
| 21. INSTALL STEERING COLUMN ASSEMBLY (for RHD) |
| 22. INSTALL LOWER INSTRUMENT PANEL SUB-ASSEMBLY |
| 23. CONNECT HEATER WATER INLET HOSE A |
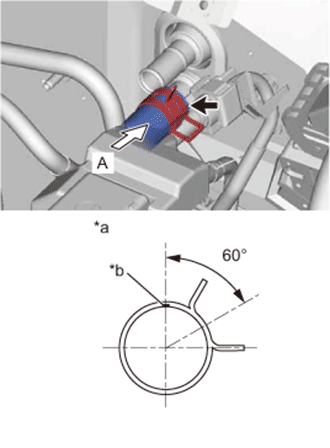 |
Connect the heater water inlet hose onto the air conditioning unit.
| *a | View A |
| *b | White Paint Mark |
| 24. CONNECT HEATER WATER OUTLET HOSE A |
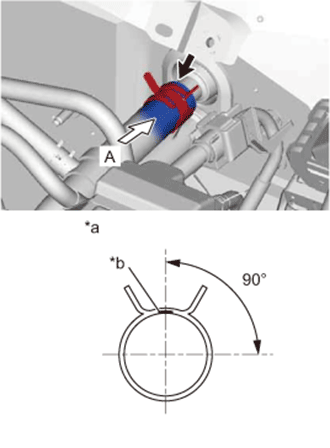 |
Connect the heater water outlet hose onto the air conditioning unit.
| *a | View A |
| *b | Purple Paint Mark |
| 25. CONNECT LIQUID TUBE SUB-ASSEMBLY A |
Remove the vinyl tape from liquid tube and the connecting portion of the unit.
Apply sufficient compressor oil (ND-OIL8) to a new O-ring and the connecting part of the liquid tube.
Install the O-ring onto the liquid tube.
Connect the liquid tube to the unit.
| 26. CONNECT SUCTION TUBE SUB-ASSEMBLY B |
Remove the vinyl tape from suction tube and the connecting portion of the unit.
Apply sufficient compressor oil (ND-OIL8) to a new O-ring and the connecting part of the suction tube.
Install the O-ring onto the suction tube.
Securely connect the suction tube to the air conditioning unit.
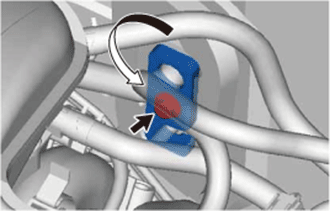 |
Turn the hook connector in the direction indicated by the arrow in the illustration.
Insert the pipe joints securely into the fitting holes and tighten the bolt.
| 27. INSTALL COWL TOP OUTER PANEL |
Install the outer cowl top panel with the 8 bolts.
Engage the 2 clamps and install the wire harness.
| 28. INSTALL COWL TOP TO COWL INNER BRACE |
Install the cowl top to cowl brace with the 2 bolts.
| 29. INSTALL FRONT AIR SHUTTER SEAL RH |
| 30. INSTALL FRONT NO. 1 VENTILATOR SEAL |
Engage the clip and install the front No. 1 ventilator seal.
| 31. INSTALL WINDSHIELD WIPER MOTOR AND LINK |
| 32. CONNECT CABLE TO NEGATIVE BATTERY TERMINAL |
| 33. ADD ENGINE COOLANT (for 1NZ-FE) |
Tighten the cylinder block drain cock plug and the radiator drain cock plug.
Pour engine coolant into the radiator assembly until it is full.
Check the coolant level inside the radiator assembly by squeezing the No. 2 radiator hose and the No. 3 radiator hose several times by hand. If the coolant level goes down, add engine coolant.
Install the water filler cap sub-assembly securely.
Slowly pour coolant into the radiator reservoir until it reaches the FULL line.
Bleed air from the cooling system.
Warm up the engine until the thermostat opens.
While the thermostat is open, circulate the coolant for several minutes.
Maintain the engine speed at 2500 to 3000 rpm.
Press the No. 2 radiator hose and No. 3 radiator hose several times by hand to bleed air.
Stop the engine and wait until the coolant cools down.
If the coolant level is below the full level, perform steps (b) through (g) again and repeat the operation until the coolant level stays at the full level.
Recheck the coolant level inside the radiator reservoir tank assembly. If it is below the full level, add coolant.
| 34. ADD ENGINE COOLANT (for 2NZ-FE) |
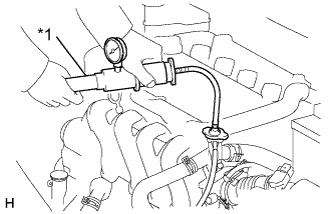 |
Fill the radiator assembly with engine coolant, then attach a radiator cap tester.
| *1 | Radiator Cap Tester |
Pump the tester to 137 kPa (1.4 kgf/cm2, 19.9 psi), then check that the pressure does not drop.
If the pressure drops, check the hoses, radiator assembly and water pump assembly for leakage. If there are no signs or traces of external engine coolant leakage, check the heater core, cylinder block and head.
| 35. CHARGE REFRIGERANT |
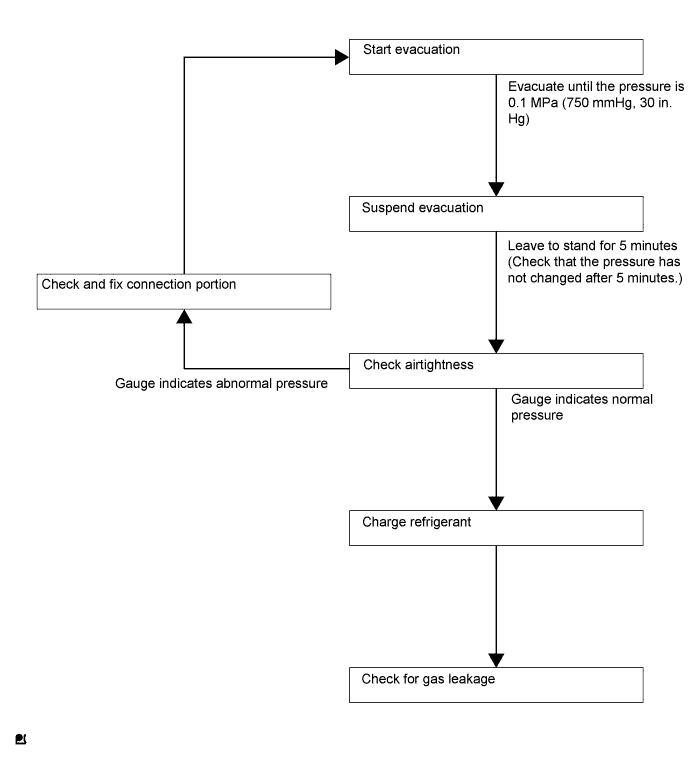
Perform vacuum purging using a vacuum pump.
Charge refrigerant HFC-134a (R134a).
| Item | Refrigerant Charging Amount |
| w/o Fan Shroud Ventilation Duct | 330 to 390 g (11.6 to 13.8 oz.) |
| w/ Fan Shroud Ventilation Duct | 350 to 410 g (12.3 to 14.5 oz.) |
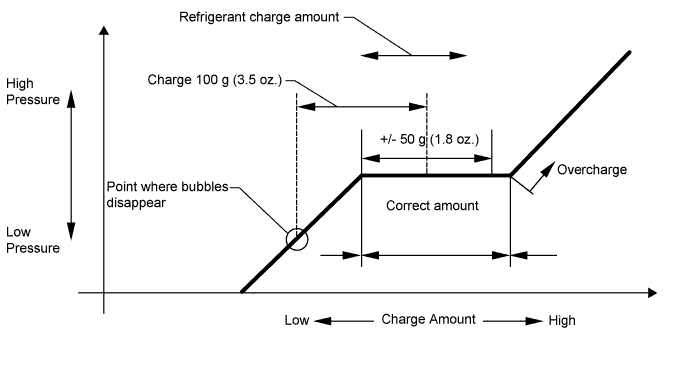
Install the caps onto the service valves on the refrigerant line.
| 36. INSPECT FOR COOLANT LEAK (for 1NZ-FE) |
|
Fill the radiator assembly with engine coolant, then attach a radiator cap tester.
| *1 | Radiator Cap Tester |
Pump the tester to 137 kPa (1.4 kgf/cm2, 19.9 psi), then check that the pressure does not drop.
If the pressure drops, check the hoses, radiator assembly and water pump assembly for leakage. If there are no signs or traces of external engine coolant leakage, check the heater core, cylinder block and head.
| 37. INSPECT FOR COOLANT LEAK (for 2NZ-FE) |
|
Fill the radiator assembly with engine coolant, then attach a radiator cap tester.
| *1 | Radiator Cap Tester |
Pump the tester to 137 kPa (1.4 kgf/cm2, 19.9 psi), then check that the pressure does not drop.
If the pressure drops, check the hoses, radiator assembly and water pump assembly for leakage. If there are no signs or traces of external engine coolant leakage, check the heater core, cylinder block and head.
| 38. WARM UP ENGINE |
| 39. INSPECT FOR REFRIGERANT LEAK |
After recharging the refrigerant gas, check for refrigerant gas leakage using a halogen leak detector.
Perform the operation as follows:
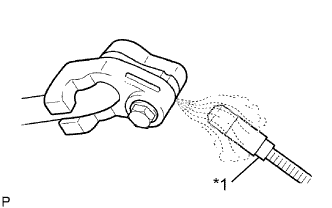 |
Using the halogen leak detector, check the refrigerant line, especially at the connection points, for leakage.
| *1 | Halogen Leak Detector |
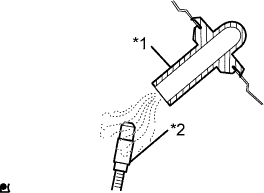 |
Bring the halogen leak detector close to the drain hose before performing the test.
| *1 | Drain Hose |
| *2 | Halogen Leak Detector |
If no gas leakage is detected from the drain hose, remove the blower motor from the cooling unit. Insert the halogen leak detector sensor into the unit and perform the test.
Disconnect the pressure switch connector and leave it for approximately 20 minutes. Bring the halogen leak detector close to the pressure switch and perform the test.