REMOVAL
- BOOT - HEADLAMP BULB
- COVER
- LAMP
- BULB - HEADLAMP
- BULB - PARK/TURN SIGNAL
- BULB - POSITION LAMP
- BULB - SIDE MARKER
- VENT
BOOT - HEADLAMP BULB
CAUTION: Do not contaminate the bulb glass by touching it with your fingers or by allowing it to contact other oily surfaces. Shortened bulb life will result.
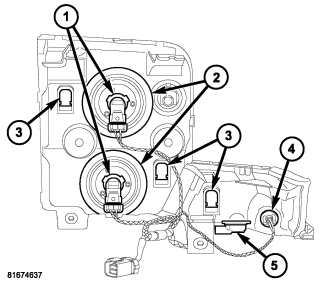
1. Remove the front lamp unit from the front of the vehicle. (Refer to 8 - ELECTRICAL/LAMPS/LIGHTING - EXTERIOR/FRONT LAMP UNIT - REMOVAL).
2. Remove the low or high beam headlamp bulb from the front lamp unit housing. (Refer to 8 - ELECTRICAL/LAMPS/LIGHTING - EXTERIOR/FRONT LAMP UNIT - REMOVAL - HEADLAMP BULB).
3. Pull the outer circumference of the low beam (upper) or high beam (lower) boot (2) up and away as necessary to disengage it from the boot collar formation on the back of the lamp housing.
4. Pull the inner circumference of the low beam or high beam boot up and away as necessary to disengage it from the bulb collar formation on the back of the lamp reflector.
5. Remove the boot from the back of the front lamp unit.
COVER
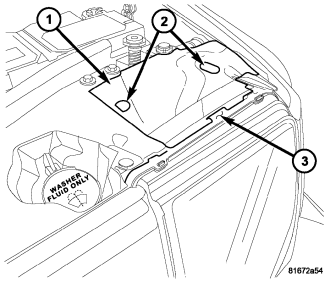
1. Insert a finger into each of the two clearance holes (2) in the front lamp unit cover (1) and pull upward to unsnap the rear edge of the cover from the two upper lamp mounting brackets.
2. Slide the cover rearward to disengage the front edge from beneath the tab (3) on the top near the front of the lamp housing.
LAMP
1. Disconnect and isolate the battery negative cable.
2. Remove the cover from over the top of the front lamp unit. (Refer to 8 - ELECTRICAL/LAMPS/LIGHTING - EXTERIOR/FRONT LAMP UNIT - REMOVAL - COVER).
3. Remove the grille from the front of the vehicle. (Refer to 23 - BODY/EXTERIOR/GRILLE - REMOVAL).
4. Remove the fascia from the front of the vehicle. (Refer to 13 - FRAME AND BUMPERS/BUMPERS/FRONT FASCIA - REMOVAL).
5. If the front lamp being serviced is on the same side of the vehicle as the engine fresh air intake tube, unsnap the air intake tube from the air cleaner housing and remove it from between the lamp and the radiator yoke hydroform.
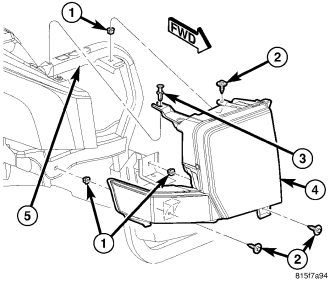
6. Remove the three screws (2) that secure the two lower and the upper inboard lamp (4) mounting brackets to the front end sheet metal.
7. Remove the push pin fastener (3) that secures the upper outboard lamp mounting bracket to the top of the radiator yoke hydroform (5).
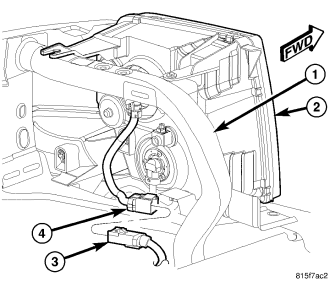
8. Pull the lamp (2) away from the radiator yoke hydroform (1) at the front of the vehicle far enough to access and disconnect the headlamp and dash wire harness connector (3) from the pigtail connector (4) on the back of the lamp housing.
9. Remove the lamp unit from the vehicle.
BULB - HEADLAMP
CAUTION: Do not contaminate the bulb glass by touching it with your fingers or by allowing it to contact other oily surfaces. Shortened bulb life will result.
NOTE: The following procedure applies to both the low beam (upper) and the high beam (lower) headlamp bulbs. The service procedures for each bulb are the same, only the bulb location, size and type differ.
1. Disconnect and isolate the battery negative cable.
2. Remove the cover from over the top of the front lamp unit. (Refer to 8 - ELECTRICAL/LAMPS/LIGHTING - EXTERIOR/FRONT LAMP UNIT - REMOVAL - COVER).
3. Disconnect the pigtail wire connector from the connector receptacle integral to the low beam (upper) or high beam (lower) bulb base (1) on the back of the front lamp unit housing.
4. Firmly grasp the bulb base and rotate it counterclockwise about 30 degrees to unlock it.
5. Pull the bulb and base straight out from the keyed opening in the reflector.
BULB - PARK/TURN SIGNAL
1. Disconnect and isolate the battery negative cable.
2. Raise and support the vehicle.
3. Reach into the front wheel house ahead of the front wheel to unsnap and lift the cover over the access hole in the front of the wheel house splash shield.
4. Reach through the access hole in the splash shield to access the park/turn signal bulb socket (5) on the bottom of the front lamp unit housing.
5. Firmly grasp the socket on the bottom of the front lamp unit housing and rotate it counterclockwise about 30 degrees to unlock it.
6. Pull the socket and bulb straight out from the keyed opening in the housing.
7. Pull the base of the bulb straight out of the socket.
BULB - POSITION LAMP
NOTE: The following procedure applies only to vehicles manufactured for export markets. Vehicles manufactured for North American markets do not have a position lamp bulb, socket or wiring provided in the front lamp unit.
1. Remove the front lamp unit from the front of the vehicle. (Refer to 8 - ELECTRICAL/LAMPS/LIGHTING - EXTERIOR/FRONT LAMP UNIT - REMOVAL).
2. Firmly grasp the position lamp bulb socket on the bottom of the front lamp unit housing and rotate it counterclockwise about 30 degrees to unlock it.
3. Pull the socket and bulb straight out from the keyed opening in the housing.
4. Pull the base of the bulb straight out of the socket.
BULB - SIDE MARKER
NOTE: The following procedure applies only to vehicles manufactured for the North American market. Vehicles manufactured for export markets do not have a bulb, socket or wiring provided to illuminate the front side marker compartment of the front lamp unit. The front side marker lens is present, but serves only as a reflector on export market vehicles.
1. Disconnect and isolate the battery negative cable.
2. Raise and support the vehicle.
3. Reach into the front wheel house ahead of the front wheel to unsnap and lift the cover over the access hole in the front of the wheel house splash shield.
4. Reach through the access hole in the splash shield to access the front side marker bulb socket (4) on the back of the front lamp unit housing.
5. Firmly grasp the front side marker bulb socket on the back of the housing and rotate it counterclockwise about 30 degrees to unlock it.
6. Pull the socket and bulb straight out from the keyed opening in the housing.
7. Pull the base of the bulb straight out of the socket.
VENT
NOTE: There are three vents on the front lamp unit, one each for the low beam, high beam and park/turn signal bulb compartments. The service procedures for each vent are the same only the location on the housing differs.
1. Remove the front lamp unit from the front of the vehicle. (Refer to 8 - ELECTRICAL/LAMPS/LIGHTING - EXTERIOR/FRONT LAMP UNIT - REMOVAL).
2. Locate the vent (3) on the back of the lamp housing.
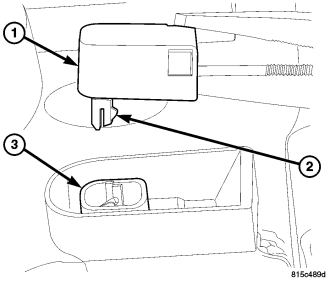
3. Using a suitable pair of pliers, firmly grasp the vent (1) and pry it out of the vent chimney formation (3) on the back of the lamp housing until the vent latch features (2) release.
4. Discard the removed vent.