DISASSEMBLY
HOUSING-AIR DISTRIBUTION
NOTE: The air distribution housing must be removed from the HVAC housing and disassembled for service of the mode-air and blend-air doors.
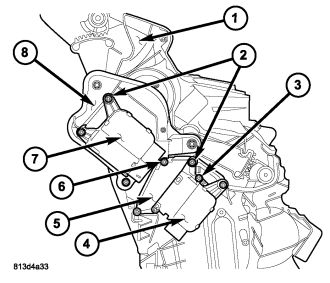
1. Remove the air distribution housing (1) from the HVAC housing and place it on a workbench (refer to 24 - HEATING & AIR CONDITIONING/DISTRIBUTION - FRONT/HOUSING-HVAC - AIR DISTRIBUTION HOUSING - REMOVAL).
2. Remove the screws (2) that secure the blend door actuator (4) and the mode door actuator (7) to the left side of the air distribution housing and remove the actuators.
3. Remove the screws (3 and 6) that secure the blend door actuator mounting bracket (5) and the mode door actuator mounting bracket (8) to the left side of the air distribution housing and remove the mounting brackets.
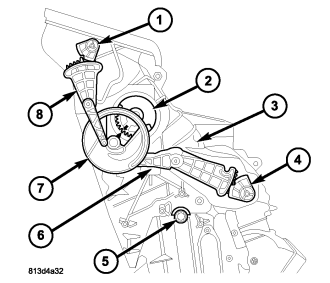
4. Using a flat bladed tool, remove the upper defrost/panel door pivot gear (1), front floor door pivot gear (4) and the blend door stop (5) from the left side of the air distribution housing (3).
5. Remove the upper defrost/panel door linkage rod (8) and the mode door cam (7) from the air distribution housing.
6. Remove the lower defrost/panel door pivot gear (2) and the front floor door linkage rod (6) from the air distribution housing.
7. On RHD models carefully pull the heater core out of the left side of the air distribution housing.
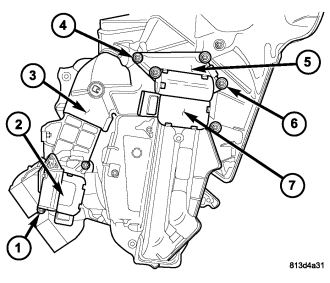
8. Remove the screws (1) that secure the rear floor/console door actuator (2) to the right side of the air distribution housing (3) and remove the actuator.
9. If equipped with dual zone heating-A/C, remove the screws (6) that secure the blend door actuator (7) to the right side of the air distribution housing and remove the actuator.
10. If equipped with dual zone heating-A/C, remove the screws (4) that secure the blend door actuator mounting bracket (5) to the right side of the air distribution housing and remove the mounting bracket.
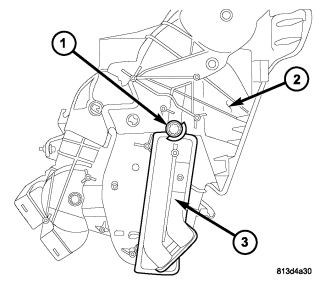
11. On LHD models equipped with dual zone heating-A/C, remove the blend door stop (1) from the right side of the air distribution housing (2).
12. On LHD models carefully pull the heater core (3) out of the right side of the air distribution housing.
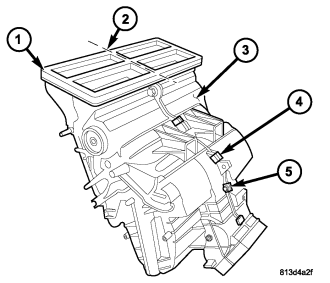
13. Carefully cut the foam seal (1) along the parting line (2) of the two halves of the air distribution housing (3). If the seal is deformed or damaged, it must be replaced.
14. Remove the 4 metal clips (4) that secure the two halves of the air distribution housing together.
15. Remove the eight screws (5) that secure the two halves of the air distribution housing together.
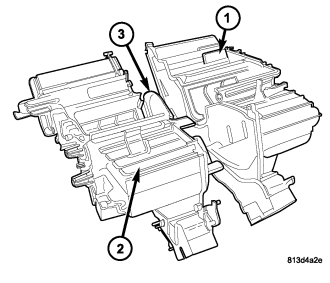
16. Carefully separate the left half of the air distribution housing (1) from the right half of the air distribution housing (2).
17. Remove the center partition (3) from the distribution housing.
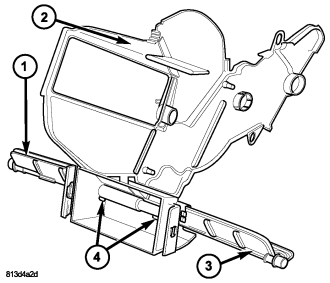
NOTE: If the seal on any air door is deformed or damaged, the air door must be replaced.
18. If required, remove the front floor air doors (1 and 3) from the center partition (2) by disengaging the retaining tabs (4) and pulling the air doors apart from each other.
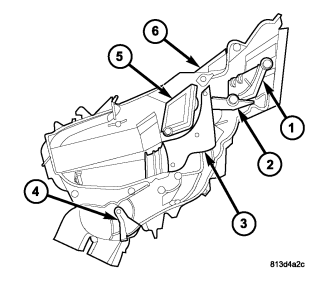
NOTE: If the seal on any air door is deformed or damaged, the air door must be replaced.
19. Remove the upper defrost/panel-air door (1), lower defrost/panel-air door (2), directional vane (3), rear outlet-air door (4) and the blend-air door (5) from the right side air distribution housing (6) as required.
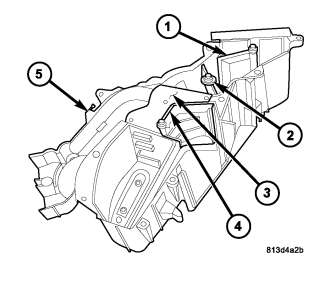
NOTE: If the seal on any air door is deformed or damaged, the air door must be replaced.
20. Remove the upper defrost/panel-air door (1), lower defrost/panel-air door (2), directional vane (3) and the blend-air door (4) from the left side air distribution housing (5) as required.
HOUSING-AIR INLET
NOTE: The air inlet housing must be removed from HVAC housing and disassembled for service of the recirculation-air door.
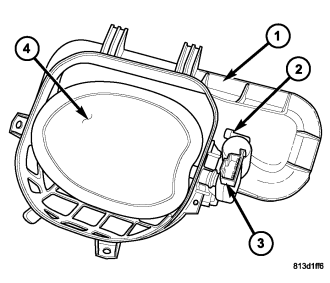
NOTE: LHD model shown. RHD model similar.
1. Remove the air inlet housing (1) from the HVAC housing and place it on a workbench (refer to 24 - HEATING & AIR CONDITIONING/DISTRIBUTION - FRONT/HOUSING-HVAC - AIR INLET HOUSING - REMOVAL)
2. Remove the two screws (2) that secure the recirculation door actuator (3) to the air inlet housing and remove the actuator.
NOTE: If the foam seal on the recirculation-air door or the air inlet housing is deformed or damaged, it must be replaced.
3. Carefully remove the recirculation-air door (4) from the air inlet housing.
HOUSING-HVAC ASSEMBLY
NOTE: The HVAC housing must be removed from the vehicle and disassembled for service of the A/C evaporator.
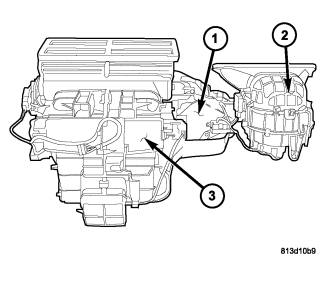
1. Remove the HVAC housing assembly and place it on a workbench (refer to 24 - HEATING & AIR CONDITIONING/DISTRIBUTION - FRONT/HOUSING-HVAC - HVAC HOUSING ASSEMBLY - REMOVAL).
2. Remove the air distribution housing (3) from the HVAC housing (1) (refer to 24 - HEATING & AIR CONDITIONING/DISTRIBUTION - FRONT/HOUSING-HVAC - AIR DISTRIBUTION HOUSING - REMOVAL).
3. Remove the air inlet housing (2) from the HVAC housing (refer to 24 - HEATING & AIR CONDITIONING/DISTRIBUTION - FRONT/HOUSING-HVAC - AIR INLET HOUSING - REMOVAL).
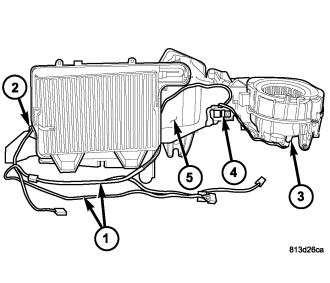
4. Disconnect the HVAC wire harness (1) from the evaporator temperature sensor (2) and the blower motor resistor or power module (4) (depending on application).
5. Disconnect the wire harness for the blower motor (3) from the blower motor resistor or power module (depending on application).
6. Disengage the two HVAC wire harness retainers from the HVAC housing (5) and remove the wire harness.
7. Remove the blower motor (refer to 24 - HEATING & AIR CONDITIONING/DISTRIBUTION - FRONT/MOTOR-BLOWER - REMOVAL).
8. Remove the blower motor resistor or power module, depending on application (refer to 24 - HEATING & AIR CONDITIONING/CONTROLS - FRONT/RESISTOR-BLOWER MOTOR - REMOVAL) or (refer to 24 - HEATING & AIR CONDITIONING/CONTROLS - FRONT/MODULE-POWER-BLOWER MOTOR - REMOVAL).
9. Remove the evaporator temperature sensor (refer to 24 - HEATING & AIR CONDITIONING/CONTROLS - FRONT/SENSOR-EVAPORATOR TEMPERATURE - REMOVAL).
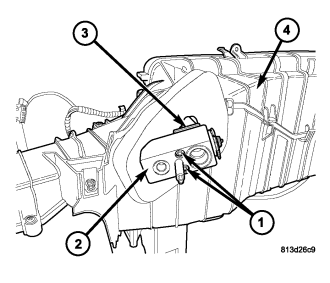
10. Remove the two bolts (1) that secure the A/C expansion valve (2) to the evaporator tube tapping block (3) located at the front of the HVAC housing (4).
11. Remove the A/C expansion valve from the evaporator tube tapping block and remove and discard the O-ring seals.
12. Install plugs in, or tape over the opened evaporator tube fittings and all expansion valve ports.
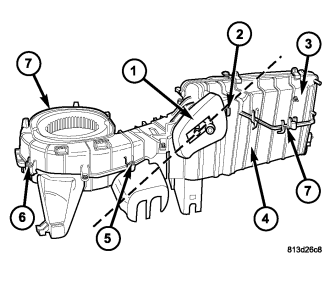
13. Carefully cut the foam seal (1) along the parting line (2) of the upper half of the HVAC housing (3) and the lower half of the HVAC housing (4). If the seal is deformed or damaged, it must be replaced.
14. Remove the three metal retaining clips (5) that secure the two halves of the HVAC housing together.
15. Remove the ten screws (6) that secure the two halves of the HVAC housing together.
16. Disengage the two plastic retaining clips (7) and separate the two halves of the HVAC housing.
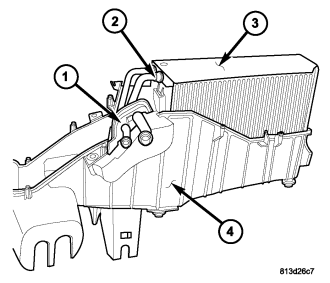
17. Open the rubber seal (1) and carefully lift the A/C evaporator (2) and insulator (3) out of the lower half of the HVAC housing (4).
18. If required, remove the rubber seal from the lower half of the HVAC housing. If the seal is deformed or damaged, it must be replaced.
19. If required, remove the insulator from the A/C evaporator. If the insulator is deformed or damaged, it must be replaced.