CALIPER-FRONT DISC BRAKE
REMOVAL
NOTE: Before proceeding, (Refer to 5 - BRAKES - WARNING) (Refer to 5 - BRAKES - CAUTION).
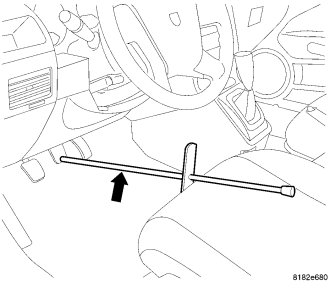
1. Using a brake pedal holding tool as shown, depress the brake pedal past its first 25 mm (1 inch) of travel and hold it in this position. This will isolate the master cylinder from the brake hydraulic system and will not allow the brake fluid to drain out of the master cylinder reservoir when the lines are opened.
2. Raise and support the vehicle. (Refer to LUBRICATION & MAINTENANCE/HOISTING - STANDARD PROCEDURE)
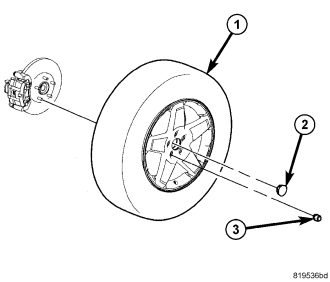
3. Remove the wheel mounting nuts (3), then the tire and wheel assembly (1).
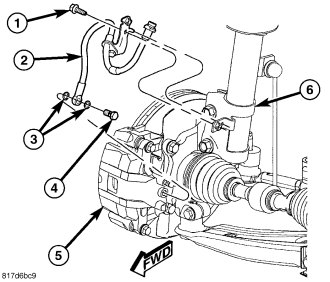
4. Remove the banjo bolt (4) connecting the brake flex hose (2) to the brake caliper (5). There are two washers (3) that will come off with the banjo bolt. Discard the washers.
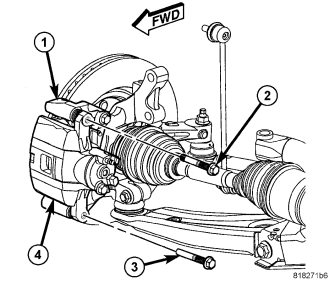
NOTE: When removing the caliper guide pin bolts (2, 3) note that one (upper) has a special sleeve on the end. It important that his bolt be installed in the upper mounting hole when the caliper is installed.
5. Remove the two brake caliper guide pin bolts (2, 3).
6. Slide the disc brake caliper (4) from the disc brake adapter bracket (1) and brake pads and remove.
DISASSEMBLY
NOTE: Before disassembling the brake caliper, remove it from the vehicle. (Refer to 5 - BRAKES/HYDRAULIC/MECHANICAL/DISC BRAKE CALIPER - REMOVAL)
NOTE: Before disassembling the brake caliper, clean and inspect it. (Refer to 5 - BRAKES/HYDRAULIC/MECHANICAL/DISC BRAKE CALIPER - CLEANING) (Refer to 5 - BRAKES/HYDRAULIC/MECHANICAL/DISC BRAKE CALIPER - INSPECTION)
WARNING: Under no condition should high pressure air ever be used to remove a piston from a caliper bore. Personal injury could result from such a practice.
CAUTION: Do not use excessive force when clamping caliper in vise. Excessive vise pressure will cause bore distortion.
1. Mount the caliper in a vise equipped with protective jaws.
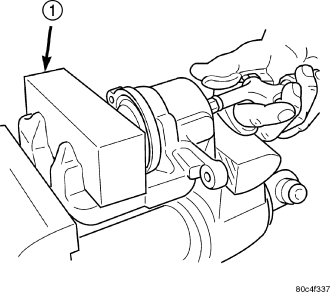
WARNING: Do not place face or hands near caliper and piston if using compressed air pressure to remove piston. Do not use high pressure.
2. Place a wooden block (1) in the caliper as shown.
3. If necessary, apply low pressure compressed air to the caliper fluid inlet in short spurts to force the piston out.
4. Remove the piston from the caliper.
5. Remove the dust boot from the piston and discard it.
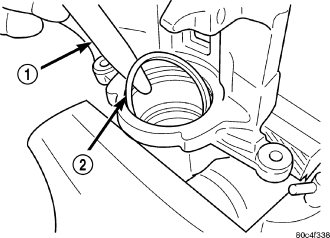
CAUTION: Do not use a screw driver or other metal tool for seal removal. Using such tools can scratch the bore or leave burrs on the seal groove edges.
6. Using a soft tool such as a plastic trim stick (1), work the piston seal (2) out of its groove in caliper piston bore. Discard the used seal.
7. Clean the piston bore and drilled passage ways with alcohol or a suitable solvent. Wipe it dry using only a lint-free cloth.
8. Inspect both the piston and bore for scoring or pitting. Bores that show light scratches or corrosion can usually be cleared of the light scratches or corrosion using crocus cloth.
CLEANING
WARNING: Dust and dirt accumulating on brake parts during normal use may contain asbestos fibers from production or aftermarket brake linings. Breathing excessive concentrations of asbestos fibers can cause serious bodily harm. Exercise care when servicing brake parts. Do not sand or grind brake lining unless equipment used is designed to contain the dust residue. Do not clean brake parts with compressed air or by dry brushing. Cleaning should be done by dampening the brake components with a fine mist of water, then wiping the brake components clean with a dampened cloth. Dispose of cloth and all residue containing asbestos fibers in an impermeable container with the appropriate label. Follow practices prescribed by the Occupational Safety And Health Administration (OSHA) and the Environmental Protection Agency (EPA) for the handling, processing, and disposing of dust or debris that may contain asbestos fibers.
To clean or flush the internal passages of the brake caliper, use fresh brake fluid or Mopar® Non-Chlorinated Brake Parts Cleaner. Never use gasoline, kerosene, alcohol, oil, transmission fluid or any fluid containing mineral oil to clean the caliper. These fluids will damage rubber cups and seals.
INSPECTION
Inspect the disc brake caliper for the following:
- Brake fluid leaks in and around piston boot area
- Ruptures, brittleness or damage to the piston dust boot
If caliper fails inspection, disassemble and recondition caliper, replacing the seals and dust boots.
ASSEMBLY
NOTE: Always have clean hands when assembling a brake caliper.
NOTE: Always use fresh, clean brake fluid when assembling a brake caliper.
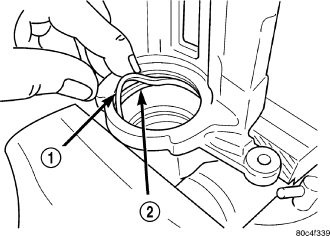
NOTE: Never use an old piston seal.
1. Dip the NEW piston seal in clean brake fluid and install it in the groove (2) of the caliper bore. The seal (1) should be started at one area of the groove and gently worked around into the groove using only your clean fingers to seat it.
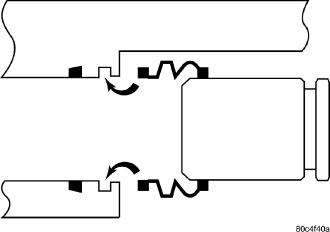
2. Coat the NEW piston with clean brake fluid.
3. Coat the NEW piston boot with clean brake fluid leaving a generous amount inside the boot.
4. Position the dust boot over the lower section of the piston.
5. Extend the dust boot below the bottom of the piston and guide the lip seal into the groove in the caliper piston bore.
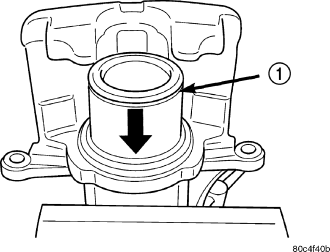
CAUTION: Force applied to the piston (1) to seat it in the bore must be applied uniformly to avoid cocking and binding of the piston.
6. Install the piston (1) into the bore, carefully pushing it past the piston seal using hand pressure. Push the piston in until it bottoms in the caliper bore and the dust boot lip seal falls into the groove near the top of the piston.
7. Install the caliper on the vehicle and bleed the brakes as necessary. (Refer to 5 - BRAKES/HYDRAULIC/MECHANICAL/DISC BRAKE CALIPER - INSTALLATION)
INSTALLATION
1. Completely retract the caliper piston back into the bore of the caliper. Use a C-clamp to retract the piston. Place a wood block over the piston before installing the C-clamp to avoid damaging the piston.
CAUTION: Use care when installing the caliper (4) onto the adapter bracket (1) to avoid damaging the guide pin boots.
2. Install the disc brake caliper over the brake pads on the brake caliper adapter bracket.
NOTE: When installing the caliper guide pin bolts (2, 3) make sure that the one that has a special sleeve on the end is installed in the upper mounting hole.
3. Align the caliper guide pin bolt holes with the adapter bracket. Install the upper (with special sleeve) (2) and lower (3) caliper guide pin bolts. Tighten the guide pin bolts to 43 N·m (32 ft. lbs.).
4. Install the banjo bolt (4) connecting the brake flex hose (2) to the brake caliper (5). Install NEW washers (3) on each side of the hose fitting as the banjo bolt is guided through the fitting. Thread the banjo bolt into the caliper and tighten it to 24 N·m (18 ft. lbs.).
5. Install the tire and wheel assembly (1) (Refer to 22 - TIRES/WHEELS - INSTALLATION). Install and tighten the wheel mounting nuts (3) to 135 N·m (100 ft. lbs.).
6. Lower the vehicle.
7. Remove the brake pedal holding tool.
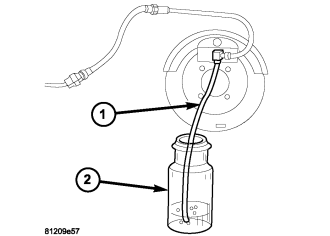
8. Bleed the caliper as necessary. (Refer to 5 - BRAKES - STANDARD PROCEDURE)
9. Road test the vehicle and make several stops to wear off any foreign material on the brakes and to seat the brake shoes.