MODULE-DOOR TRIM
DESCRIPTION
Door trim modules include the hardware, window regulators, latch, remote handle and links, speakers and wiring harness. In addition to providing manufacturing efficiencies, the door modules benefit the customer too. Having all the parts assembled into a module improves build accuracy and fit and finish between the components and trim as a result of greater communication between the release engineers and suppliers.
Lower door trim (from the beltline down) is molded polypropylene. The door trim is two-tone with a darker color matching the instrument panel in the upper third and a lighter shade for the lower two-thirds, including the bolster and substrate.
Items Serviceable without removing module or opening bolster:
- Speaker grille
- Speaker
- I/s handle screw cover
- Front door mirror flag cover
- Fasteners accessible :
- Substrate and lower window regulator screws
- Speaker screws (after grille removal)
- Pull cup screw
- I/s handle screw (after cover removal)
Items Serviceable without removing module but with opening of bolster:
- Electric window switch
- Electric mirror switch (front driver door only)
- Bolster trim assembly
- Bolster seal
- Sock seals on switches
- Outside handle link
- Front door lock and rod assembly
- Front door latch
- Fasteners accessible :
- Pull cup clip
- Upper window regulator screws
- Pull cup screw (to biw)
Items Serviceable by removing entire module:
- Rear door latch
- Window regulator
- Inside remote handle
- Inside handle links
- Periphery seal (around edge of trim)
- Wire harness
REMOVAL
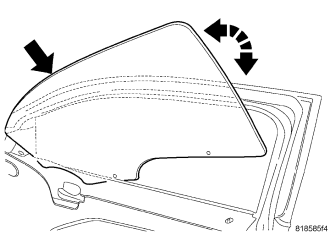
1. Remove the door glass, (Refer to 23 - BODY/DOOR - FRONT/DOOR GLASS - REMOVAL).
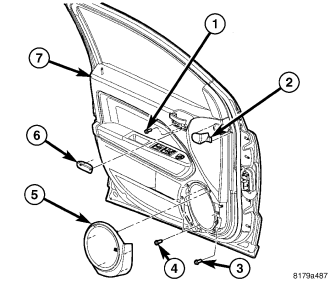
2. Remove speaker (5), (Refer to 8 - ELECTRICAL/AUDIO/SPEAKER - REMOVAL).
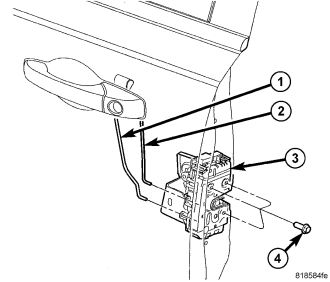
3. Disconnect the latch linkages (1 and 2).
4. Remove the latch screws (4).
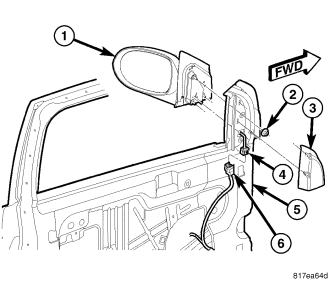
5. Using a trim stick C-4755 or equivalent, remove the outside mirror trim (3).
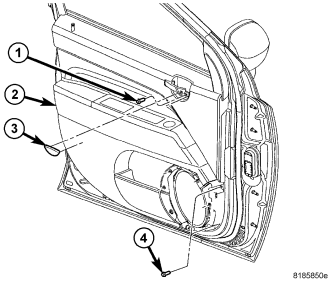
6. Remove the trim screws (4) from the speaker opening.
7. Remove the trim cap (3) and the screw (1) at the inside handle.
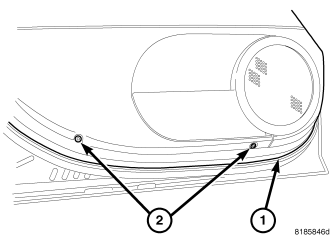
8. Loosen lower screws (2).
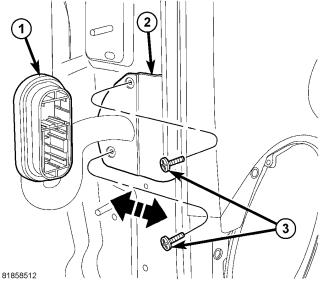
9. Disconnect main harness connector.
10. Remove screws and separate harness from door frame.
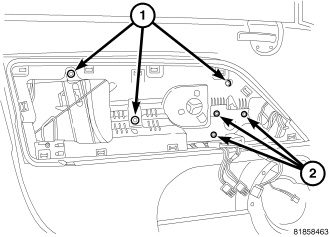
11. Remove three upper bolts (1).
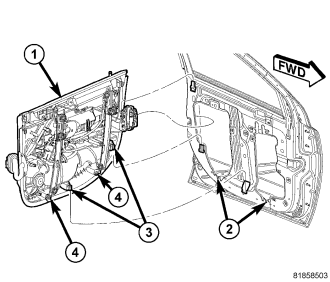
12. Lift the module (1) up off of the four trim hooks (3) and the lower regulator screws (4).
13. Pull the front of the trim module (1) out from the door and forward to remove the latch.
INSTALLATION
1. Position the latch into the door and set the trim module (1) in place.
2. Position the four trim hooks (3) and the lower regulator screws (4) into the corresponding slots (2) in the door and seat trim module fully.
3. Position the wire harness door bracket (2) into the door and install the screws (3).
4. Install the upper regulator screws (1) and tighten to 8 N·m (71 in. lbs.)
5. Tighten the lower trim screws (2) to 6 N·m (53 in. lbs.).
6. Install the screws (4) in the front corner and tighten to 6 N·m (53 in. lbs.).
7. Install the screw (1) at the inside handle and seat the trim (3) fully.
8. Install the outside mirror trim flag (3).
9. Install the latch screws (4).
10. Tighten the screws to 7 N·m (62 in. lbs.).
11. Attach the exterior handle rod (1) and lock rod (2), if equipped.
12. Install the speaker (5), (Refer to 8 - ELECTRICAL/AUDIO/SPEAKER - INSTALLATION).
13. Install the door glass, (Refer to 23 - BODY/DOOR - FRONT/DOOR GLASS - INSTALLATION).