SEAT BACK - FRONT
REMOVAL
Driver Seat
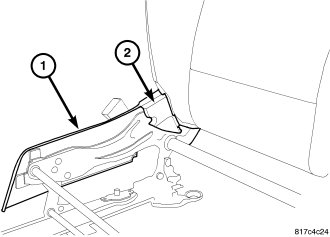
1. Before proceeding with the following repair procedure, review all warnings and cautions. (Refer to 23 - BODY/SEATS - WARNING)
2. Remove the seat cushion (Refer to 23 - BODY/SEATS/SEAT CUSHION - FRONT - REMOVAL) .
3. Remove both of the inner side shields (2).
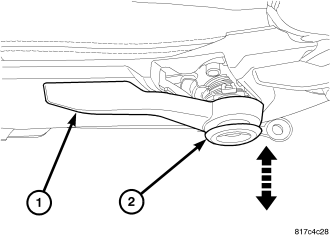
4. Remove the lift lever trim cap (2).
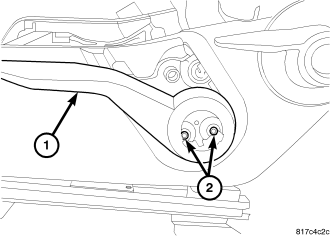
5. Remove the screws (2) and remove the lift lever (1).
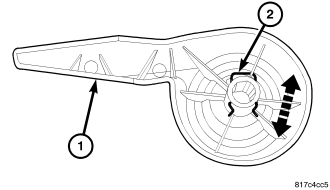
6. Separate the clip (2).
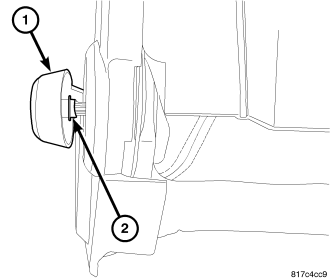
7. Remove the recliner handle (1).
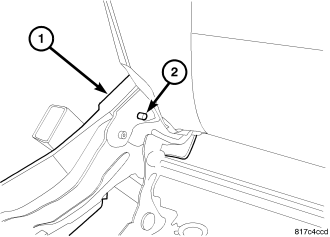
8. Remove the screws (2) attaching the inboard and outboard side shields (1) to the seat frame.
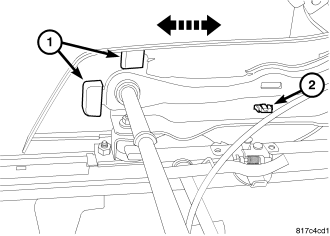
9. Separate the clip fasteners (2) and remove the side shields from the seat cushion frame tabs (1).
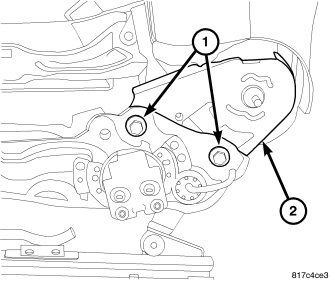
WARNING: Discard and replace the seat back bolts (1) with new bolts when servicing. Installing used bolts may result in the loosening of the seat back bolts after repair. Failure to follow these instructions may result in serious or fatal injury.
10. Remove and discard the bolts (1) and remove the seat back assembly (2).
Passenger Seat
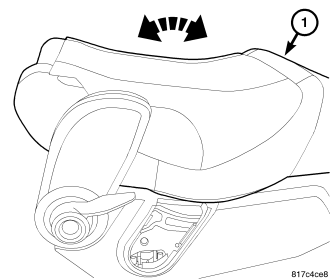
1. Before proceeding with the following repair procedure, review all warnings and cautions. (Refer to 23 - BODY/SEATS - WARNING)
2. Remove the seat cushion (Refer to 23 - BODY/SEATS/SEAT CUSHION - FRONT - REMOVAL) .
3. Fold the seat back (1) into the down position.
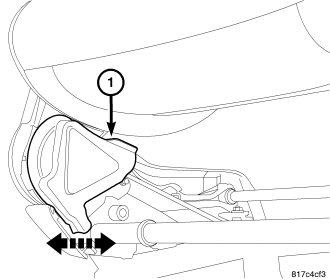
4. Remove both of the inner side shields (1).
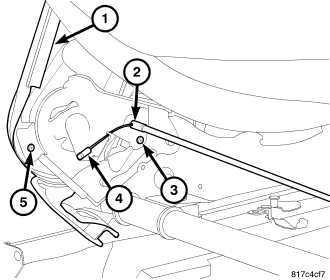
5. Release the cable housing (2) from the seat back frame and disconnect the recliner cable ends (4).
6. Remove the screw (5) and remove the recliner shields (1).
7. Remove the screw (3) attaching the inboard and outboard side shields to the seat frame.
8. Separate the clip fasteners (2) and remove the side shields from the seat cushion frame tabs (1).
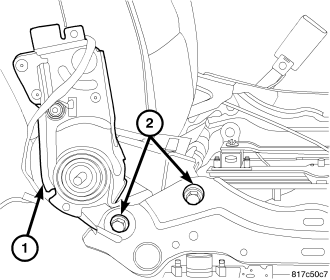
WARNING: Discard and replace the seat back bolts (2) with new bolts when servicing. Installing used bolts may result in the loosening of the seat back bolts after repair. Failure to follow these instructions may result in serious or fatal injury.
9. Remove and discard the bolts (2) and remove the seat back assembly (1).
DISASSEMBLY
1. Before proceeding with the following repair procedure, review all warnings and cautions. (Refer to 23 - BODY/SEATS - WARNING)
2. Remove the seat back (Refer to 23 - BODY/SEATS/SEAT BACK - FRONT - REMOVAL).
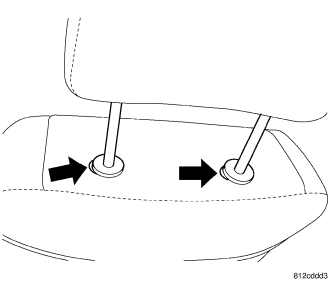
3. Remove the headrest.
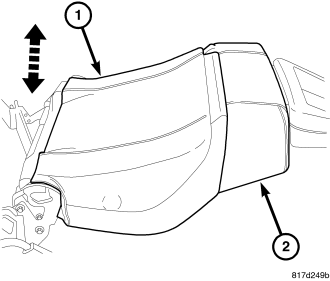
4. Remove the lumbar handle, if equipped.
5. Remove the back panel (1).
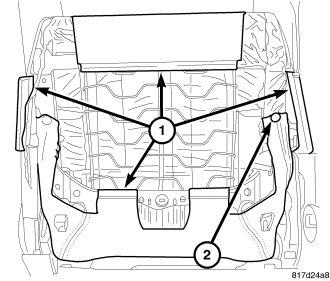
6. Separate the J-straps (1) and the push-pin fasteners (2).
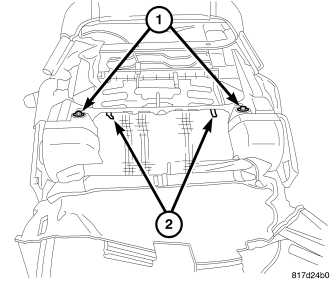
7. Release the push-pin fasteners (1) and release the cover from the hooks (2).
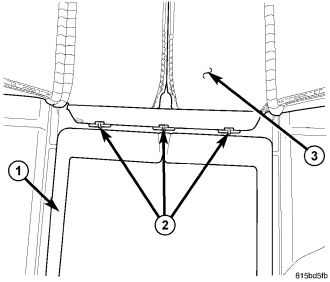
8. Separate the seat cover (3) from the foam cushion (1) and cut off all hog rings (2) attaching cover to the foam.
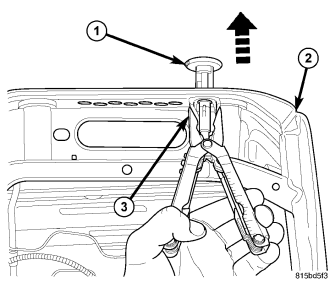
9. Squeeze the locking tab (3) and remove the headrest sleeves (1) and remove the cover.
10. Remove the seat back cover and cushion.
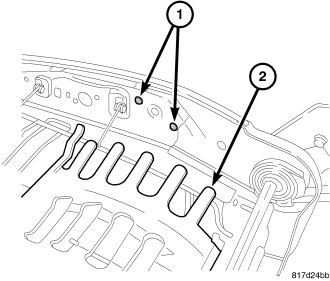
11. Remove the lumbar adjuster screws (1).
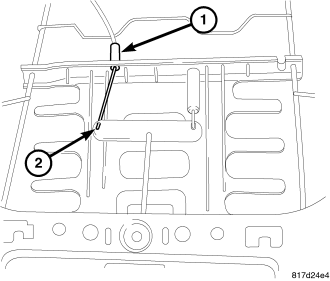
12. Disconnect the lumbar cable (2) and separate the cable housing (1).
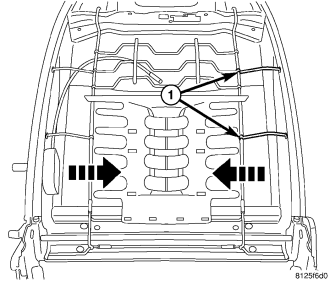
13. Release the lumbar mat side wires (1) by pulling out on the wire supports and then pulling them in.
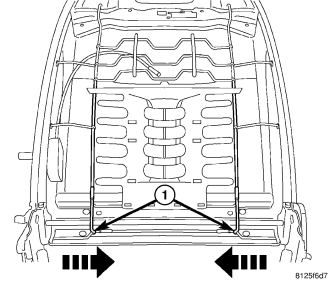
14. Squeeze the lower support wires (1) in and release the lower wires.
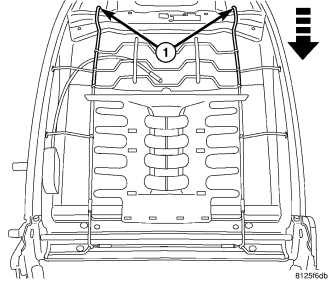
15. Pull the upper support wires (1) down and release the lumbar mat from the seat back frame.
16. Seat mechanical part description and specifications are found in the seat description. (Refer to 23 - BODY/SEATS/SEAT - FRONT - DESCRIPTION)
ASSEMBLY
1. Before proceeding with the following repair procedure, review all warnings and cautions. (Refer to 23 - BODY/SEATS - WARNING)
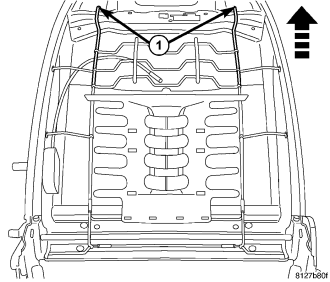
2. Place lumbar mat onto seat back frame and insert the upper support wires (1) into the frame.
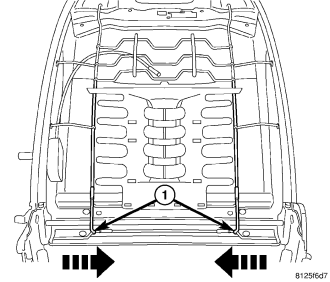
3. Squeeze the lower support wires (1) together and insert into the lower frame.
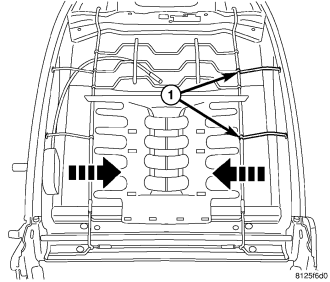
4. Squeeze the side support wires together and insert them into the sides of the seat back frame.
5. Connect the lumbar cable housing (1) and connect the cable end (2) to the anchor.
6. Install the lumbar adjuster and install the adjuster screws (1).
7. Position the seat back cushion on the frame and position the cover over the cushion.
8. Attach the seat cover (3) to the seat back cushion (1) and install new hog rings (2) as required.
9. Install the push pins (1) and connect the inner cover to the hooks (2).
10. Install the push-pin fasteners (2) and connect the J-straps (1).
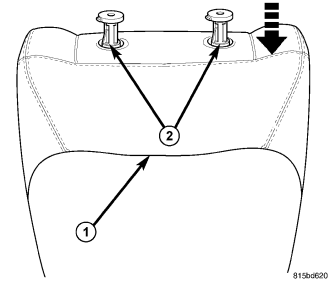
11. Install the headrest sleeves (2).
12. Position the seat back panel (1) onto the seat back (2) and seat fully.
13. Press the headrest sleeve release buttons and install the headrest.
14. Install the seat back (Refer to 23 - BODY/SEATS/SEAT BACK - INSTALLATION).
INSTALLATION
Driver Seat
1. Before proceeding with the following repair procedure, review all warnings and cautions. (Refer to 23 - BODY/SEATS - WARNING)
WARNING: Discard and replace the seat back bolts (1) with new bolts when servicing. Installing used bolts may result in the loosening of the seat back bolts after repair. Failure to follow these instructions may result in serious or fatal injury.
2. Install the seat back assembly (2) and install the new bolts (1).
3. Tighten the bolts to 40 N·m (30 ft. lbs.).
4. Position the side shields onto the seat adjuster tabs (1) and seat the clip (2) fully.
5. Install the outer side shield screw (2).
6. Install the clip (2) onto the recliner handle, if necessary.
7. Position the recliner handle (1) onto the spined shaft (2) and seat fully.
8. Install the height adjuster handle (1) and install the screws (2), if equipped.
9. Position the lift lever trim cap (2) and seat fully.
10. Position the inner side shields (2) and seat fully.
11. Install the seat cushion, (Refer to 23 - BODY/SEATS/SEAT CUSHION - FRONT - INSTALLATION).
Passenger Seat
WARNING: Discard and replace the seat back bolts (2) with new bolts when servicing. Installing used bolts may result in the loosening of the seat back bolts after repair. Failure to follow these instructions may result in serious or fatal injury.
1. Install the seat back assembly (1) and install the new bolts (2).
2. Tighten the bolts to 40 N·m (30 ft. lbs.).
3. Position the side shields onto the seat adjuster tabs (1) and seat the clip (2) fully.
4. Install the screws (3) attaching the inboard and outboard side shields to the seat frame.
5. Install the recliner shields (1) and install the screws (5).
6. Connect the recliner cable ends (4) and fasten the cable housing (2) to the seat back frame.
7. Install both of the inner side shields (1).
8. Position the seat back (1) into the upright position.
9. Install the seat cushion, (Refer to 23 - BODY/SEATS/SEAT CUSHION - FRONT - INSTALLATION).