INSTALLATION
STABILIZER BAR BUSHINGS
1. Install the stabilizer bushings to the stabilizer bar.
2. Install the stabilizer bushing clamps. Tighten the nuts to 149 N·m (110 ft.lbs.).
3. Lower the vehicle.
LOWER CONTROL ARM BUSHING
NOTE: Extreme pressure lubrication must be used on the threaded portions of the tool. This will increase the longevity of the tool and insure proper operation during the removal and installation process .
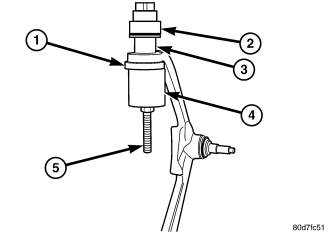
1. Install the new lower control arm bushings into the lower control arm using tools 8858-5 (driver), 8858-6 (receiver) and the bearing with the threaded rod 8839 making sure to properly orient the bushing in the control arm.
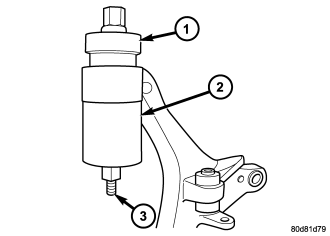
2. Remove the control arm from the vise.
3. Install the lower control arm (Refer to 2 - SUSPENSION/FRONT/LOWER CONTROL ARM - INSTALLATION).
4. Reset the vehicle ride height (Refer to 2 - SUSPENSION/WHEEL ALIGNMENT - STANDARD PROCEDURE).
5. Perform a wheel alignment (Refer to 2 - SUSPENSION/WHEEL ALIGNMENT - STANDARD PROCEDURE).
CLEVIS BRACKET BUSHING
NOTE: Extreme pressure lubrication must be used on the threaded portions of the tool. This will increase the longevity of the tool and insure proper operation during the removal and installation process .
1. Install the new clevis bracket bushing into the lower control arm using tools 8858-2 (driver), 8858-1 (receiver) and the bearing with the threaded rod 8839 making sure to properly orient the bushing in the control arm.
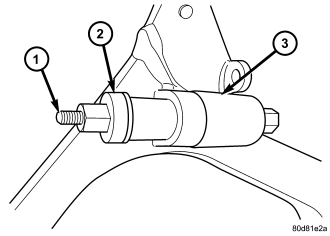
2. Install the clevis bracket (Refer to 2 - SUSPENSION/FRONT/CLEVIS BRACKET - INSTALLATION).
UPPER CONTROL ARM BUSHINGS
NOTE: Extreme pressure lubrication must be used on the threaded portions of the tool. This will increase the longevity of the tool and insure proper operation during the removal and installation process .
1. Install the new upper control arm bushings into the upper control arm using tools 8830-3 (Adapter), 8830-1 (Driver) and 8830-2 (Receiver) the bearing with the threaded rod 8838 making sure to properly orient the bushing in the control arm.
2. Remove the control arm from the vise.
3. Install the upper control arm (Refer to 2 - SUSPENSION/FRONT/UPPER CONTROL ARM - INSTALLATION).
4. Perform a wheel alignment (Refer to 2 - SUSPENSION/WHEEL ALIGNMENT - STANDARD PROCEDURE).