DISASSEMBLY
AIR INLET HOUSING
NOTE: The air inlet housing must be removed from HVAC housing and disassembled for service of the recirculation-air door.
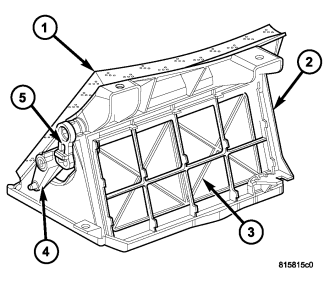
1. Remove the air inlet housing from the HVAC housing and place it on a workbench (refer to 24 - HEATING & AIR CONDITIONING/DISTRIBUTION/HOUSING-HVAC - HOUSING-AIR INLET - REMOVAL)
NOTE: If the foam seal on the air inlet housing is deformed or damaged, the seal must be replaced.
2. If required, remove the foam seal (1) from the top of the air inlet housing (2).
3. To remove the recirculation-air door (3) from the inside of the air inlet housing, first carefully pull the recirculation door lever (5) out from the end of the pivot shaft of the recirculation-air door, using pliers.
4. Remove the pivot lever (4) from the side of the air inlet housing.
NOTE: If the seal on the air door is deformed or damaged, the air door must be replaced.
5. Remove the recirculation-air door from the air inlet housing.
HVAC HOUSING
NOTE: The HVAC housing must be removed from the vehicle and disassembled for service of the A/C evaporator and the mode-air and blend-air doors.
NOTE: LHD model shown in illustrations. RHD model similar.
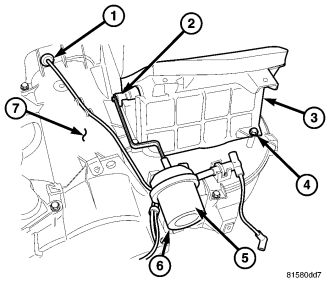
1. Remove the HVAC housing from the vehicle and place it on a workbench (refer to 24 - HEATING & AIR CONDITIONING/DISTRIBUTION/HOUSING-HVAC - REMOVAL).
2. Remove the vacuum harness and grommet (1) from the top of the HVAC housing (7).
3. Disconnect the vacuum harness connector (6) from the recirculation door actuator (5).
4. Carefully disconnect the recirculation door actuator from the recirculation door lever (2) and remove the actuator from the HVAC housing (refer to 24 - HEATING & AIR CONDITIONING/CONTROLS/ACTUATOR-RECIRCULATION DOOR - REMOVAL).
5. Remove the four screws (4) that secure the air inlet housing (3) to the top of the HVAC housing and remove the air inlet housing.
NOTE: If the foam seal on the air inlet housing is deformed or damaged, the seal must be replaced.
6. If required, disassemble the air inlet housing (refer to 24 - HEATING & AIR CONDITIONING/DISTRIBUTION/HOUSING-HVAC - HOUSING-AIR INLET - DISASSEMBLY).
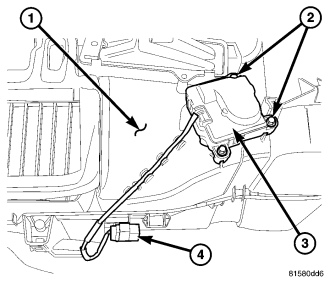
7. Disengage the wire harness lead and connector (4) for the blend door actuator (3) from the retainers located on the top and on the rear of the HVAC housing (1).
8. Remove the three screws (2) that secure the blend door actuator to the top of the HVAC housing and remove the actuator and wire harness lead and connector from the housing.
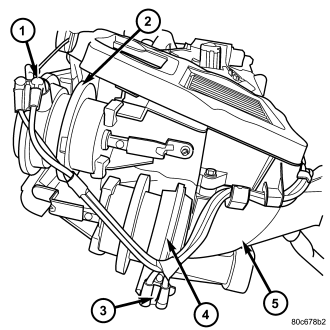
9. Disconnect the vacuum harness connectors (1 and 3) from the two mode door actuators (2 and 4) located on the driver side end of the HVAC housing (5).
10. Carefully disconnect the mode door actuators from the mode-air door levers and remove the actuators from the HVAC housing (refer to 24 - HEATING & AIR CONDITIONING/CONTROLS/ACTUATOR-MODE DOOR - REMOVAL).
11. Disengage the HVAC vacuum harness from the routing clips located on the HVAC housing and remove the vacuum harness from the housing.
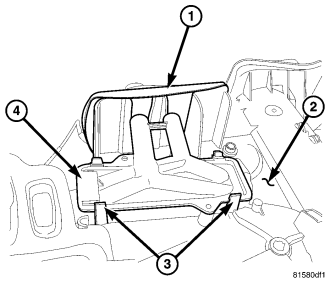
NOTE: If the foam seal around the heater core tubes is deformed or damaged, the seal must be replaced.
12. Carefully remove the foam seal (1) from the heater core (4) and the front of the HVAC housing (2). If the seal is deformed or damaged, it must be replaced.
NOTE: If the foam insulator around the heater core is deformed or damaged, the insulator must be replaced.
13. Disengage the four retaining tabs (3) that secure the heater core to the top of the HVAC housing and carefully remove the heater core from the housing.
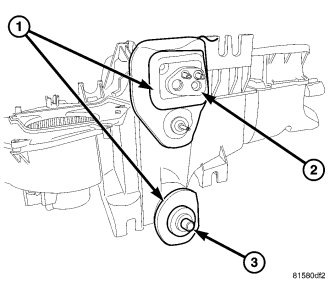
NOTE: If any foam or rubber seal is deformed or damaged, the seal must be replaced.
14. Carefully remove the foam and rubber seals (1) from around the evaporator tapping block (2) and the condensate drain (3). If any seal is deformed or damaged, it must be replaced.
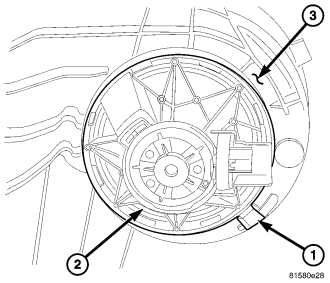
15. Release the locking tab (1) that secures the blower motor (2) to the HVAC housing (3) and rotate blower motor counterclockwise.
16. Rotate the blower motor counterclockwise as needed to remove the blower motor and wheel from the HVAC housing.
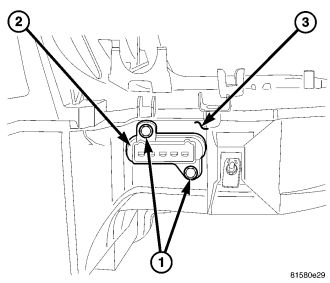
17. Remove the two screws (1) that secure the blower motor resistor (2) to the rear of the HVAC housing (3) and remove the resistor.
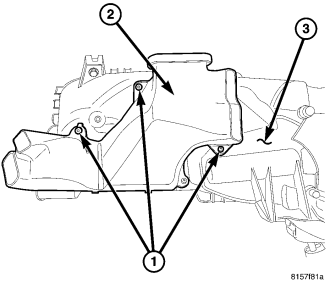
NOTE: If the foam seal on the floor distribution duct is deformed or damaged, the seal must be replaced.
18. Remove the three screws (1) that secure the floor distribution duct (2) to the bottom of the HVAC housing (3) and remove the duct.
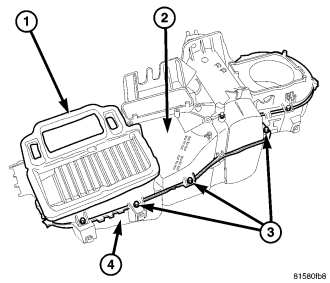
NOTE: If the foam seal on the panel/defrost outlet is deformed or damaged, the seal must be replaced.
19. If required, remove the foam seal (1) from the panel/defrost outlet located on the upper half of the HVAC housing (2).
20. Remove the screws (3) that secure the upper half of the HVAC housing to the lower half of the HVAC housing (4).
21. Carefully separate the two halves of the HVAC housing.
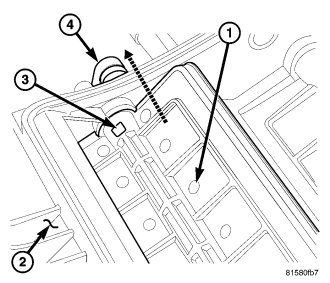
22. To remove the panel-air door (1) from the inside of the upper half of the HVAC housing (2), first carefully release the retaining tab (3) of the panel door lever (4) from the pivot shaft of the panel-air door, using a small pick-type tool.
23. Pull the panel door lever out of the pivot shaft of the panel-air door.
NOTE: If the seal on the air door is deformed or damaged, the air door must be replaced.
24. Remove the panel-air door from the upper half of the HVAC housing.
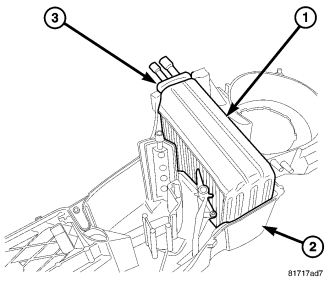
NOTE: If the foam insulator around the A/C evaporator is deformed or damaged, the insulator must be replaced.
25. Carefully lift the A/C evaporator (1) and the foam insulator out of the lower half of the HVAC housing (2).
NOTE: If the rubber seal around the evaporator tubes is deformed or damaged, the seal must be replaced.
26. If required, remove the rubber seal (3) from around the evaporator tubes.
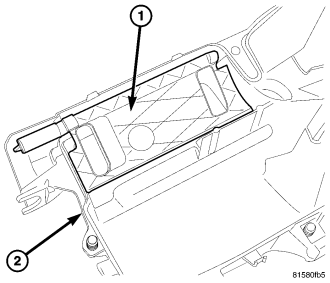
NOTE: If the seal on the air door is deformed or damaged, the air door must be replaced.
27. Remove the floor/defrost-air door (1) from the lower half of the HVAC housing (2).
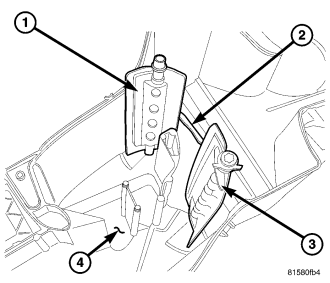
NOTE: If the seal on any air door is deformed or damaged, the air door must be replaced.
28. Remove both blend-air doors (1 and 3) from the lower half of the HVAC housing (4).
29. If required, disengage the blend door arm (2) from both blend-air doors.