WIPER MODULE
DESCRIPTION
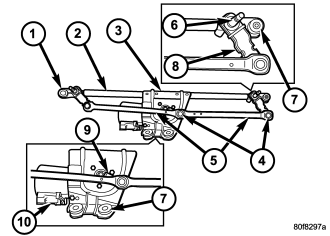
The front wiper module bracket is secured with two nuts below the wiper motor through rubber insulators (7) to two weld studs on the bottom of the cowl plenum panel beneath the cowl plenum cover/grille panel. Two screws secure the top of the module bracket to the cowl plenum panel through rubber insulators located on the outboard end of each pivot bracket. The ends of the wiper pivot shafts that protrude through dedicated openings in the cowl plenum cover/grille panel to drive the wiper arms and blades are the only visible components of the front wiper module. The front wiper module consists of the following major components:
- Bracket - The front wiper module bracket consists of a long tubular steel main member (2) that has a die cast pivot bracket (1) formation near each end where the two wiper pivots are secured. A stamped steel mounting plate (3) for the wiper motor is secured with welds near the center of the main member. A short stamped steel tab that extends laterally from one side of the mounting plate provides a mounting location for the wiper motor pigtail wire connector (10).
- Crank Arm (9) - The front wiper motor crank arm is a stamped steel unit with a slotted hole on the driven end that is secured to the wiper motor output shaft with a nut, and has a ball stud secured to the drive end.
- Linkage (5) - Two stamped steel drive links connect the wiper motor crank arm to the wiper pivot lever arms. The right side drive link has a plastic socket-type bushing (4) on each end. The left side drive link has a plastic socket-type bushing on one end, and a plastic sleeve-type bushing on the other end. The socket-type bushing on one end of each drive link is snap-fit over the ball stud on the lever arm of its respective pivot. The left side drive link sleeve-type bushing end is then fit over the motor crank arm ball stud, and the other socket-type bushing of the right side drive link is snap-fit over the exposed end of the wiper motor crank arm ball stud.
- Motor - The front wiper motor is secured with three screws to the motor mounting plate near the center of the wiper module bracket. The wiper motor output shaft passes through a hole in the module bracket, where a nut secures the wiper motor crank arm to the motor output shaft. The two-speed permanent magnet wiper motor features an integral transmission, an internal park switch, and an internal automatic resetting circuit breaker.
- Pivots - The two front wiper pivots are secured within the die cast pivot brackets on the outboard ends of the wiper module main member. The lever arms (8) that extend from the center of the pivot shafts (6) each have a ball stud on their end. The upper end of each pivot shaft where the wiper arms will be fastened each is tapered and serrated with a threaded stud formation at the tip. The lower ends of the pivot shafts are installed through lubricated bushings in the pivot brackets and are secured with snap rings.
The front wiper module cannot be adjusted or repaired. If any component of the module is ineffective or damaged, the entire front wiper module unit must be replaced.
OPERATION
The front wiper module operation is controlled by the battery current inputs received by the wiper motor from the wiper on/off and wiper high/low relays. The wiper motor speed is controlled by current flow to either the low speed or the high speed set of brushes. The park switch is a single pole, single throw, momentary switch within the wiper motor that is mechanically actuated by the wiper motor transmission components. The park switch alternately closes the wiper park switch sense circuit to ground or to battery current, depending upon the position of the wipers on the glass. This feature allows the motor to complete its current wipe cycle after the wiper system has been turned OFF, and to park the wiper blades in the lowest portion of the wipe pattern. The automatic resetting circuit breaker protects the motor from overloads.
The wiper motor crank arm, the two wiper linkage members, and the two wiper pivots mechanically convert the rotary output of the wiper motor to the back and forth wiping motion of the wiper arms and blades on the glass.
The hard wired inputs and outputs of the front wiper motor may be diagnosed using conventional diagnostic tools and procedures. Refer to the appropriate wiring information. However, conventional diagnostic methods will not prove conclusive in the diagnosis of the front wiper motor or the electronic controls or communication between other modules and devices that provide some features of the front wiper and washer system. The most reliable, efficient, and accurate means to diagnose the front wiper motor or the electronic controls and communication related to front wiper motor operation requires the use of a diagnostic scan tool. Refer to the appropriate diagnostic information.
REMOVAL
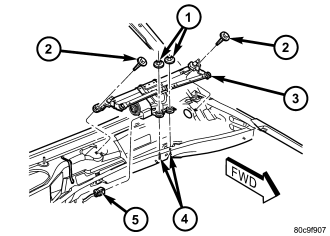
1. Unlatch and open the hood.
2. Disconnect and isolate the battery negative cable.
3. Remove both front wiper arms from the wiper pivots. (Refer to 8 - ELECTRICAL/WIPERS/WASHERS - FRONT/FRONT WIPER ARM - REMOVAL).
4. Remove the cowl plenum cover/grille panel from over the cowl plenum. (Refer to 23 - BODY/EXTERIOR/COWL GRILLE - REMOVAL).
5. Disconnect the headlamp and dash wire harness connector (5) for the front wiper motor from the motor pigtail wire connector.
6. Remove the two screws (2) that secure the front wiper module (3) to the top of the cowl plenum panel at the pivot brackets.
7. Remove the two nuts (1) that secure the front wiper module to the two weld studs (4) on the bottom of the cowl plenum panel.
8. Lift the front wiper module up from the cowl plenum panel far enough to disengage the two lower insulators from the weld studs on the bottom of the plenum panel.
9. Remove the front wiper module from the cowl plenum panel as a unit.
INSTALLATION
1. Position the front wiper module (3) to the cowl plenum as a unit.
2. Lower the front wiper module lower mounting insulators over the two weld studs (4) on the bottom of the cowl plenum panel.
3. Install the two screws (2) that secure the front wiper module to the top of the cowl plenum panel at the pivot brackets. Tighten the screw on the driver side, followed by the screw on the passenger side. Tighten the screws to 8 N·m (72 in. lbs.).
4. Install and tighten the two nuts (1) that secure the front wiper module to the two weld studs on the bottom of the cowl plenum panel. Tighten the nuts to 8 N·m (72 in. lbs.).
5. Reconnect the headlamp and dash wire harness connector (5) for the front wiper motor to the motor pigtail wire connector.
6. Reinstall the cowl plenum cover/grille panel over the cowl plenum. (Refer to 23 - BODY/EXTERIOR/COWL GRILLE - INSTALLATION).
7. Close and latch the hood.
8. Reinstall both front wiper arms onto the wiper pivots. (Refer to 8 - ELECTRICAL/FRONT WIPERS/WASHERS/FRONT WIPER ARM - INSTALLATION).
9. Reconnect the battery negative cable.