| Last Modified: 11-27-2007 | 1.6 A | |
| Service Category: Vehicle Interior | Section: Heating/Air Conditioning | |
| Model Year: 2008 | Model: LX570 | Doc ID: RM00000180400SX |
| Title: HEATING / AIR CONDITIONING: CONDENSER: INSTALLATION (2008 LX570) | ||
INSTALLATION
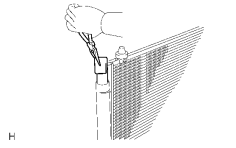
1. INSTALL COOLER DRYER
|
(a) Using pliers, install the cooler dryer. |
|
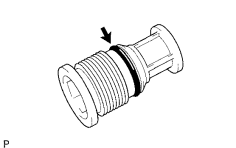
(b) Apply a sufficient amount of compressor oil to the contact surfaces of a new O-ring and the cap. Compressor oil: ND-OIL 8 or equivalent |
(c) Install the O-ring to the cap.
|
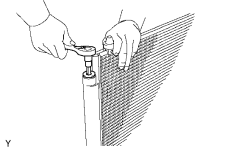
(d) Using a 14 mm socket hexagon wrench, install the cap to the modulator. Torque: 2.9 N·m (30 kgf·cm, 26 in·lbf) |
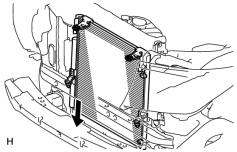
2. INSTALL COOLER CONDENSER ASSEMBLY
|
(a) Install the cooler condenser as shown in the illustration. |
3. INSTALL RADIATOR SUPPORT SUB-ASSEMBLY
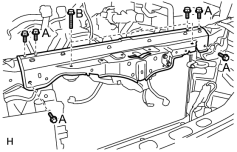
(a) Install the radiator support with the 8 bolts.
Torque: 21.7 N·m (221 kgf·cm, 16 ft·lbf)
Torque: 9.8 N·m (100 kgf·cm, 87 in·lbf)
4. INSTALL HOOD LOCK ASSEMBLY

5. INSTALL HOOD LOCK CONTROL CABLE COVER
6. INSTALL HOOD LOCK SUPPORT BRACE SUB-ASSEMBLY
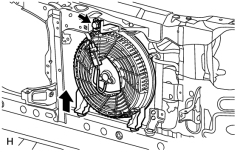
(a) Install the brace with the 3 bolts and nut.
Torque: 21.7 N·m (221 kgf·cm, 16 ft·lbf)
Torque: 5.5 N·m (56 kgf·cm, 49 in·lbf)
(b) Install the hood lock nut cap.
7. INSTALL OIL COOLER ASSEMBLY
|
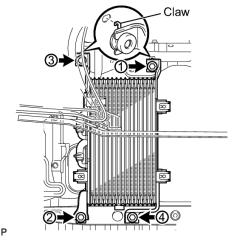
(a) Temporarily install the oil cooler to the radiator support. NOTICE:
Securely attach the 2 claws of the oil cooler into the hole of the radiator support. |
(b) Install the 4 bolts in the sequence shown in the illustration.
Torque: 12 N·m (122 kgf·cm, 9 ft·lbf)
8. INSTALL TRANSMISSION OIL COOLER AIR DUCT
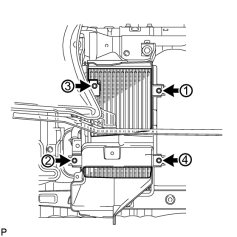
(a) Install the oil cooler air duct with the 4 bolts in the sequence shown in the illustration.
Torque: 4.9 N·m (50 kgf·cm, 43 in·lbf)
9. INSTALL SHROUD BLOWER ASSEMBLY
10. INSTALL LOW PITCHED HORN ASSEMBLY
11. INSTALL HIGH PITCHED HORN ASSEMBLY
12. INSTALL MILLIMETER WAVE RADAR SENSOR ASSEMBLY (w/ Dynamic Radar Cruise Control System)
13. CONNECT NO. 1 COOLER REFRIGERANT DISCHARGE HOSE
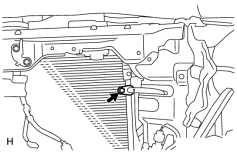
(a) Remove the attached vinyl tape from the hose and the connecting part of the cooler condenser.
(b) Sufficiently apply compressor oil to a new O-ring and the fitting surface of the discharge hose joint.
Compressor oil:
ND-OIL 8 or equivalent
(c) Install the O-ring to the discharge hose.
(d) Connect the discharge hose to the cooler condenser with the bolt.
Torque: 5.4 N·m (55 kgf·cm, 48 in·lbf)
NOTICE:
- When tightening the bolt, do not allow any tools to contact the pipe.
- When tightening the bolt, hold a part of the pipe near the connector.
14. CONNECT COOLER REFRIGERANT LIQUID PIPE A
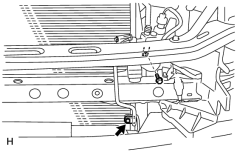
(a) Remove the attached vinyl tape from the pipe and the connecting part of the cooler condenser.
(b) Sufficiently apply compressor oil to a new O-ring and the fitting surface of the liquid pipe A joint.
Compressor oil:
ND-OIL 8 or equivalent
(c) Install the O-ring to the liquid pipe A.
(d) Connect the liquid pipe A to the cooler condenser with the 2 bolts.
Torque: 5.4 N·m (55 kgf·cm, 48 in·lbf)
NOTICE:
- When tightening the bolts, do not allow any tools to contact the pipe.
- When tightening the bolts, hold a part of the pipe near the connector.
15. CONNECT CABLE TO NEGATIVE BATTERY TERMINAL
NOTICE:
When disconnecting the cable, some systems need to be initialized after the cable is reconnected
.
16. CHARGE REFRIGERANT
17. INSTALL FRONT BUMPER COVER
(a) Install the front bumper cover
.
18. WARM UP ENGINE
19. CHECK FOR REFRIGERANT GAS LEAK
20. CHECK SRS WARNING LIGHT
(a) Check the SRS warning light
.
21. ADJUST MILLIMETER WAVE RADAR SENSOR ASSEMBLY (w/ Dynamic Radar Cruise Control System)
(a) Adjust the millimeter wave radar sensor assembly
.

|

|