| Last Modified: 11-27-2007 | 1.6 A | |
| Service Category: Vehicle Exterior | Section: Door/Hatch | |
| Model Year: 2008 | Model: LX570 | Doc ID: RM000001BLH00TX |
| Title: DOOR / HATCH: TAIL GATE: REASSEMBLY (2008 LX570) | ||
REASSEMBLY
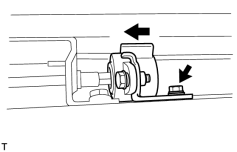
1. INSTALL BACK DOOR DAMPER ASSEMBLY
|
(a) Install the bolt and back door damper. Torque: 7.5 N·m (76 kgf·cm, 66 in·lbf) |
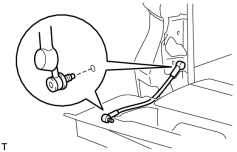
2. INSTALL TAIL GATE STAY SUB-ASSEMBLY LH
(a) Clean the threaded surface on the vehicle body with a non-residue solvent.
(b) Apply adhesive to the threads of the screws.
Adhesive:
Toyota Genuine Adhesive 1324, Three Bond 1324 or equivalent
|
(c) Using a T40 "TORX" wrench, install the tail gate stay with the 2 screws. |
3. INSTALL TAIL GATE STAY SUB-ASSEMBLY RH
HINT:
Use the same procedures described for the LH side.
4. INSTALL NO. 2 BACK DOOR GARNISH SUB-ASSEMBLY OUTSIDE

5. INSTALL LOWER TAIL GATE LOCK ASSEMBLY LH
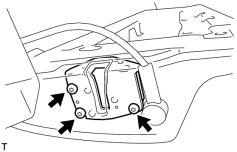
(a) w/o Power Back Door:
|
(1) Using a T30 "TORX" wrench, install the lower tail gate lock with the 3 screws. Torque: 12 N·m (122 kgf·cm, 9 ft·lbf) |
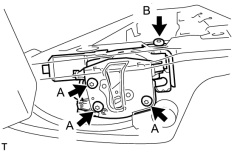
(b) w/ Power Back Door:
|
(1) Using a T30 "TORX" wrench, install the lower tail gate lock with the 3 screws labeled A. Torque: 12 N·m (122 kgf·cm, 9 ft·lbf) |
(2) Using a T30 "TORX" wrench, install the screw labeled B.
Torque: 7.5 N·m (76 kgf·cm, 66 in·lbf)
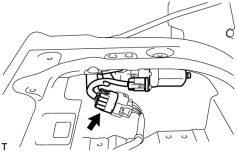
|
(3) Connect the connector. |
6. INSTALL BACK DOOR REMOTE CONTROL ASSEMBLY
(a) w/o Power Back Door:
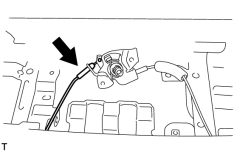
|
(1) Connect the left side cable. |
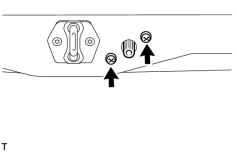
|
(2) Install the back door remote control with the 2 screws. Torque: 5.0 N·m (51 kgf·cm, 44 in·lbf) |
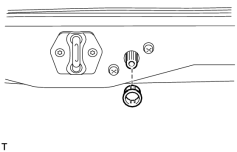
|
(3) Install the back door handle grommet. |
(b) w/ Power Back Door:
(1) Connect the connector.
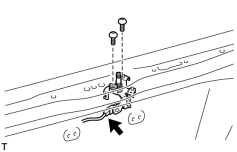
|
(2) Install the back door remote control with the 2 screws. Torque: 5.0 N·m (51 kgf·cm, 44 in·lbf) |
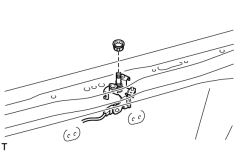
|
(3) Install the back door handle grommet. |
7. INSTALL LOWER TAIL GATE LOCK ASSEMBLY RH
(a) w/o Power Back Door:
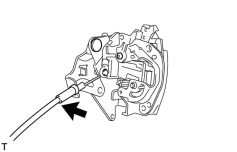
|
(1) Connect the cable to the lower tail gate lock. |
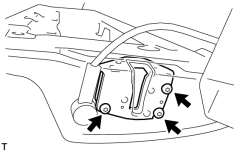
|
(2) Using a T30 "TORX" wrench, install the lower tail gate lock with the 3 screws. Torque: 12 N·m (122 kgf·cm, 9 ft·lbf) |
(b) w/ Power Back Door:
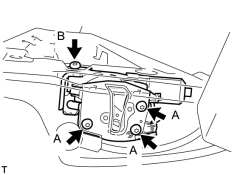
|
(1) Using a T30 "TORX" wrench, install the lower tail gate lock with the 3 screws labeled A. Torque: 12 N·m (122 kgf·cm, 9 ft·lbf) |
(2) Using a T30 "TORX" wrench, install the screw labeled B.
Torque: 7.5 N·m (76 kgf·cm, 66 in·lbf)
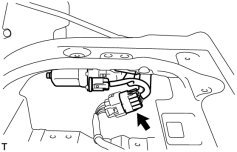
|
(3) Connect the connector. |
8. INSTALL BACK DOOR GARNISH
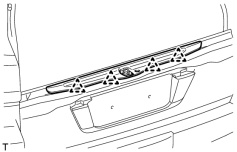
|
(a) Attach the 4 clips to install the back door garnish. |
9. INSTALL BACK DOOR INSIDE HANDLE ASSEMBLY
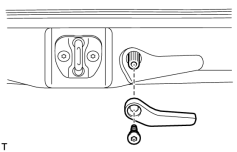
|
(a) Install the back door inside handle with the screw. Torque: 5.0 N·m (51 kgf·cm, 44 in·lbf) |
10. INSTALL BACK DOOR TORSION BAR GUIDE
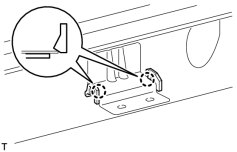
|
(a) Attach the 2 claws to install the back door torsion bar guide. |
11. INSTALL LOWER BACK DOOR TORSION BAR ASSEMBLY
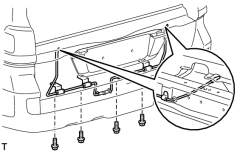
|
(a) Install the lower back door torsion bar with the 4 bolts. Torque: 7.5 N·m (76 kgf·cm, 66 in·lbf) |
12. INSTALL SPARE TIRE
13. INSTALL REAR BUMPER COVER
(a) Install the rear bumper cover
.
14. INSTALL BACK DOOR TRIM PANEL ASSEMBLY
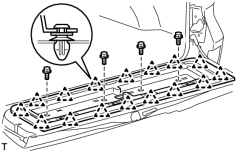
|
(a) Attach the 16 clips to install the back door trim cover. |
(b) Install the 4 bolts.
15. INSTALL BACK DOOR TRIM COVER RH
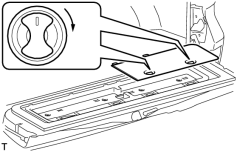
|
(a) Install the back door trim cover RH as shown in the illustration. |
16. INSTALL BACK DOOR TRIM COVER LH
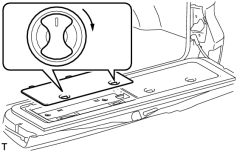
|
(a) Install the back door trim cover LH as shown in the illustration. |
17. INSTALL REAR FLOOR MAT REAR SUPPORT PLATE
18. CONNECT CABLE TO NEGATIVE BATTERY TERMINAL
NOTICE:
When disconnecting the cable, some systems need to be initialized after the cable is reconnected
.
19. INSTALL ENGINE ROOM SIDE COVER LH

|

|