Compressor Assembly Removal and Installation
Precautions: Precautions for Diagnosing Trouble · General safety (00)
M16A Model and D16AA Model
K14C Model
Removal
1)Recover refrigerant from A/C system using recovery and recycling equipment referring to “Recovery” in Operation Procedure for Refrigerant Charge:Manual Type.
2)Disconnect negative (–) cable at battery.
3)Remove drive belt. 
4)Remove engine undercover.
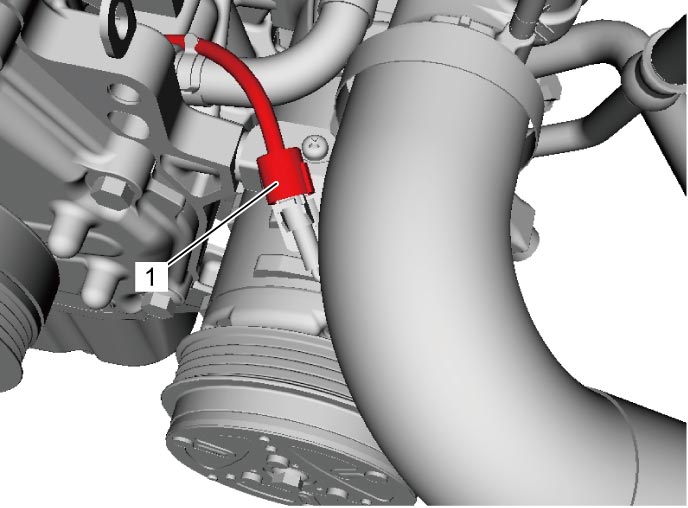
5)Disconnect magnet clutch lead wire connector (1).

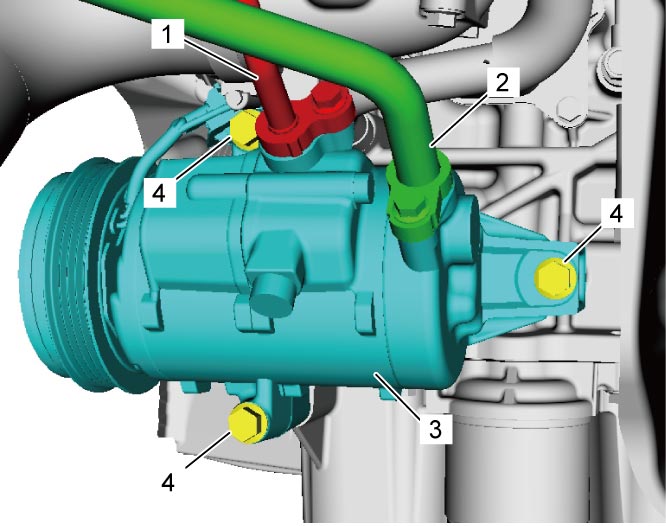
6)Disconnect discharge hose (1) and suction hose (2) from compressor (3).
NOTE:
Cap open fittings immediately to keep moisture out of the system.
7)Remove compressor mounting bolts (4) and compressor from cylinder block.
Installation
Reverse removal procedure noting the following points.
•If compressor is replaced, replenish A/C system with new compressor oil referring to “Replenishing Compressor Oil” in Operation Procedure for Refrigerant Charge:Automatic Type.
•Apply compressor oil to new O-rings of discharge hose and suction hose.
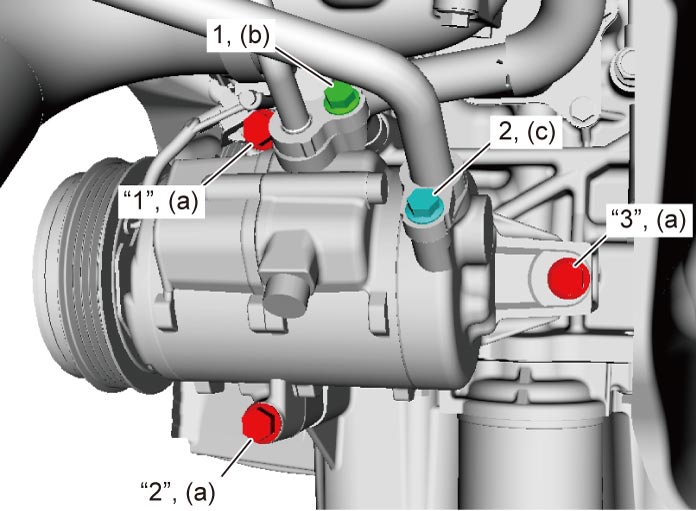
•Tighten compressor mounting bolts in numerical order (“1” – “3”) to specified torque as shown in figure.
•Tighten discharge hose bolt (1) and suction hose bolt (2) to specified torque.
Discharge hose bolt (b): 11 N·m (1.1 kgf-m, 8.5 lbf-ft)
Suction hose bolt (c): 11 N·m (1.1 kgf-m, 8.5 lbf-ft)
 •Adjust drive belt.
•Evacuate and charge A/C system referring to “Evacuation” and “Charge” in Operation Procedure for Refrigerant Charge:Automatic Type.
•Apply compressor oil to new O-rings of discharge hose and suction hose.
•Tighten compressor mounting bolts in numerical order (“1” – “3”) to specified torque as shown in figure.
•Tighten discharge hose bolt (1) and suction hose bolt (2) to specified torque.
Tightening torque
Compressor mounting bolt (a): 25 N·m (2.5 kgf-m, 18.5 lbf-ft)Discharge hose bolt (b): 11 N·m (1.1 kgf-m, 8.5 lbf-ft)
Suction hose bolt (c): 11 N·m (1.1 kgf-m, 8.5 lbf-ft)
•Evacuate and charge A/C system referring to “Evacuation” and “Charge” in Operation Procedure for Refrigerant Charge:Automatic Type.