Home › ENGINE · 2UZ-FE › ENGINE CONTROL SYSTEM › SFI SYSTEM

DTC    P2A00    A/F Sensor Circuit Slow Response (Bank 1 Sensor 1)

DTC    P2A03    A/F Sensor Circuit Slow Response (Bank 2 Sensor 1)

for Preparation Click here


DESCRIPTION

  1. DTC P2A00 indicates malfunctions related to the bank 1 A/F sensor.
  2. DTC P2A03 indicates malfunctions related to the bank 2 A/F sensor.
  3. Bank 1 refers to the bank that includes No. 1 cylinder.
  4. Bank 2 refers to the bank that includes No. 2 cylinder.
  5. Sensor 1 refers to the sensor mounted in front of the Three-Way Catalytic Converter (TWC) and is located near the engine assembly.
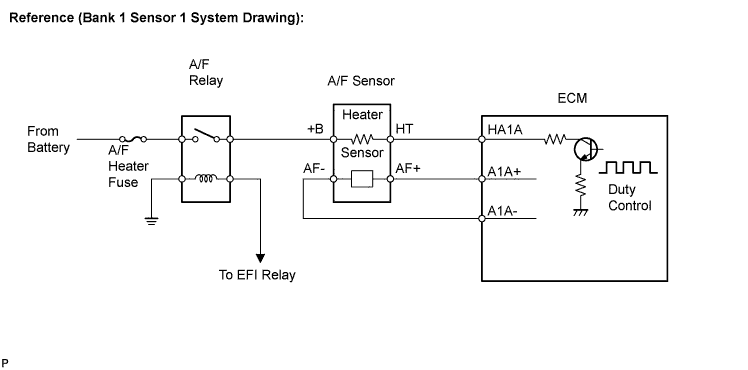
Refer to DTC P2195 .

DTC No.
DTC Detection Condition
Trouble Area
P2A00
P2A03
Calculated test value for Air Fuel Ratio (A/F) sensor response rate deterioration level is less than threshold.
  1. Open or short in Air Fuel Ratio (A/F) sensor (sensor 1) circuit
  2. Air Fuel Ratio (A/F) sensor (sensor 1)
  3. ECM

MONITOR DESCRIPTION

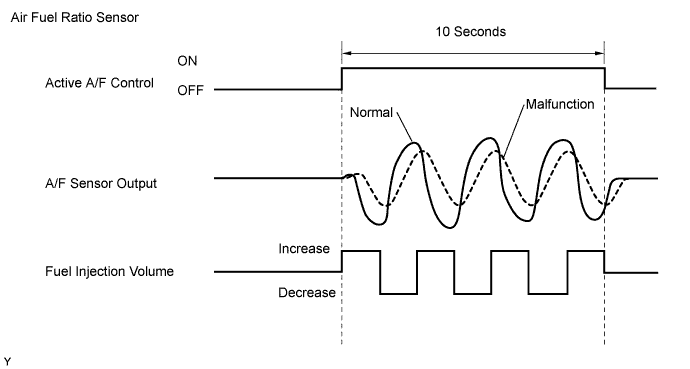
After engine is warmed up, the ECM performs air fuel ratio feedback control to regulate the air fuel ratio at stoichiometric ratio. In addition, this vehicle performs Active Air Fuel Ratio (A/F) Control for approximately 10 seconds after preconditions are met in order to measure the A/F sensor response rate. During active air fuel ratio control, the ECM forcibly increases and decreases the injection volume a certain amount based on learned stoichiometric air fuel ratio during usual air fuel feedback control, and measures the A/F sensor response rate. The ECM receives a signal from the A/F sensor while performing active A/F control and uses it to calculate the A/F sensor response rate deterioration level.
If the test value for A/F sensor response rate deterioration level is less than the threshold, the ECM interprets this as a malfunction, and sets the DTC.

A115363E02


MONITOR STRATEGY


Related DTCs
P2A00: Air fuel ratio (A/F) sensor (bank 1) slow response
P2A03: Air fuel ratio (A/F) sensor (bank 2) slow response
Required Sensors/Components (Main)
A/F sensor
Frequency of Operation
Once per driving cycle
Duration
10 to 15 seconds
MIL Operation
2 driving cycles
Sequence of Operation
None

TYPICAL ENABLING CONDITIONS


Monitor runs whenever following DTCs not present
P0031, P0032, P0051, P0052 (A/F sensor heater - Sensor 1)
P0100 - P0103 (MAF meter)
P0110 - P0113 (IAT sensor)
P0115 - P0118 (ECT sensor)
P0120 - P0223, P2135 (TP sensor)
P0125 (Insufficient ECT for Closed Loop)
P0171, P0172 (Fuel system)
P0300 - P0308 (Misfire)
P0335 (CKP sensor)
P0455, P0456 (EVAP system)
P0500 (VSS)
P2196, P2198 (A/F sensor - rationality)
P2440 (AIR control valve stuck open)
P2441 (AIR control valve stuck close)
P2444 (AIP stuck ON)
P2445 (AIP stuck OFF)
Active A/F control
Performing
Active A/F control is performed when the following conditions set
-
Battery Voltage
11 V or more
ECT
75°C (167°F) or more
Idle
OFF
Engine RPM
Less than 4,000 rpm
A/F sensor status
Activated
Fuel cut
OFF
Engine load
10 to 70 %
Shift position
2nd or more
Catalyst monitor
Not executing
Intake air amount
2.5 to 12 g/sec.

TYPICAL MALFUNCTION THRESHOLDS


Response rate deterioration level
Less than 0.2 V

MONITOR RESULT

Detailed information on Checking Monitor Status (Click here).
The test value and test limit information are described as shown in the following table. Check the monitor result and test values after performing the monitor drive pattern (refer to "Confirmation Monitor").
  1. MID (Monitor Identification Data) is assigned to each emissions-related component.
  2. TID (Test Identification Data) is assigned to each test value.
  3. Scaling is used to calculate the test value indicated on generic OBD II scan tools.

    A/F sensor bank 1 sensor 1 
    MID
    TID
    Scaling
    Description of Test Value
    Minimum Test Limit
    Maximum Test Limit
    $01
    $8E
    Multiply by 0.0003 (no dimension)
    Response rate deterioration level for A/F sensor
    Malfunction criterion
    FF

    A/F sensor bank 2 sensor 1 
    MID
    TID
    Scaling
    Description of Test Value
    Minimum Test Limit
    Maximum Test Limit
    $05
    $8E
    Multiply by 0.0003 (no dimension)
    Response rate deterioration level for A/F sensor
    Malfunction criterion
    FF

CONFIRMATION DRIVING PATTERN

HINT:
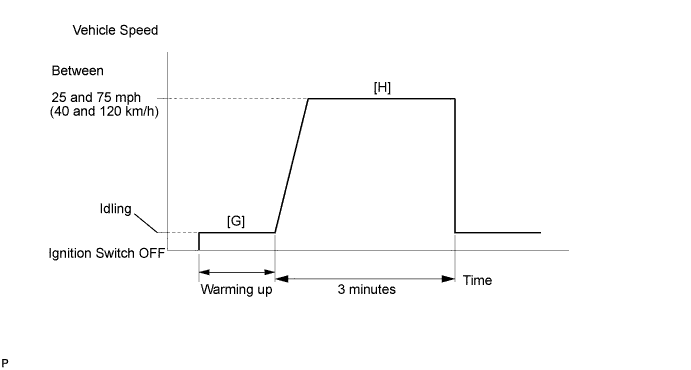
Performing this confirmation pattern will activate the air fuel ratio (A/F) sensor response monitor.


A115372E43

  1. Connect the intelligent tester to the DLC3 with CAN VIM [A].
  2. Turn the ignition switch ON [B].
  3. Turn the tester ON [C].
  4. Clear DTCs (if set) (Click here) [D].
  5. Enter the following menus: DIAGNOSIS / ENHANCED OBD II / MONITOR INFO / MONITOR RESULT [E].
  6. Check that RES RATE B1 S1 is INCOMPL [F].
  7. Start the engine and warm it up [G].
  8. Drive the vehicle at between 25 mph and 75 mph (40 km/h and 120 km/h) for 3 minutes. However, the vehicle should be driven at a constant speed [H].
  9. Check the monitor result values on the intelligent tester by entering the following menus: DIAGNOSIS / ENHANCED OBD II / MONITOR INFO / TEST RESULT [I].
  10. If the values indicated on the tester do not change, perform READINESS MONITOR DRIVE PATTERN for the A/F sensor and the heated oxygen sensor (Click here) [J].

    HINT:
    Completion of all A/F sensor monitors are required to change the value in TEST RESULT.

  11. Note the value of the Monitor Result [K].
  12. Enter the following menus: DIAGNOSIS / ENHANCED OBD II / DTC INO / PENDING CODES [L].
  13. Check if any pending DTCs are set [M].

WIRING DIAGRAM

Refer to DTC P2195 .

INSPECTION PROCEDURE

HINT:
Intelligent tester only:
Malfunctioning areas can be identified by performing the A/F CONTROL function provided in the ACTIVE TEST. The A/F CONTROL function can help to determine whether the Air Fuel Ratio (A/F) sensor, Heated Oxygen (HO2) sensor and other potential trouble areas are malfunctioning.

The following instructions describe how to conduct the A/F CONTROL operation using the intelligent tester.
  1. Connect the intelligent tester to the DLC3 with CAN VIM.
  2. Start the engine and turn the tester ON.
  3. Warm up the engine at an engine speed of 2,500 rpm for approximately 90 seconds.
  4. On the intelligent tester, enter the following menus: DIAGNOSIS / ENHANCED OBD II / ACTIVE TEST / A/F CONTROL.
  5. Perform the A/F CONTROL operation with the engine in an idling condition (press the RIGHT or LEFT button to change the fuel injection volume).
  6. Monitor the output voltages of the A/F and HO2 sensors (AFS B1S1 (AFS B2S1) and O2S B1S2 (O2S B2S2)) displayed on the tester.

    HINT:
    1. The A/F CONTROL operation lowers the fuel injection volume by 12.5 % or increases the injection volume by 25 %.
    1. Each sensor reacts in accordance with increases and decreases in the fuel injection volume.


    Standard: 
    Tester Display
    (Sensor)
    Injection Volume
    Status
    Voltage
    AFS B1S1 (AFS B2S1)
    (A/F)
    +25 %
    Rich
    Less than 3.0
    AFS B1S1 (AFS B2S1)
    (A/F)
    -12.5 %
    Lean
    More than 3.35
    O2S B1S2 ( O2S B2S2)
    (HO2)
    +25 %
    Rich
    More than 0.55
    O2S B1S2 (O2S B2S2)
    (HO2)
    -12.5 %
    Lean
    Less than 0.4

    NOTICE:
    The Air Fuel Ratio (A/F) sensor has an output delay of a few seconds and the Heated Oxygen (HO2) sensor has a maximum output delay of approximately 20 seconds.


    Case
    A/F Sensor (Sensor 1)
    Output Voltage
    HO2 Sensor (Sensor 2)
    Output Voltage
    Main Suspected Trouble Area
    1
    Injection Volume
    +25 %
    -12.5 %
    A103184
    Injection Volume
    +25 %
    -12.5 %
    A103184
    -
    Output Voltage
    More than 3.35 V
    Less than 3.0 V
    A112626
    Output Voltage
    More than 0.55 V
    Less than 0.4 V
    A104057
    2
    Injection Volume
    +25 %
    -12.5 %
    A103184
    Injection Volume
    +25 %
    -12.5 %
    A103184
    1. A/F sensor
    2. A/F sensor heater
    3. A/F sensor circuit
    Output Voltage
    Almost
    no reaction
    A103185
    Output Voltage
    More than 0.55 V
    Less than 0.4 V
    A104057
    3
    Injection Volume
    +25 %
    -12.5 %
    A103184
    Injection Volume
    +25 %
    -12.5 %
    A103184
    1. HO2 sensor
    2. HO2 sensor heater
    3. HO2 sensor circuit
    Output Voltage
    More than 3.35 V
    Less than 3.0 V
    A112626
    Output Voltage
    Almost
    no reaction
    A103185
    4
    Injection volume
    +25 %
    -12.5 %
    A103184
    Injection Volume
    +25 %
    -12.5 %
    A103184
    1. Fuel injector
    2. Fuel pressure
    3. Gas leakage from exhaust system
      (Air fuel ratio extremely lean or rich)
    Output Voltage
    Almost
    no reaction
    A103185
    Output Voltage
    Almost
    no reaction
    A103185
  1. Following the A/F CONTROL procedure enables technicians to check and graph the voltage outputs of both the A/F and HO2 sensors.
  2. To display the graph, enter the following menus: DIAGNOSIS / ENHANCED OBD II / ACTIVE TEST / A/F CONTROL / USER DATA / AFS B1S1 and O2S B1S2 or AFS B2S1 and O2S B2S2. Then press the YES button and ENTER button, followed by the F4 button.

    HINT:
    1. DTC P2A00 may be also set when the air fuel ratio is stuck rich or lean.
    2. A low A/F sensor voltage could be caused by a rich air fuel mixture. Check for conditions that would cause the engine to run rich.
    3. A high A/F sensor voltage could be caused by a lean air fuel mixture. Check for conditions that would cause the engine to run lean.
    4. Read freeze frame data using the intelligent tester. The ECM records vehicle and driving condition information as freeze frame data the moment a DTC is stored. When troubleshooting, freeze frame data can be helpful in determining whether the vehicle was running or stopped, whether the engine was warmed up or not, whether the air/fuel ratio was lean or rich, as well as other data recorded at the time of a malfunction.

1.CHECK ANY OTHER DTCS OUTPUT (IN ADDITION TO DTC P2A00 AND/OR P2A03)
  1. Connect the intelligent tester to the DLC3 with CAN VIM.

  1. Turn the ignition switch ON and turn the tester ON.

  1. Enter the following menus: DIAGNOSIS / ENHANCED OBD II / DTC INFO / CURRENT CODES.

  1. Read DTCs.

    Result:

    Display (DTC Output)
    Proceed to
    P2A00 and/or P2A03
    A
    P2A00 and/or P2A03 and other DTCs
    B

    HINT:
    If any DTCs other than P2A00 and/or P2A03 are output, troubleshoot those DTCs first.


B
GO TO DTC CHART
A


2.INSPECT AIR FUEL RATIO SENSOR (HEATER RESISTANCE)


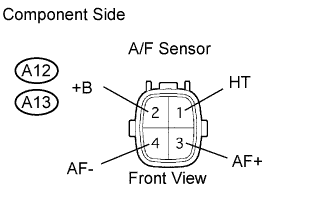
    A085152E60
  1. Disconnect the A12 or A13 Air Fuel Ratio (A/F) sensor connector.

  1. Measure the resistance of the A/F sensor connector.

    Standard resistance:
    Tester Connection
    Specified Condition
    HT (1) - +B (2)
    1.8 to 3.4 Ω at 20°C (68°F)
    HT (1) - AF- (4)
    10 kΩ or higher

  1. Reconnect the A/F sensor connector.


NG
REPLACE AIR FUEL RATIO SENSOR
OK


3.CHECK HARNESS AND CONNECTOR (A/F SENSOR - ECM)


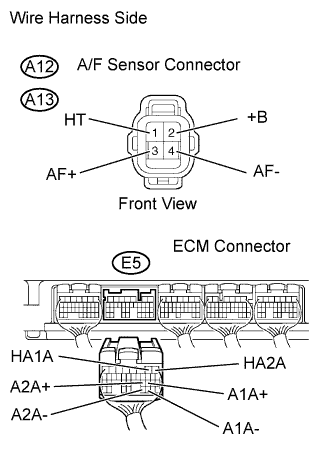
    A115727E02
  1. Disconnect the A12 or A13 A/F sensor connector.

  1. Turn the ignition switch ON.

  1. Measure the voltage between the +B terminal of the A/F sensor connector and body ground.

    Standard voltage:
    Tester Connections
    Specified Conditions
    +B (2) - Body ground
    10 V or more

  1. Turn the ignition switch OFF.

  1. Disconnect the E5 ECM connector.


  1. Measure the resistance.

    Standard resistance (Check for open):
    Tester Connections
    Specified Conditions
    HT (A12-1) - HA1A (E5-2)
    Below 1 Ω
    HT (A13-1) - HA2A (E5-1)
    AF+ (A12-3) - A1A+ (E5-22)
    AF+ (A13-3) - A2A+ (E5-23)
    AF- (A12-4) - A1A- (E5-30)
    AF- (A13-4) - A2A- (E5-31)

    Standard resistance (Check for short):
    Tester Connections
    Specified Conditions
    HT (A12-1) or HA1A (E5-2) - Body ground
    10 kΩ or higher
    HT (A13-1) or HA2A (E5-1) - Body ground
    AF+ (A12-3) or A1A+ (E5-22) - Body ground
    AF+ (A13-3) or A2A+ (E5-23) - Body ground
    AF- (A12-4) or A1A- (E5-30) - Body ground
    AF- (A13-4) or A2A- (E5-31) - Body ground


    A118002E02

  1. Reconnect the A/F sensor connector.

  1. Reconnect the ECM connector.


NG
REPAIR OR REPLACE HARNESS OR CONNECTOR
OK


4.PERFORM CONFIRMATION DRIVING PATTERN

NEXT


5.CHECK WHETHER DTC OUTPUT RECURS (DTC P2A00 AND/OR P2A03)
  1. Read DTCs using the intelligent tester.

  1. Enter the following menus: DIAGNOSIS / ENHANCED OBD II / DTC INFO / PENDING CODES.

    Result:

    Display (DTC Output)
    Proceed to
    P2A00 and/or P2A03
    A
    No output
    B


B
CHECK FOR INTERMITTENT PROBLEMS
A


6.REPLACE AIR FUEL RATIO SENSOR

NEXT


7.PERFORM CONFIRMATION DRIVING PATTERN

NEXT


8.CHECK WHETHER DTC OUTPUT RECURS (DTC P2A00 AND/OR P2A03)
  1. Read DTCs using the intelligent tester.

  1. Enter the following menus: DIAGNOSIS / ENHANCED OBD II / DTC INFO / PENDING CODES.

    Result:

    Display (DTC Output)
    Proceed to
    P2A00 and/or P2A03
    A
    No output
    B


A
CHECK EXTREMELY RICH OR LEAN ACTUAL AIR FUEL RATIO (REFER TO DTC P0171 PROCEDURE)
B

END