Home › Audio / Visual / Telematics › AUDIO / VIDEO › AUDIO AND VISUAL SYSTEM › 2009.08–2013.08
RM1440E _56 Audio / Visual / Telematics _056150 AUDIO / VIDEO _0274026 AUDIO AND VISUAL SYSTEM C

AUDIO / VIDEO  AUDIO AND VISUAL SYSTEM  01-DD  Master Reset  01-E1  Voice Processing Device ON Error  


DESCRIPTION

DTC Code DTC Detection Condition Trouble Area
01-DD*1 The device that should be the master has been disconnected after engine start.
·

Radio receiver power source circuit


·

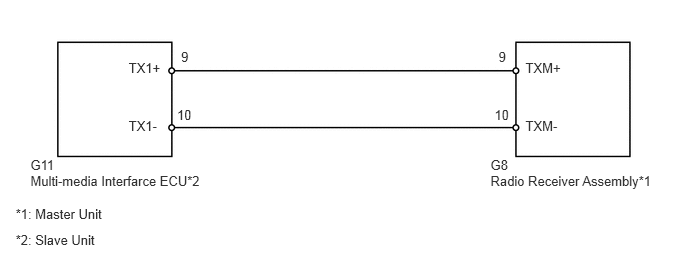
AVC-LAN circuit between the radio receiver assembly and the component which has stored this code


·

Radio receiver assembly


·

Component which has stored this code


01-E1*2 The AMP device records that the AMP output does not function even while the source device operates.

HINT:
·

*1: This code may be stored if the engine is started and the ignition switch is turned to the start position again.

·

*2: Even if no fault is present, this trouble code may be stored depending on the battery condition or engine start voltage.


NOTICE:
·

Before starting troubleshooting, be sure to clear DTCs to clear codes stored due to the reasons described in Hint above. Then, check for DTCs and troubleshoot according to the output DTCs.


·

The radio receiver assembly is the master unit.


·

Be sure to clear and recheck DTCs after the inspection is completed to confirm that no DTCs are output.


WIRING DIAGRAM
E204412E01
0.317,1.636 0.656,1.803 0.339,0.167 10 G11 0.317,1.804 2.212,1.971 1.895,0.167 10 Multi-media Interfarce ECU*2 0.163,2.141 1.912,2.307 1.749,0.167 10 *1: Master Unit 0.163,2.421 1.912,2.588 1.749,0.167 10 *2: Slave Unit 5.109,1.636 5.448,1.803 0.339,0.167 10 G8 5.473,1.23 5.916,1.397 0.444,0.167 10 TXM- 5.473,0.628 5.916,0.794 0.444,0.167 10 TXM+ 5.151,1.118 5.358,1.285 0.207,0.167 10 10 5.193,0.515 5.345,0.682 0.152,0.167 10 9 1.34,1.23 1.728,1.397 0.388,0.167 10 TX1- 1.34,0.628 1.728,0.794 0.388,0.167 10 TX1+ 1.844,1.118 2.052,1.285 0.207,0.167 10 10 1.886,0.515 2.038,0.682 0.152,0.167 10 9 5.109,1.804 6.920,1.971 1.812,0.167 10 Radio Receiver Assembly*1

CAUTION / NOTICE / HINT

NOTICE:

Be sure to read Description before performing the following procedures.


PROCEDURE

1.CHECK RADIO RECEIVER POWER SOURCE CIRCUIT
a.

Refer to Radio Receiver Power Source Circuit (See page Audio / Visual / Telematics>AUDIO / VIDEO>AUDIO AND VISUAL SYSTEM>Radio Receiver Power Source Circuit).

HINT:

If the power source circuit is operating normally, proceed to the next step.


NEXT
2.INSPECT RADIO RECEIVER ASSEMBLY
a.
U181066E02
1.646,1.417 1.49,1.813 1.49,1.813 1.208,1.813 true 1.802,1.417 1.958,1.813 1.958,1.813 2.24,1.813 true 0.823,1.74 1.219,1.958 0.396,0.219 10 false TXM- 1.594,0.365 1.896,0.583 0.302,0.219 10 false G8 2.292,1.729 2.771,1.948 0.479,0.219 10 false TXM+

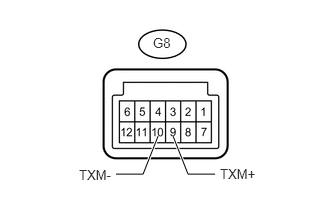
Disconnect the G8 radio receiver assembly connectors.


b.

Measure the resistance according to the value(s) in the table below.

Standard Resistance:
Tester Connection Condition Specified Condition
G8-9 (TXM+) - G8-10 (TXM-) Always 60 to 80 Ω


OK

3.IDENTIFY COMPONENT WHICH HAS STORED THIS CODE

NG

REPLACE RADIO RECEIVER ASSEMBLY

3.IDENTIFY COMPONENT WHICH HAS STORED THIS CODE
a.

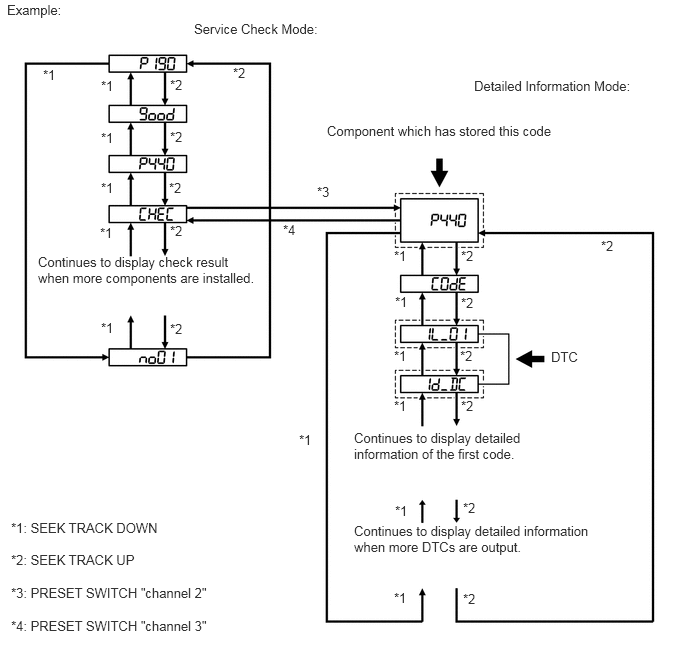
Enter the diagnostic mode.

E146440E32
1.052,0.813 1.323,1 0.271,0.188 10 false *1 1.052,1.354 1.344,1.542 0.292,0.188 10 false *1 1.052,1.875 1.323,2.063 0.271,0.188 10 false *1 1.042,2.344 1.313,2.531 0.271,0.188 10 false *1 1.052,3.333 1.323,3.521 0.271,0.188 10 false *1 0.448,0.698 0.802,0.885 0.354,0.188 10 false *1 4.104,2.583 4.375,2.771 0.271,0.188 10 false *1 4.115,3.063 4.385,3.25 0.271,0.188 10 false *1 4.104,3.625 4.375,3.813 0.271,0.188 10 false *1 4.104,4.146 4.375,4.333 0.271,0.188 10 false *1 4.115,5.24 4.385,5.427 0.271,0.188 10 false *1 4.104,6.146 4.375,6.333 0.271,0.188 10 false *1 3.115,4.5 3.385,4.688 0.271,0.188 10 false *1 4.823,6.156 5.146,6.344 0.323,0.188 10 false *2 4.823,5.208 5.177,5.396 0.354,0.188 10 false *2 4.802,4.146 5.135,4.333 0.333,0.188 10 false *2 4.792,3.625 5.146,3.813 0.354,0.188 10 false *2 4.802,3.073 5.135,3.26 0.333,0.188 10 false *2 4.802,2.583 5.135,2.771 0.333,0.188 10 false *2 6.26,2.479 6.594,2.667 0.333,0.188 10 false *2 1.771,3.344 2.146,3.531 0.375,0.188 10 false *2 1.771,2.323 2.073,2.51 0.302,0.188 10 false *2 1.76,1.875 2.104,2.063 0.344,0.188 10 false *2 1.771,1.344 2.104,1.531 0.333,0.188 10 false *2 1.771,0.802 2.073,0.99 0.302,0.188 10 false *2 2.427,0.677 2.719,0.865 0.292,0.188 10 false *2 3.302,1.917 3.646,2.104 0.344,0.188 10 false *3 2.948,2.313 3.292,2.5 0.344,0.188 10 false *4 0.115,5.417 1.844,5.594 1.729,0.177 10 false *1: SEEK TRACK DOWN 0.115,5.75 1.677,5.927 1.563,0.177 10 false *2: SEEK TRACK UP 0.115,6.094 2.49,6.26 2.375,0.167 10 false *3: PRESET SWITCH "channel 2" 0.115,6.438 2.49,6.604 2.375,0.167 10 false *4: PRESET SWITCH "channel 3" 5.74,3.635 6.063,3.802 0.323,0.167 10 false DTC 3.406,1.281 5.854,1.49 2.448,0.208 10 false Component which has stored this code 2.021,0.219 3.833,0.396 1.813,0.177 10 false Service Check Mode: 4.938,0.813 6.979,0.99 2.042,0.177 10 false Detailed Information Mode: 3.688,4.479 5.854,4.813 2.167,0.333 10 false Continues to display detailed information of the first code. 3.688,5.448 6.438,5.823 2.75,0.375 10 false Continues to display detailed information when more DTCs are output. 0.396,2.646 2.729,2.958 2.333,0.313 10 false Continues to display check result when more components are installed. 0.073,0.021 0.865,0.198 0.792,0.177 10 false Example:


b.

Press the preset switch "channel 3" to change to "Detailed Information Mode".


c.

Identify the component which has stored this code.

Component Table
Component Physical Address
Radio receiver assembly 190
Multi-media interface ECU 388


HINT:
·

"440 (stereo component amplifier)" is the component which has stored this code in the example shown in the illustration.

·

For details of the DTC display, refer to DTC Check/Clear (See page Audio / Visual / Telematics>AUDIO / VIDEO>AUDIO AND VISUAL SYSTEM>DTC CHECK / CLEAR).


NEXT

4.CHECK HARNESS AND CONNECTOR (RADIO RECEIVER - COMPONENT WHICH HAS STORED THIS CODE)
HINT:

For details of connectors, refer to Terminals of ECU (See page Audio / Visual / Telematics>AUDIO / VIDEO>AUDIO AND VISUAL SYSTEM>TERMINALS OF ECU).


a.

Referring to the wiring diagram, check the AVC-LAN circuit between the radio receiver assembly and the component which has stored this code.

i.

Disconnect all connectors between the radio receiver assembly and the component which has stored this code.


ii.

Check for an open or short in the AVC-LAN circuit between the radio receiver assembly and the component which has stored this code.

OK:

There is no open or short circuit.


OK

5.REPLACE RADIO RECEIVER ASSEMBLY

NG

REPAIR OR REPLACE HARNESS OR CONNECTOR

5.REPLACE RADIO RECEIVER ASSEMBLY
a.

Replace the radio receiver assembly (See page Audio / Visual / Telematics>AUDIO / VIDEO>RADIO RECEIVER>REMOVAL).

OK:

Same problem does not occur.


OK

END

NG

REPLACE COMPONENT WHICH HAS STORED THIS CODE