AUDIO / VIDEO AUDIO AND VISUAL SYSTEM Radio Receiver Communication Error
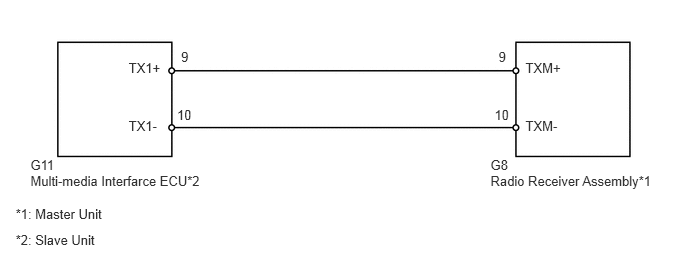
WIRING DIAGRAM
PROCEDURE
Enter the diagnostic mode.
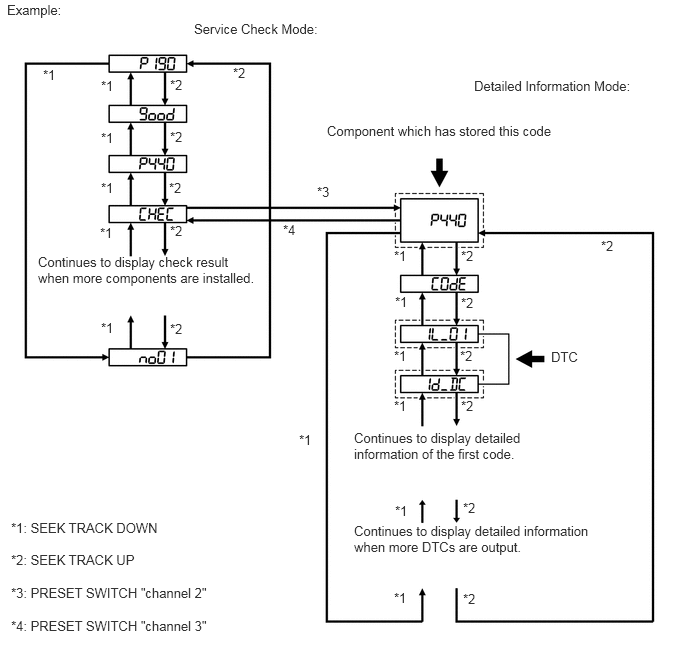
Press the preset switch "channel 3" to change to "Detailed Information Mode".
Identify the component shown by the sub-code.
- HINT:
- ·
"190 (radio receiver assembly)" is the component shown by the sub-code in the example shown in the illustration.
- ·
For details of the DTC display, refer to DTC Check/Clear (See page Audio / Visual / Telematics>AUDIO / VIDEO>AUDIO AND VISUAL SYSTEM>DTC CHECK / CLEAR).
NEXT
Inspect the power source circuit of the component shown by the sub-code.
- HINT:
-
If the power source circuit is operating normally, proceed to the next step.
| Component | Proceed to |
|---|---|
| Multi-media interface ECU (388) | Multi-media Interface ECU Power Source Circuit (See page ( )) |
NEXT
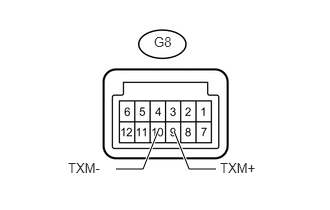
Disconnect the G8 radio receiver assembly connectors.
Measure the resistance according to the value(s) in the table below.
- Standard Resistance:
Tester Connection Condition Specified Condition G8-9 (TXM+) - G8-10 (TXM-) Always 60 to 80 Ω
OK
NG
- HINT:
- ·
Start the check from the circuit that is near the component shown by the sub-code first.
- ·
For details of the connectors, refer to Terminals of ECU (See page Audio / Visual / Telematics>AUDIO / VIDEO>AUDIO AND VISUAL SYSTEM>TERMINALS OF ECU).
Referring to the wiring diagram below, check the AVC-LAN circuit between the radio receiver assembly and the component shown by the sub-code.
Disconnect all connectors between the radio receiver assembly and the component shown by the sub-code.
Check for an open or short in the AVC-LAN circuit between the radio receiver assembly and the component shown by the sub-code.
- OK:
There is no open or short circuit.
OK
NG
Replace the component shown by the sub-code with a normal one and check if the same problem occurs again.
- OK:
Same problem does not occur.
OK
NG