METER / GAUGE / DISPLAY METER / GAUGE SYSTEM Speed Signal Circuit
DESCRIPTION
The vehicle speed signal consists of pulses sent to the combination meter assembly from the master cylinder solenoid (skid control ECU).
WIRING DIAGRAM
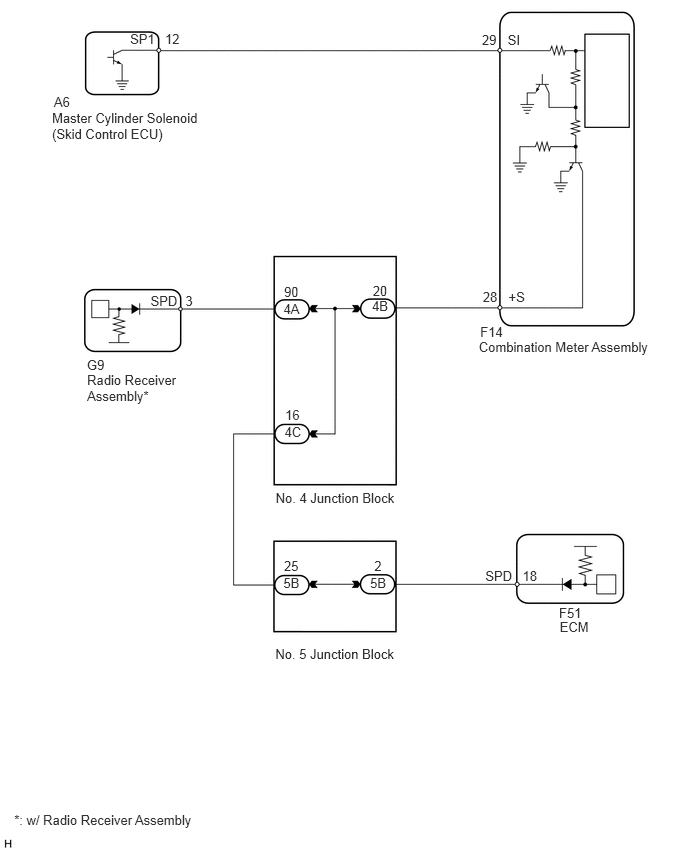
PROCEDURE
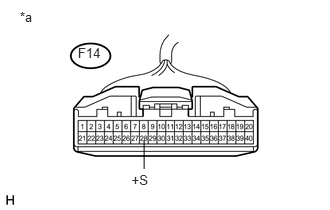
Disconnect the F14 meter connector.
Measure the voltage according to the value(s) in the table below.
- Standard Voltage:
Tester Connection Switch Condition Specified Condition F14-28 (+S) - Body ground Ignition switch ON 4.5 to 14 V
| *a | Front view of wire harness connector
(to Combination Meter Assembly) |
OK
NG
Disconnect the A6 master cylinder solenoid (skid control ECU) connector.
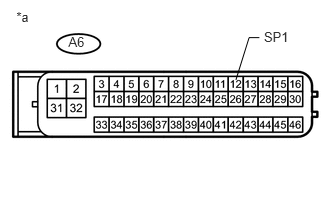
Measure the voltage according to the value(s) in the table below.
- Standard Voltage:
Tester Connection Switch Condition Specified Condition A6-12 (SP1) - Body ground Ignition switch ON 11 to 14 V
| *a | Front view of wire harness connector
(to Master Cylinder Solenoid (Skid Control ECU)) |
OK
NG
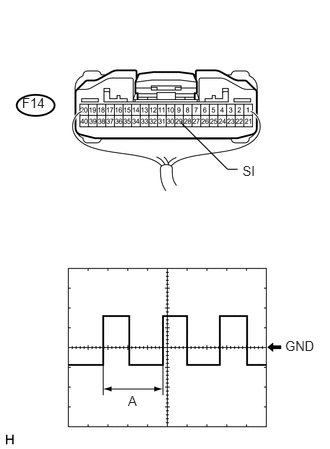
Check the input waveform.
Reconnect the F14 meter connector.
Remove the combination meter assembly with the connector(s) still connected.
Connect an oscilloscope to terminal F14-29 (SI) and body ground.
Turn the ignition switch to ON.
Check the signal waveform according to the condition(s) in the table below.
| Item | Condition |
|---|---|
| Terminal No. (Symbol) | F14-29 (SI) - Body ground |
| Tool setting | 5 V/DIV., 20 ms./DIV. |
| Condition | Driving at approx. 20 km/h (12 mph) |
- OK:
The waveform displayed is as shown in the illustration.
- HINT:
-
When the system is functioning normally, one wheel revolution generates 4 pulses. As the vehicle speed increases, the width indicated by (A) in the illustration narrows.
OK
NG
Disconnect the F14 meter connector.
Disconnect the A6 master cylinder solenoid (skid control ECU ) connector.
Measure the resistance according to the value(s) in the table below.
- Standard Resistance:
Tester Connection Condition Specified Condition F14-29 (SI) - A6-12 (SP1) Always Below 1 Ω A6-12 (SP1) - Body ground Always 10 kΩ or higher
OK
NG
Disconnect the F14 meter connector.
Disconnect the 4B junction block connector.
Measure the resistance according to the value(s) in the table below.
- Standard Resistance:
Tester Connection Condition Specified Condition F14-28 (+S) - 4B-20 Always Below 1 Ω F14-28 (+S) - Body ground Always 10 kΩ or higher
OK
NG
Inspect for a short in the circuit that is connected to the junction block connector shown in the wiring diagram.
- HINT:
-
If voltage is not present, it is possible that an ECU or circuit has a malfunction. The malfunctioning ECU or circuit will be diagnosed in the following steps.
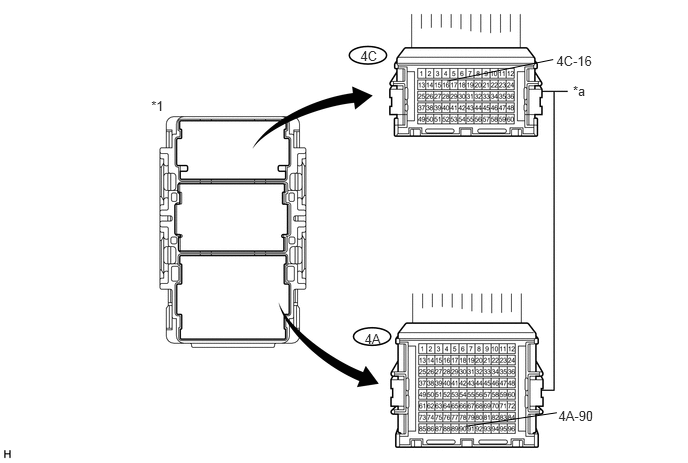 5.968,0.868 6.138,1.038 0.170,0.170 10 *a 3.754,0.502 3.949,0.648 0.195,0.147 10 4C 4.658,0.844 5.762,0.62 false 5.795,0.553 6.201,0.723 0.407,0.170 10 4C-16 4.85,4.44 5.8,4.299 false 5.817,4.251 6.216,4.422 0.399,0.170 10 4A-90 3.798,3.445 3.992,3.591 0.195,0.147 10 4A 1.575,1.02 1.745,1.190 0.170,0.170 10 *1
Text in Illustration *1 No. 4 Junction Block - - *a Front view of wire harness connector
(to No. 4 Junction Block)- -
Disconnect the 4A junction block connector.
Disconnect the 4C junction block connector.
Measure the voltage according to the value(s) in the table below.
- Standard Voltage:
Tester Connection Switch Condition Specified Condition 4C-16 - Body ground Ignition switch ON 4.5 to 14 V 4A-90 - Body ground* Ignition switch ON 4.5 to 14 V
*: w/ Radio Receiver Assembly
| Result | Proceed to |
|---|---|
| Voltage is not present in one circuit | A |
| Voltage is present in all the circuits | B |
A
B
Select the circuit for which voltage was not present in the previous step.
| Tester Connection | System that Uses the Circuit | Proceed to |
|---|---|---|
| 4C-16 - Body ground | SFI system | A |
| 4A-90 - Body ground | Audio and visual system* | B |
*: w/ Radio Receiver Assembly
A
B
Disconnect the 4C junction block connector.
Disconnect the 5B junction block connector.
Measure the resistance according to the value(s) in the table below.
- Standard Resistance:
Tester Connection Condition Specified Condition 4C-16 - 5B-25 Always Below 1 Ω 4C-16 - Body ground Always 10 kΩ or higher
OK
NG
Inspect for a short in the circuit that is connected to the junction block connector shown in the wiring diagram.
Disconnect the 5B junction block connector.
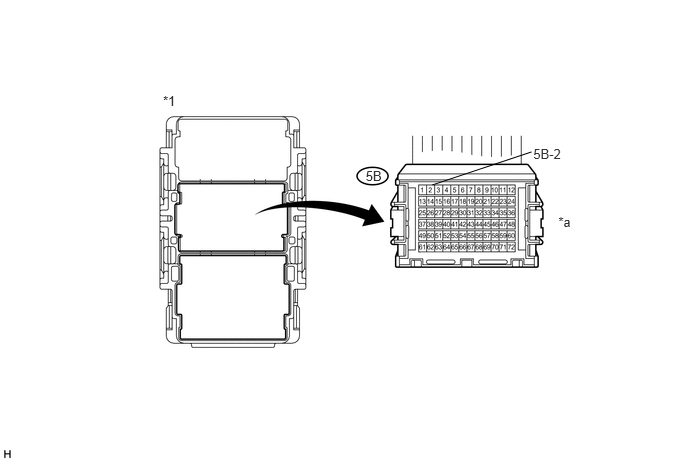
| *1 | No. 5 Junction Block | - | - |
| *a | Front view of wire harness connector
(to No. 5 Junction Block) |
- | - |
Measure the voltage according to the value(s) in the table below.
- Standard Voltage:
Tester Connection Switch Condition Specified Condition 5B-2 - Body ground Ignition switch ON 4.5 to 14 V
OK
NG
Disconnect the F51 ECM connector.
Measure the resistance according to the value(s) in the table below.
- Standard Resistance:
Tester Connection Condition Specified Condition F51-18 (SPD) - 5B-2 Always Below 1 Ω F51-18 (SPD) - Body ground Always 10 kΩ or higher
OK
NG
Disconnect the G9 radio receiver connector.
Measure the resistance according to the value(s) in the table below.
- Standard Resistance:
Tester Connection Condition Specified Condition G9-3 (SPD) - Body ground Always 10 kΩ or higher
OK
NG