HEATING / AIR CONDITIONING CONDENSER INSTALLATION
PROCEDURE

 88474
1.INSTALL COOLER DRYER
Using pliers, install the cooler dryer.
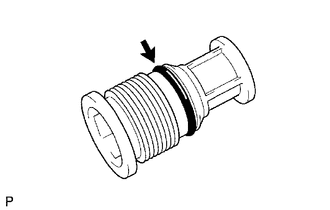
Apply a sufficient amount of compressor oil to the contact surfaces of a new O-ring and the cap.
- Compressor oil:
ND-OIL 8 or equivalent
Install the O-ring to the cap.
Using a 14 mm socket hexagon wrench, install the cap to the modulator.
- Torque:
- 2.9 N*m (30 kgf*cm, 26 in.*lbf)
88460
2.INSTALL COOLER CONDENSER ASSEMBLY
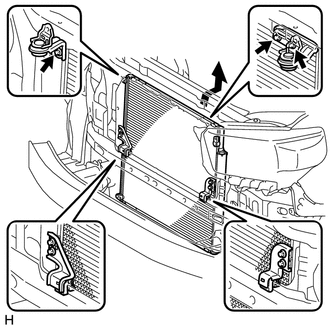
Install the 3 bolts and the cooler condenser, as shown in the illustration.
88463
3.CONNECT NO. 1 COOLER CONDENSER BRACKET
Connect the No. 1 cooler condenser bracket with the bolt.
88463A
4.CONNECT NO. 2 COOLER CONDENSER BRACKET
Connect the No. 2 cooler condenser bracket with the bolt.
88716A
5.CONNECT COOLER REFRIGERANT LIQUID PIPE A
Remove the attached vinyl tape from the pipe and the connecting part of the cooler condenser.
Sufficiently apply compressor oil to a new O-ring and the fitting surface of the liquid pipe A joint.
- Compressor oil:
ND-OIL 8 or equivalent
Install the O-ring on the liquid pipe A.
Connect the liquid pipe A to the cooler condenser with the bolt.
- Torque:
- 5.4 N*m (55 kgf*cm, 48 in.*lbf)
- NOTICE:
- ·
When tightening the bolts, do not allow any tools to contact the pipe.
·When tightening the bolts, hold a part of the pipe near the connector.
88703
6.CONNECT DISCHARGE HOSE SUB-ASSEMBLY
Remove the attached vinyl tape from the hose and the connecting part of the cooler condenser.
Sufficiently apply compressor oil to a new O-ring and the fitting surface of the discharge hose joint.
- Compressor oil:
ND-OIL 8 or equivalent
Install the O-ring on the discharge hose.
Connect the discharge hose to the cooler condenser with the bolt.
- Torque:
- 5.4 N*m (55 kgf*cm, 48 in.*lbf)
- NOTICE:
- ·
When tightening the bolt, do not allow any tools to contact the pipe.
·When tightening the bolt, hold a part of the pipe near the connector.
7.CONNECT CABLE TO NEGATIVE BATTERY TERMINAL
- NOTICE:
-
When disconnecting the cable, some systems need to be initialized after the cable is reconnected (See page General>INTRODUCTION>REPAIR INSTRUCTION>INITIALIZATION).
8.CHARGE REFRIGERANT
16400
9.INSTALL RADIATOR ASSEMBLY
Install the radiator assembly (See page Engine / Hybrid System>1GR-FE COOLING>RADIATOR>INSTALLATION).
10.ADD ENGINE COOLANT
Add engine coolant (See page Engine / Hybrid System>1GR-FE COOLING>COOLANT>REPLACEMENT).
11.WARM UP ENGINE
12.INSPECT FOR COOLANT LEAK
13.CHECK FOR REFRIGERANT GAS LEAK
14.CHECK SRS WARNING LIGHT
Check the SRS warning light (See page Vehicle Interior>SUPPLEMENTAL RESTRAINT SYSTEMS>AIRBAG SYSTEM>CHECK MODE PROCEDURE).