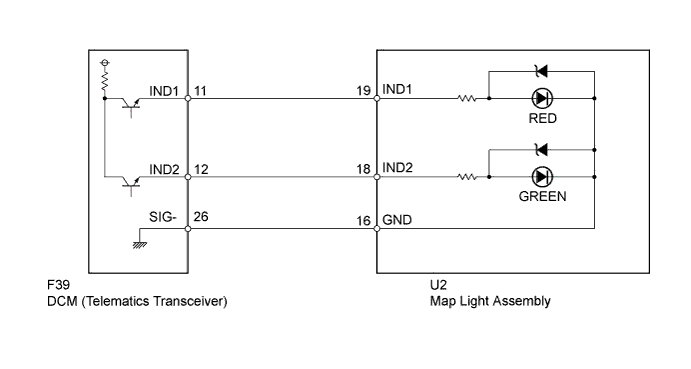
DTC B1570 Manual (SOS) Switch Red Indicator Malfunction |
| DTC Code | DTC Detection Condition | Trouble Area |
| B1570 | Current for the manual (SOS) switch red indicator reaches the malfunction criteria for 10 seconds when the ignition switch is ON. |
|
| 1.CHECK FOR DTC |
Turn the ignition switch off.
Connect the Techstream to the DLC3.
Turn the ignition switch to ON and wait for 10 seconds.
Perform "Health Check" and check for current DTCs (Click here).
| Result | Proceed to |
| DTC B1570 and B1571 are output | A |
| DTC B1570 is output (DTC B1571 is not output) | B |
|
| ||||
| A | |
 |
| 2.CHECK HARNESS AND CONNECTOR (DCM - MAP LIGHT) |
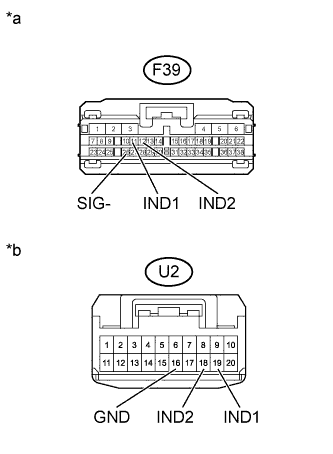 |
Disconnect the F39 DCM (Telematics Transceiver) connector.
Disconnect the U2 map light assembly connector.
Measure the resistance according to the value(s) in the table below.
| Tester Connection | Condition | Specified Condition |
| F39-11 (IND1) - U2-19 (IND1) | Always | Below 1 Ω |
| F39-12 (IND2) - U2-18 (IND2) | Always | Below 1 Ω |
| F39-26 (SIG-) - U2-16 (GND) | Always | Below 1 Ω |
| F39-11 (IND1) - Body ground | Always | 10 kΩ or higher |
| F39-12 (IND2) - Body ground | Always | 10 kΩ or higher |
| F39-26 (SIG-) - Body ground | Always | 10 kΩ or higher |
| *a | Front view of wire harness connector (to DCM [Telematics Transceiver]) |
| *b | Front view of wire harness connector (to Map Light Assembly) |
|
| ||||
| OK | |
|
| 3.CHECK HARNESS AND CONNECTOR (MAP LIGHT GROUND LINE - BODY GROUND) |
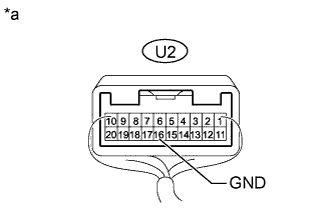 |
Remove the map light assembly with the connector connected (Click here).
Measure the resistance according to the value(s) in the table below.
| Tester Connection | Condition | Specified Condition |
| U2-16 (GND) - Body ground | Always | Below 1 Ω |
| *a | Component with harness connected (Map Light Assembly) |
|
| ||||
| OK | |
|
| 4.INSPECT MAP LIGHT ASSEMBLY (RED INDICATOR) |
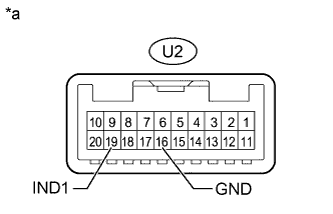 |
Disconnect the U2 map light assembly connector.
Connect 2 dry-cell batteries (1.5 V each) in series.
Connect a positive (+) lead of the battery to terminal U2-19 (IND1) and a negative (-) lead to terminal U2-16 (GND) of the map light assembly connector.
Check if the manual (SOS) switch red indicator comes on.
| *a | Component without harness connected (Map Light Assembly) |
|
| ||||
| OK | |
|
| 5.INSPECT MAP LIGHT ASSEMBLY (MANUAL [SOS] SWITCH RED INDICATOR CONDITION) |
Confirm the red indicator status after the ignition switch is turned to ON (Click here).
| Result | Proceed to |
| Red indicator remains off | A |
| Red indicator remains on | B |
|
| ||||
| A | |
|
| 6.CHECK MAP LIGHT ASSEMBLY (RED INDICATOR INPUT VOLTAGE) |
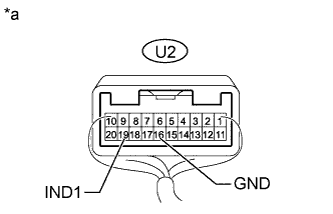 |
Remove the map light assembly with the connector connected .
Set a voltmeter to the map light assembly connector terminals, connect a positive (+) lead to terminal U2-19 (IND1) and a negative (-) lead to terminal U2-16 (GND).
Measure the voltage.
| *a | Component with harness connected (Map Light Assembly) |
|
| ||||
| OK | ||
 | ||
| ||
| 7.CHECK DCM (TELEMATICS TRANSCEIVER) (RED INDICATOR OUTPUT VOLTAGE) |
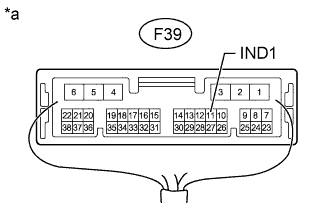 |
Remove the DCM (Telematics Transceiver) with the connectors connected (Click here).
Set a voltmeter to the DCM (Telematics Transceiver) connector terminals, connect a positive (+) lead to terminal F39-11 (IND1) and a negative (-) lead to body ground.
Measure the voltage.
| *a | Component with harness connected (DCM [Telematics Transceiver]) |
|
| ||||
| OK | ||
| ||
| ||
| 8.CHECK HARNESS AND CONNECTOR (DCM - BODY GROUND) |
|
Remove the DCM (Telematics Transceiver) with the connectors connected (Click here).
Measure the resistance according to the value(s) in the table below.
| Tester Connection | Condition | Specified Condition |
| F39-11 (IND1) - Body ground | Always | 10 kΩ or higher |
| *a | Component with harness connected (DCM [Telematics Transceiver]) |
|
| ||||
| OK | |
|
| 9.REPLACE DCM (TELEMATICS TRANSCEIVER) |
Replace the DCM (Telematics Transceiver) (Click here).
| NEXT | ||
| ||
| ||

