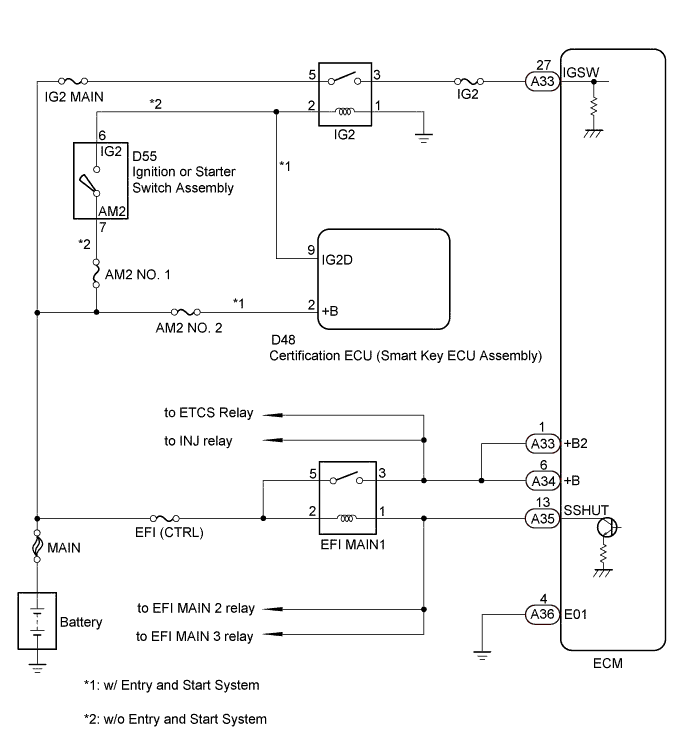
SFI SYSTEM > ECM Power Source Circuit |
| 1.INSPECT ECM (POWER SOURCE VOLTAGE) |
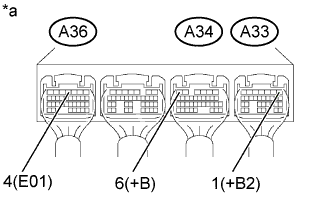 |
Turn the ignition switch to ON.
Measure the voltage according to the value(s) in the table below.
| Tester Connection | Condition | Specified Condition |
| A34-6 (+B) - A36-4 (E01) | Ignition switch ON | 12 to 14 V |
| A33-1 (+B2) - A36-4 (E01) | Ignition switch ON | 12 to 14 V |
| *a | Component with harness connected (ECM) |
|
| ||||
| OK | |
 |
| 2.CHECK HARNESS AND CONNECTOR (ECM - BODY GROUND) |
Disconnect the ECM connector.
Measure the resistance according to the value(s) in the table below.
| Tester Connection | Condition | Specified Condition |
| A36-4 (E01) - Body ground | Always | Below 1 Ω |
|
| ||||
| OK | |
|
| 3.INSPECT ECM (IGSW TERMINAL VOLTAGE) |
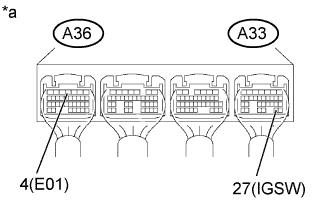 |
Turn the ignition switch to ON.
Measure the voltage according to the value(s) in the table below.
| Tester Connection | Condition | Specified Condition |
| A33-27 (IGSW) - A36-4 (E01) | Ignition switch ON | 10 to 13 V |
| *a | Component without harness connected (ECM) |
|
| ||||
| OK | ||
 | ||
| ||
| 4.INSPECT ECM (SSHUT TERMINAL VOLTAGE) |
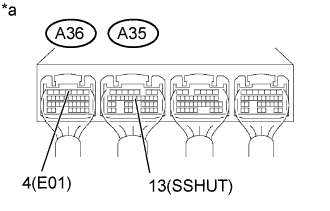 |
Turn the ignition switch to ON.
Measure the voltage according to the value(s) in the table below.
| Tester Connection | Switch Condition | Specified Condition |
| A35-13 (SSHUT) - A36-4 (E01) | Ignition switch ON | approximately 0 V |
| *a | Component without harness connected (ECM) |
|
| ||||
| OK | |
|
| 5.INSPECT RELAY (EFI MAIN1) |
Inspect the EFI MAIN1 relay .
|
| ||||
| OK | |
|
| 6.CHECK HARNESS AND CONNECTOR (EFI MAIN1 RELAY - ECM) |
Remove the EFI MAIN1 relay from the engine room relay block assembly.
Disconnect the ECM connector.
Measure the resistance according to the value(s) in the table below.
| Tester Connection | Condition | Specified Condition |
| EFI MAIN1 relay terminal 1 - A35-13 (SSHUT) | Always | Below 1 Ω |
| EFI MAIN1 relay terminal 3 - A34-6 (+B) | Always | Below 1 Ω |
| EFI MAIN1 relay terminal 3 - A33-1 (+B2) | Always | Below 1 Ω |
| Tester Connection | Condition | Specified Condition |
| EFI MAIN1 relay terminal 1 or A35-13 (SSHUT) - Body ground | Always | 10 kΩ or higher |
| EFI MAIN1 relay terminal 3, A34-6 (+B) or A33-1 (+B2) - Body ground | Always | 10 kΩ or higher |
|
| ||||
| OK | |
|
| 7.INSPECT TERMINAL VOLTAGE (EFI MAIN1 RELAY) |
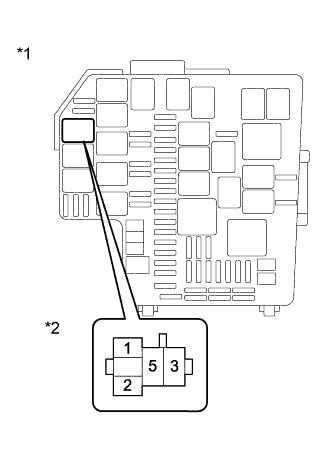 |
Remove the EFI MAIN1 relay from the engine room relay block assembly.
Measure the resistance according to the value(s) in the table below.
| Tester Connection | Condition | Specified Condition |
| EFI MAIN1 relay terminal 2 - Body ground | Always | 11 to 14 V |
| EFI MAIN1 relay terminal 5 - Body ground | Always | 11 to 14 V |
| *1 | Engine Room Relay Block Assembly |
| *2 | EFI MAIN1 Relay Terminal |
|
| ||||
| OK | |
|
| 8.CHECK HARNESS AND CONNECTOR (IG2 RELAY - ECM) |
Remove the IG2 relay from the engine room relay block assembly.
Disconnect the ECM connector.
Measure the resistance according to the value(s) in the table below.
| Tester Connection | Condition | Specified Condition |
| IG2 relay terminal 3 - A33-27 (IGSW) | Always | Below 1 Ω |
| IG2 relay terminal 1 - Body ground | Always | Below 1 Ω |
| Tester Connection | Condition | Specified Condition |
| IG2 relay terminal 3 or A33-27 (IGSW) - Body ground | Always | 10 kΩ or higher |
|
| ||||
| OK | |
|
| 9.INSPECT RELAY (IG2) |
Inspect the IG2 relay .
|
| ||||
| OK | |
|
| 10.INSPECT TERMINAL VOLTAGE (IG2 RELAY) |
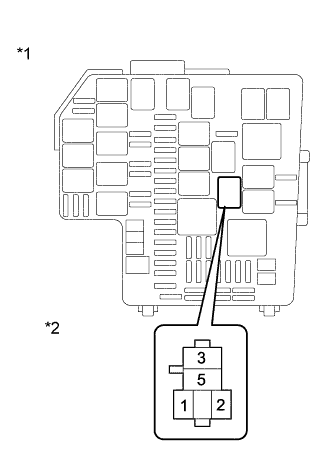 |
Remove the IG2 relay from the engine room relay block assembly.
Measure the resistance according to the value(s) in the table below.
| Tester Connection | Condition | Specified Condition |
| IG2 relay terminal 5 - Body ground | Always | 11 to 14 V |
| *1 | Engine Room Relay Block Assembly |
| *2 | IG2 Relay Terminal |
| Result | Proceed to |
| NG | A |
| OK (w/ Entry and Start System) | B |
| OK (w/o Entry and Start System) | C |
|
| ||||
|
| ||||
| A | ||
| ||
| ||
| 11.CHECK HARNESS AND CONNECTOR (IG2 RELAY - CERTIFICATION ECU) |
Remove the IG2 relay from the engine room relay block assembly.
Disconnect the certification ECU connector.
Measure the resistance according to the value(s) in the table below.
| Tester Connection | Condition | Specified Condition |
| IG2 relay terminal 2 - D48-9 (IG2D) | Always | Below 1 Ω |
| Tester Connection | Condition | Specified Condition |
| IG2 relay terminal 2 or D48-9 (IG2D) - Body ground | Always | 10 kΩ or higher |
|
| ||||
| OK | ||
| ||
| ||
| 12.CHECK HARNESS AND CONNECTOR (IG2 RELAY - IGNITION OR STARTER SWITCH ASSEMBLY) |
Remove the IG2 relay from the engine room relay block assembly.
Disconnect the ignition or starter switch assembly connector.
Measure the resistance according to the value(s) in the table below.
| Tester Connection | Condition | Specified Condition |
| IG2 relay terminal 2 - D55-6 (IG2) | Always | Below 1 Ω |
| Tester Connection | Condition | Specified Condition |
| IG2 relay terminal 2 or D55-6 (IG2) - Body ground | Always | 10 kΩ or higher |
|
| ||||
| OK | |
|
| 13.INSPECT IGNITION OR STARTER SWITCH ASSEMBLY |
Inspect the ignition or starter switch assembly (Click here).
|
| ||||
| OK | ||
| ||
| ||

