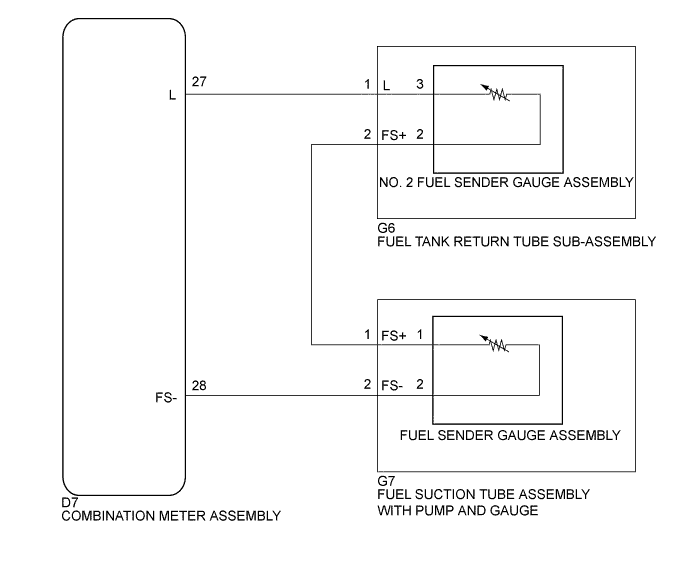
METER / GAUGE SYSTEM > Fuel Gauge Malfunction |
| 1.CONFIRM DTC OUTPUT |
Check DTC (Click here).
| Result | Proceed to |
| DTC B1500 is not output | A |
| DTC B1500 is output | B |
|
| ||||
| A | |
 |
| 2.PERFORM ACTIVE TEST USING GTS (FUEL METER OPERATION) |
Connect the GTS to the DLC3.
Turn the ignition switch to ON.
Turn the GTS on.
Enter the following menus: Body Electrical / Combination Meter / Active Test.
According to the display on the tester, perform the Active Test.
| Tester Display | Test part | Control Range | Diagnostic Note |
| Fuel Meter Operation | Fuel gauge | EMPTY, 1/2, FULL | - |
|
| ||||
| OK | |
|
| 3.READ VALUE USING GTS (FUEL INPUT) |
Connect the GTS to the DLC3.
Turn the ignition switch to ON.
Turn the GTS on.
Enter the following menus: Body Electrical / Combination Meter / Data List.
According to the display on the tester, read the Data List.
| Item | Measurement Item/Range | Normal Condition | Diagnostic Note |
| Fuel Input | Fuel sender gauge input Min.: 0 Max.: 127.5 | Fuel sender input value | Unit: Liter |
|
| ||||
| OK | ||
 | ||
| ||
| 4.INSPECT FUEL SENDER GAUGE ASSEMBLY |
Remove the fuel sender gauge assembly (Click here).
Inspect the fuel sender gauge assembly (Click here).
|
| ||||
| A | |
|
| 5.INSPECT FUEL SUCTION TUBE ASSEMBLY WITH PUMP AND GAUGE |
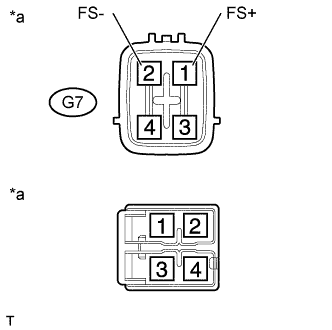 |
Remove the fuel suction tube assembly with pump and gauge (Click here).
Measure the resistance according to the value(s) in the table below.
| Tester Connector | Condition | Specified Condition |
| G7-1 (FS+) - 1 | Always | Below 1 Ω |
| G7-2 (FS-) - 2 | Always | Below 1 Ω |
| *a | Component without harness connected (Fuel Suction Tube Assembly with Pump and Gauge) |
|
| ||||
| A | |
|
| 6.REPLACE NO. 2 FUEL SENDER GAUGE ASSEMBLY |
Remove the No. 2 fuel sender gauge assembly (Click here).
Inspect the No. 2 fuel sender gauge assembly (Click here).
|
| ||||
| A | |
|
| 7.REPLACE FUEL TANK RETURN TUBE SUB-ASSEMBLY |
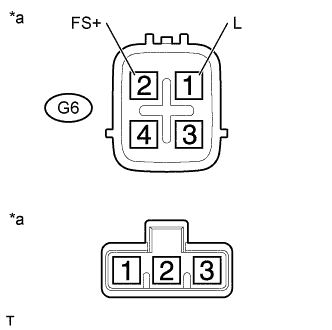 |
Remove the fuel tank return tube sub-assembly (Click here).
Measure the resistance according to the value(s) in the table below.
| Tester Connector | Condition | Specified Condition |
| G6-1 (L) - 3 | Always | Below 1 Ω |
| G6-2 (FS+) - 2 | Always | Below 1 Ω |
| *a | Component without harness connected (Fuel Tank Return Tube Sub-assembly) |
|
| ||||
| A | |
|
| 8.CHECK HARNESS AND CONNECTOR (COMBINATION METER ASSEMBLY - FUEL SUCTION TUBE ASSEMBLY WITH PUMP AND GAUGE) |
Disconnect the D7 combination meter assembly connector.
Disconnect the G7 fuel suction tube assembly with pump and gauge connector.
Measure the resistance according to the value(s) in the table below.
| Tester Connector | Condition | Specified Condition |
| D7-28 (FS-) - G7-2 (FS-) | Always | Below 1 Ω |
| Tester Connector | Condition | Specified Condition |
| D7-28 (FS-) or G7-2 (FS-) - Body ground | Always | 10 kΩ or higher |
|
| ||||
| OK | |
|
| 9.CHECK HARNESS AND CONNECTOR (FUEL SUCTION TUBE ASSEMBLY WITH PUMP AND GAUGE - FUEL TANK RETURN TUBE SUB-ASSEMBLY) |
Disconnect the G7 fuel suction tube assembly with pump and gauge connector.
Disconnect the G6 fuel tank return tube sub-assembly connector.
Measure the resistance according to the value(s) in the table below.
| Tester Connector | Condition | Specified Condition |
| D7-1 (FS+) - G6-2 (FS+) | Always | Below 1 Ω |
| Tester Connector | Condition | Specified Condition |
| D7-1 (FS+) or G6-2 (FS+) - Body ground | Always | 10 kΩ or higher |
|
| ||||
| OK | |
|
| 10.CHECK HARNESS AND CONNECTOR (COMBINATION METER ASSEMBLY - FUEL TANK RETURN TUBE SUB-ASSEMBLY) |
Disconnect the D7 combination meter assembly connector.
Disconnect the G6 fuel tank return tube sub-assembly connector.
Measure the resistance according to the value(s) in the table below.
| Tester Connector | Condition | Specified Condition |
| D7-27 (L) - G6-1 (L) | Always | Below 1 Ω |
| Tester Connector | Condition | Specified Condition |
| D7-27 (L) or G6-1 (L) - Body ground | Always | 10 kΩ or higher |
|
| ||||
| OK | ||
| ||
| ||

