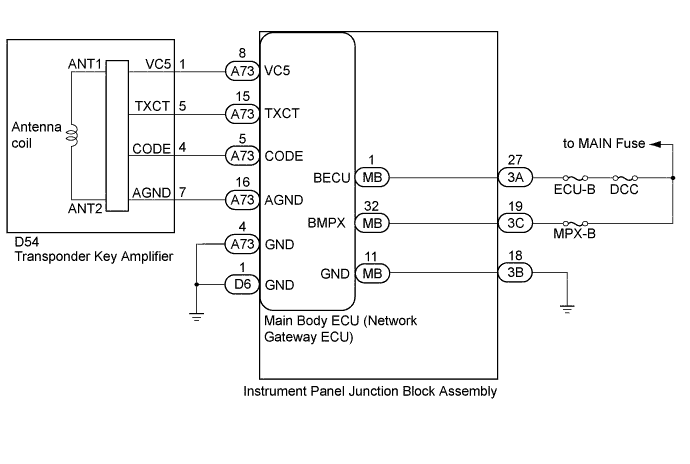
DTC B1410 Transponder Communication Circuit |
| DTC Code | DTC Detection Condition | Trouble Area |
| B1410 | When there is a problem in communication between the key and the main body ECU (network gateway ECU). |
|
| 1.CHECK FOR DTC |
Using GTS, check that the DTC is stored with all the registered keys (Click here).
| Result | Proceed to |
| DTC B1410 is stored with all the keys. | A |
| DTC B1410 is not stored with some of the keys. | B |
|
| ||||
| A | |
 |
| 2.CHECK HARNESS AND CONNECTOR (BATTERY, BODY GROUND) |
Disconnect the A73 and D6 main body ECU (network gateway ECU) connectors.
Disconnect the 3A, 3B and 3C instrument panel junction block assembly connectors.
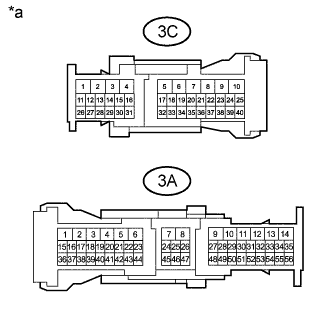 |
Measure the voltage according to the value(s) in the table below.
| Tester Connection | Condition | Specified Condition |
| 3A-27 - Body ground | Always | 11 to 14 V |
| 3C-19 - Body ground | Always | 11 to 14 V |
Measure the resistance according to the value(s) in the table below.
| Tester Connection | Condition | Specified Condition |
| 3B-18 - Body ground | Always | Below 1 Ω |
| A73-4 (GND) - Body ground | Always | Below 1 Ω |
| D6-1 (GND) - Body ground | Always | Below 1 Ω |
| *a | Component without harness connected (Instrument Panel Junction Block Assembly) |
|
| ||||
| OK | |
|
| 3.INSPECT INSTRUMENT PANEL JUNCTION BLOCK ASSEMBLY |
Remove the instrument panel junction block assembly (Click here).
Remove the main body ECU (network gateway ECU) from the instrument panel junction block assembly.
Measure the resistance according to the value(s) in the table below.
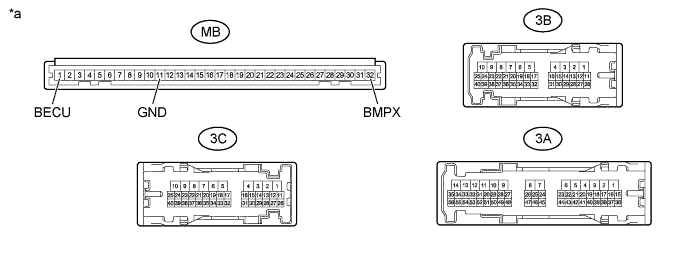
| *a | Component without harness connected (Instrument Panel Junction Block Assembly) | - | - |
| Tester Connection | Condition | Specified Condition |
| MB-1 (BECU) - 3A-27 | Always | Below 1 Ω |
| MB-32 (BMPX) - 3C-19 | Always | Below 1 Ω |
| MB-11 (GND) - 3B-18 | Always | Below 1 Ω |
|
| ||||
| OK | |
|
| 4.INSPECT TRANSPONDER KEY AMPLIFIER (POWER SOURCE) |
Install the main body ECU (network gateway ECU) to the instrument panel junction block assembly.
Install the instrument panel junction block assembly (Click here).
Reconnect the 3A, 3B and 3C instrument panel junction block assembly connectors.
Disconnect the D54 transponder key amplifier connector.
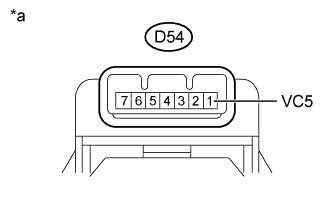 |
Measure the voltage according to the value(s) in the table below.
| Tester Connection | Condition | Specified Condition |
| D54-1 (VC5) - Body ground | Ignition switch ON | 4.5 to 5.5 V |
| Result | Proceed to |
| NG | A |
| OK | B |
| *a | Component with harness connected (Transponder Key Amplifier) |
|
| ||||
| A | |
|
| 5.CHECK HARNESS AND CONNECTOR (TRANSPONDER KEY AMPLIFIER - INSTRUMENT PANEL JUNCTION BLOCK) |
Disconnect the A73 main body ECU (network gateway ECU) connector.
Measure the resistance according to the value(s) in the table below.
| Tester Connection | Condition | Specified Condition |
| D54-1 (VC5) - A73-8 (VC5) | Always | Below 1 Ω |
| D54-1 (VC5) - Body ground | Always | 10 kΩ or higher |
|
| ||||
| OK | ||
 | ||
| ||
| 6.CHECK HARNESS AND CONNECTOR (TRANSPONDER KEY AMPLIFIER - BODY GROUND) |
Measure the resistance according to the value(s) in the table below.
| Tester Connection | Condition | Specified Condition |
| D54-7 (AGND) - Body ground | Always | Below 1 Ω |
| Result | Proceed to |
| NG | A |
| OK | B |
|
| ||||
| A | |
|
| 7.CHECK HARNESS AND CONNECTOR (TRANSPONDER KEY AMPLIFIER - INSTRUMENT PANEL JUNCTION BLOCK) |
Disconnect the A73 main body ECU (network gateway ECU) connector.
Measure the resistance according to the value(s) in the table below.
| Tester Connection | Condition | Specified Condition |
| D54-7 (AGND) - A73-16 (AGND) | Always | Below 1 Ω |
|
| ||||
| OK | ||
| ||
| ||
| 8.CHECK HARNESS AND CONNECTOR (TRANSPONDER KEY AMPLIFIER - INSTRUMENT PANEL JUNCTION BLOCK) |
Disconnect the A73 main body ECU (network gateway ECU) connector.
Measure the resistance according to the value(s) in the table below.
| Tester Connection | Condition | Specified Condition |
| D54-5 (TXCT) - A73-15 (TXCT) | Always | Below 1 Ω |
| D54-4 (CODE) - A73-5 (CODE) | Always | Below 1 Ω |
| D54-5 (TXCT) - Body ground | Always | 10 kΩ or higher |
| D54-4 (CODE) - Body ground | Always | 10 kΩ or higher |
|
| ||||
| OK | |
|
| 9.REPLACE TRANSPONDER KEY AMPLIFIER |
Temporarily replace the transponder key amplifier with a new or known good one (Click here).
| NEXT | |
|
| 10.CHECK FOR DTC |
Key is inserted into ignition key cylinder.
Turn the ignition switch off or ACC.
Check for DTCs (Click here).
|
| ||||
| OK | ||
| ||
| ||
| 11.CHECK FOR DTC |
Replace the keys in which the DTC B1410 is stored, and perform the registration.
Check for DTCs (Click here).
|
| ||||
| OK | ||
| ||
| ||

