 |
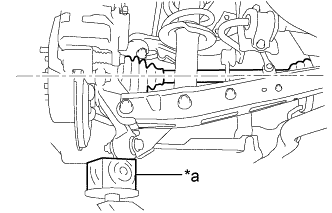
Jack up the axle carrier, with a wooden block placed between the jack and axle carrier, to apply load to the suspension so that the rear drive shaft assembly becomes level.
| *a | Wooden Block |
REAR LOWER ARM > INSTALLATION |
| 1. TEMPORARILY INSTALL REAR NO. 2 SUSPENSION ARM ASSEMBLY LH |
Temporarily install the rear No. 2 suspension arm assembly to the rear suspension member with the bolt and new nut.
Temporarily install the rear No. 2 suspension arm assembly to the axle carrier with the bolt and new nut.
| 2. TEMPORARILY INSTALL REAR SHOCK ABSORBER WITH COIL SPRING |
Temporarily install the rear shock absorber with coil spring to the rear No. 2 suspension arm assembly LH with the bolt and new nut.
| 3. INSTALL STABILIZER LINK SUB-ASSEMBLY (for LH Side) |
Temporarily install the rear stabilizer link sub-assembly to the rear No. 2 suspension arm assembly LH with the bolt and new nut.
| 4. INSTALL REAR HEIGHT CONTROL SENSOR SUB-ASSEMBLY LH (w/ HID Headlight System) |
Install the rear height control sensor sub-assembly LH to the rear No. 2 suspension arm assembly LH with the nut.
| 5. TEMPORARILY INSTALL REAR NO. 1 SUSPENSION ARM ASSEMBLY LH |
Temporarily install the rear No. 1 suspension arm assembly LH to the axle carrier with the new bolt and new nut.
Temporarily install the rear No. 1 suspension arm assembly LH to the rear suspension member with the new bolt and new nut.
| 6. STABILIZE SUSPENSION |
|
Jack up the axle carrier, with a wooden block placed between the jack and axle carrier, to apply load to the suspension so that the rear drive shaft assembly becomes level.
| *a | Wooden Block |
| 7. FULLY TIGHTEN REAR NO. 2 SUSPENSION ARM ASSEMBLY LH |
Fully tighten the nut on the rear axle carrier sub-assembly LH side.
Fully tighten the nut holding the rear shock absorber.
Fully tighten the nut on the rear suspension member sub-assembly side.
| 8. FULLY TIGHTEN REAR NO. 1 SUSPENSION ARM ASSEMBLY LH |
Fully tighten the 2 bolt and 2 nut of the rear No. 1 suspension arm assembly LH.
| 9. INSTALL NO. 1 PARKING BRAKE CABLE SUPPORT BRACKET |
Install the No. 1 parking brake cable support bracket with the bolt.
| 10. INSTALL REAR WHEEL |
| 11. INSPECT AND ADJUST REAR WHEEL ALIGNMENT |
| 12. VSC SENSOR NEUTRAL MEMORIZATION |
| 13. HEIGHT CONTROL SENSOR SIGNAL INITIALIZE (w/ HID Headlight System) |
| 14. ADJUST HEADLIGHT AIMING (w/ HID Headlight System) |